
How to get Claude for Legal to actually work
Notice: You probably shouldn't bother reading this post anymore. Less than one day after this blog entry was published, Anthropics changed both its user interface and the availability of certain marketplaces. As a result, significant portions of this blog entry are no longer accurate. The good news is that I've published a new post that shows you how to use the new interface. And that post is very much worth reading. https://legaled.ai/unleash-claude-for-legal/
I've gotten a lot of interest in my Claude for Legal post. It's an incredibly powerful tool and the gateway to getting Claude for Word to work well too. But in my eagerness to show all the cool features I might not have been as explicit as desirable in explaining how you actually get it to work. This is the missing how-to post on how to extend the capabilities of Claude with particular attention to capabilities useful in law and legal education.
Step 0: Use the Claude Desktop App
Some of what I am about to describe can be done using the web interface to Claude. But some of it cannot. To avoid the resulting complications, I am going to ask that you download and install the Claude Desktop app. Doing so will make this process and a lot of other Claude activities much easier. It runs on Mac, Windows, iOS and Android.
Step 1: Understand the Concepts
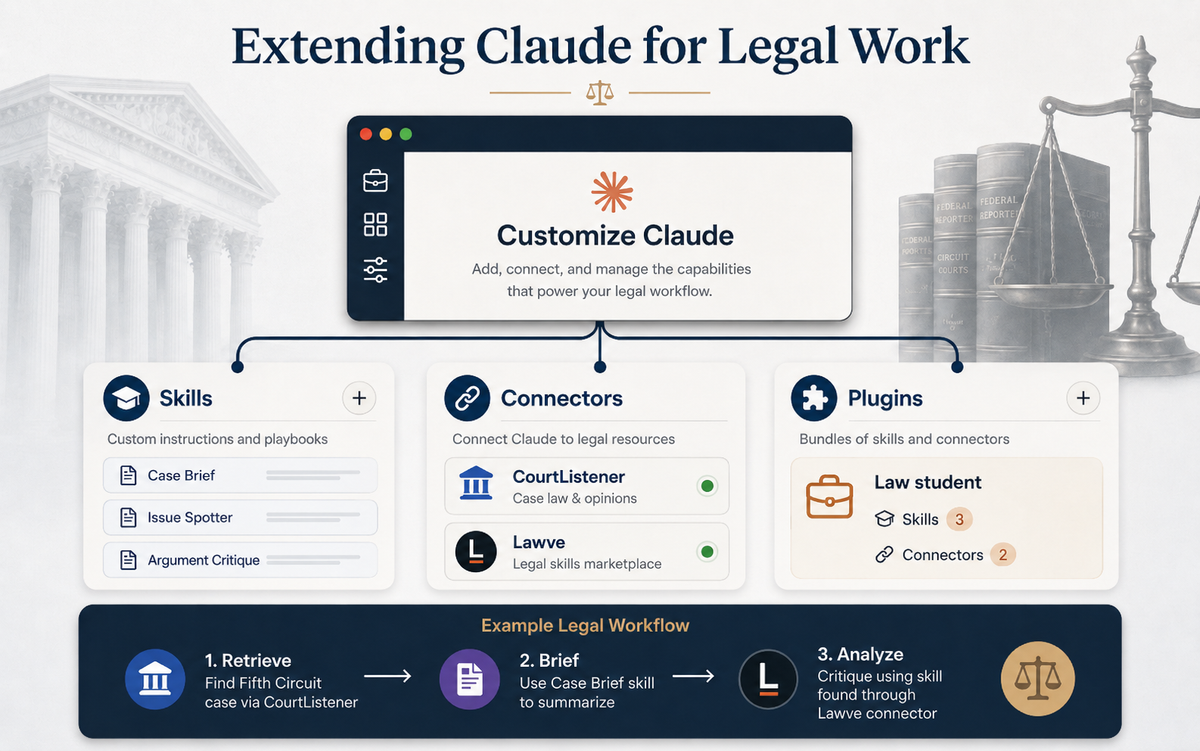
Claude now has several different ways of adding capabilities, and the interface for finding them is not exactly a triumph of self-explanatory design. There are also “Apps” and “Extensions” for Claude, but I am going to set those aside because they do not work inside the Claude Desktop app. For present purposes, the important additions are three: skills, connectors, and plugins.
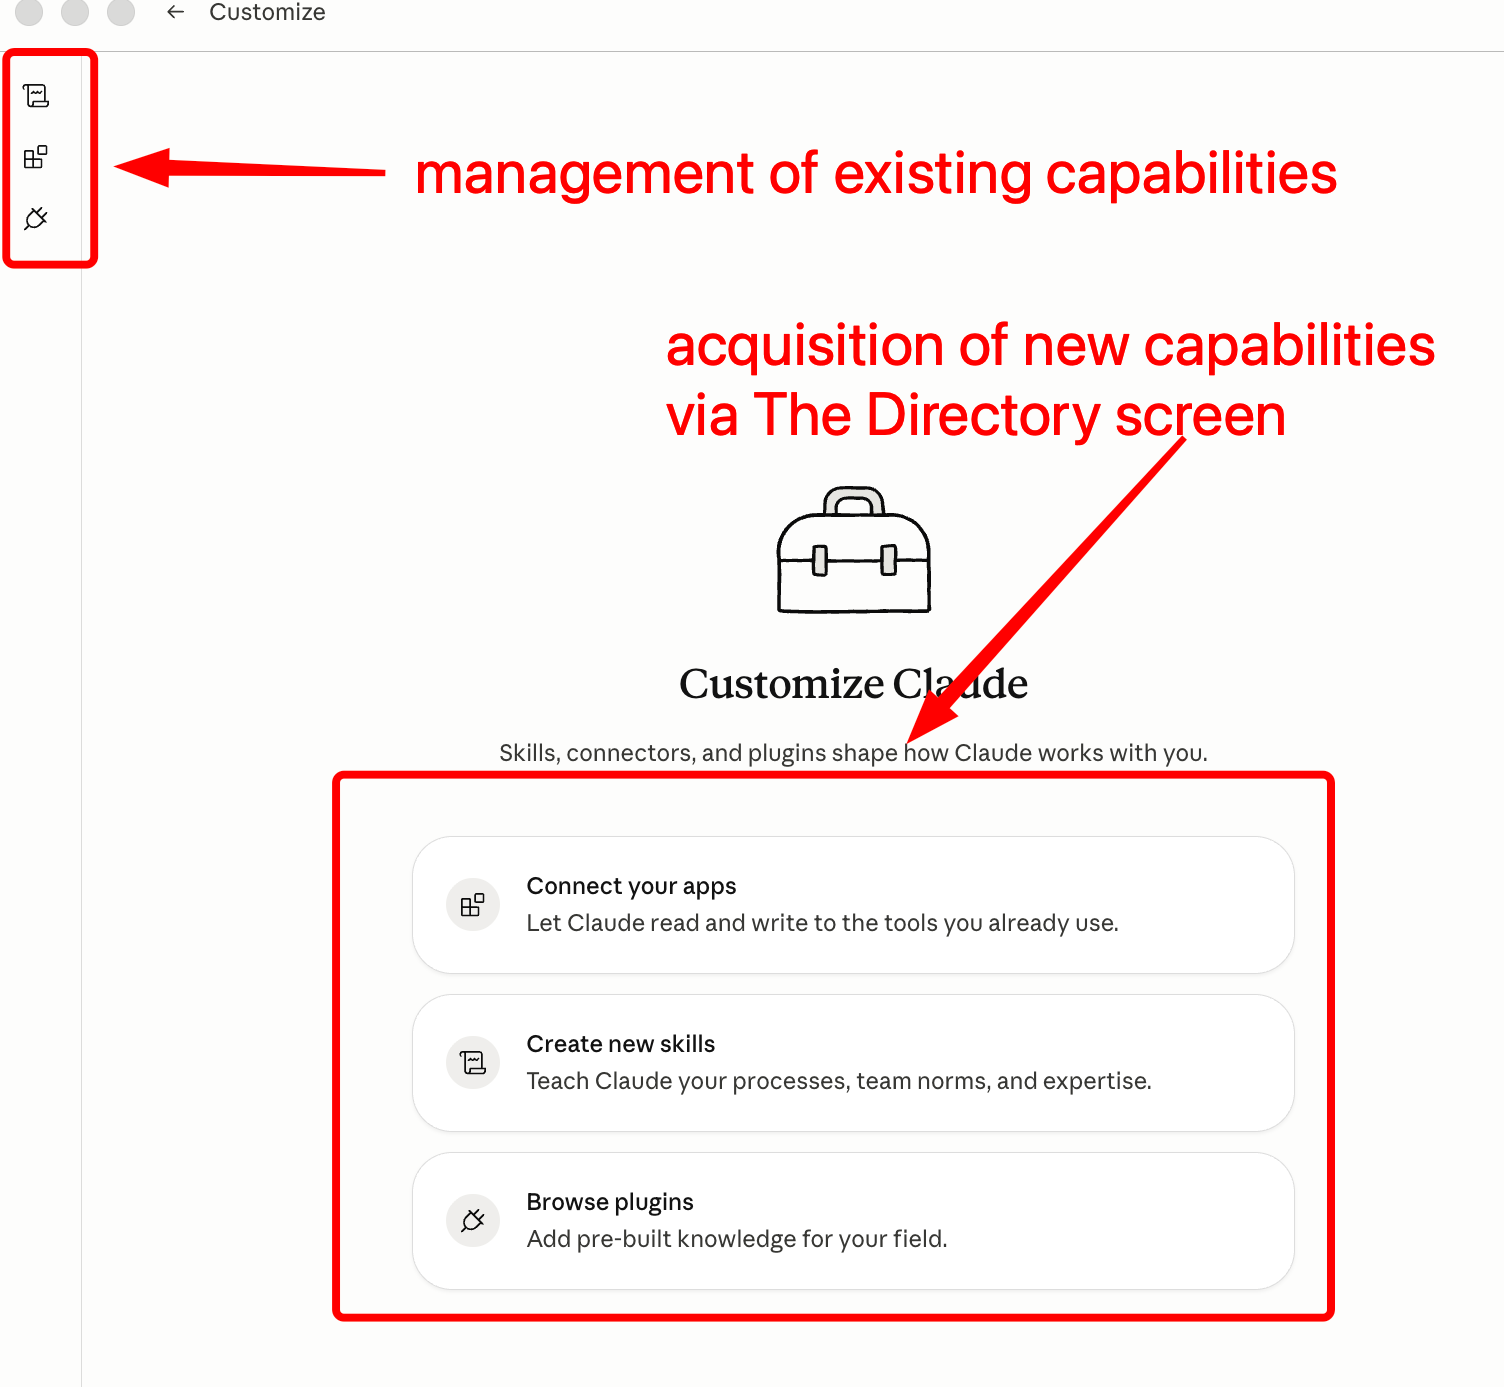
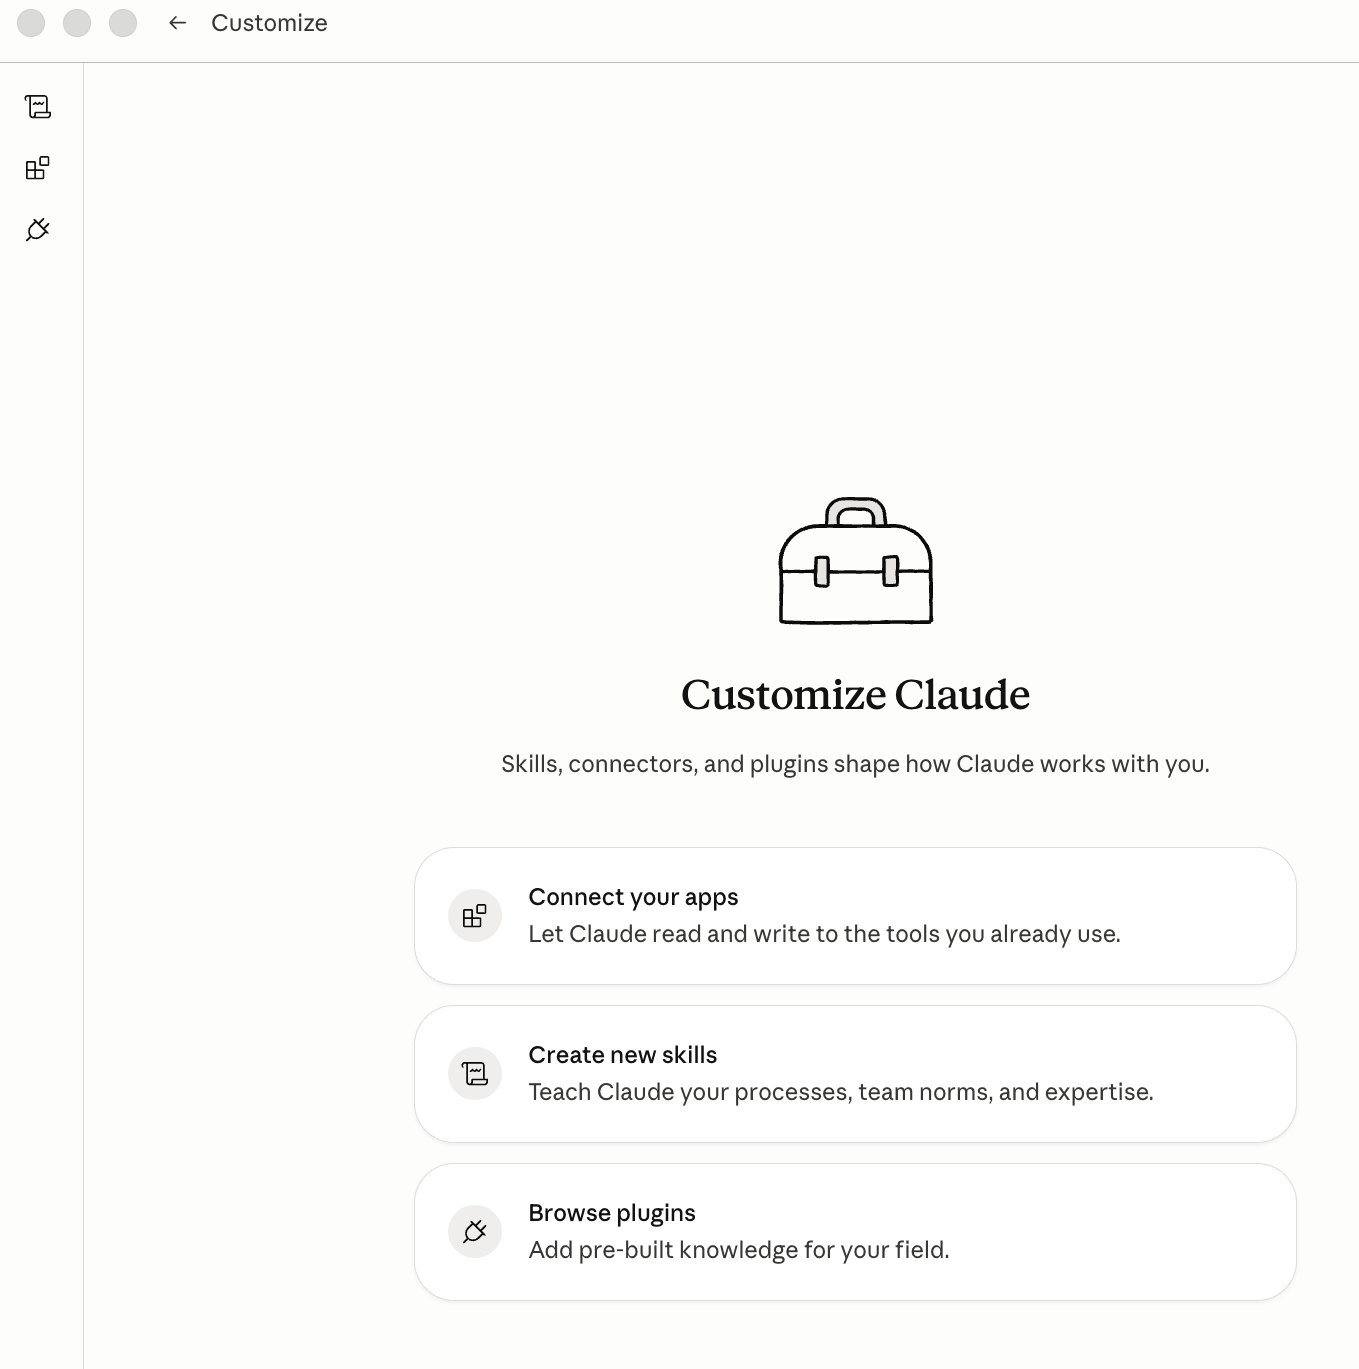
The place to start is what I will call the Customize Screen in the Claude Desktop app, although Claude does not shout that label from the rooftops. The word “Customize” appears, but modestly enough that one might forgive a user for thinking they had wandered into some other part of the interface. Still, the Customize screen is the best way to understand the structure. It is the gateway through which you reach both "The Directory," which lets you acquire new capabilities, and the management screens, which lets you manage skills, connectors and plugins you have already acquired. Here's an annotated version of the Customize Screen.
Skills are instruction packages. A skill tells Claude how to perform a particular kind of task: follow a workflow, apply a checklist, write in a specified style, analyze a document in a structured way, or use a particular method. From the Customize screen, you can go to the Skills screen, where you can add or manage skills. Skills can be acquired in several ways. You can get them from the Anthropic & Partners skill department, write them yourself inside Claude (not hard), or upload them from a file, also not hard. You can buy and sell skills or get them for free from third parties.
Connectors are different. A connector gives Claude access to an outside source, service, or system. Under the hood, connectors contain "tools": callable functions that let Claude search, retrieve, fetch, update, or otherwise interact with something outside the ordinary chat. From the Customize screen, you can go to the Connectors screen, where you can add or manage connectors. But connectors are not like skills in one important respect: you cannot readily write your own connector inside Claude or upload one from a file. For ordinary users, the practical route is to obtain connectors through the Anthropic & Partners connector department.
Plugins are larger containers. A plugin may contain skills, connectors, or both. That makes plugins more like packaged bundles of Claude capabilities than a third item that sits neatly beside skills and connectors. From the Customize screen, you can also reach plugins, but the route, as we will discuss, is more complicated. You can upload a plugin from a file. You can try to write one yourself inside Claude, though doing so is not for beginners. Or you can go to what I will call the Personal Plugins Mall.
The Personal Plugins Mall is divided into marketplaces. One marketplace is run by Anthropic & Partners. Other marketplaces can appear when you sync a GitHub repository with Claude. (GitHub is this giant repository for software that much of the programming world uses to store and develop capabilities). A marketplace can contain many different plugins, and those plugins may in turn contain skills, connectors, or both.
Taken together, the Claude capability system is less a single menu than a layered architecture hidden behind a somewhat obscure interface. Skills are portable instruction packages: they teach Claude how to do a task. Connectors are access mechanisms: they let Claude reach outside systems through tools, usually by way of MCP servers and authenticated configuration. Plugins are bundles: they can package skills, connectors, or both, sometimes distributed through Anthropic’s directory and sometimes through third-party marketplaces such as GitHub-linked repositories. The practical lesson is to stop treating skills, connectors, and plugins as three equivalent buttons. They answer different questions: how should Claude act, what outside systems may Claude use, and how are those capabilities packaged for discovery and installation.
Step 2: Understand that Claude for Legal is a confusing term
Claude for Legal is a somewhat ill-defined label. It refers not to a single product, but to a loose collection of capabilities: a newer marketplace for plugins and connectors that is itself confusingly called Claude for Legal, an earlier marketplace-like set of tools, and a growing set of connectors that expose legal tools. The account requirements vary as well. Some capabilities, including the Claude-for-Legal marketplace plugins, can be used with only an Anthropic account; no separate external account is required. Other aspects of Claude for Legal depend on third-party services such as CourtListener and Lawve and therefore require the user to create or connect an account outside Anthropic.
Step 3: Adding Plugins
I'm going to start with plugins. Our basic goal is to get to the Customize Screen and from there to the Directory with the plugins tab selected.
Step 3a: Getting to the Customize Screen
If you have not done so already, launch Claude Desktop. Make sure you are in either Claude Cowork or Claude Code. Much of what is covered here DOES NOT WORK inside Claude Chat. Here you see me working in Cowork.
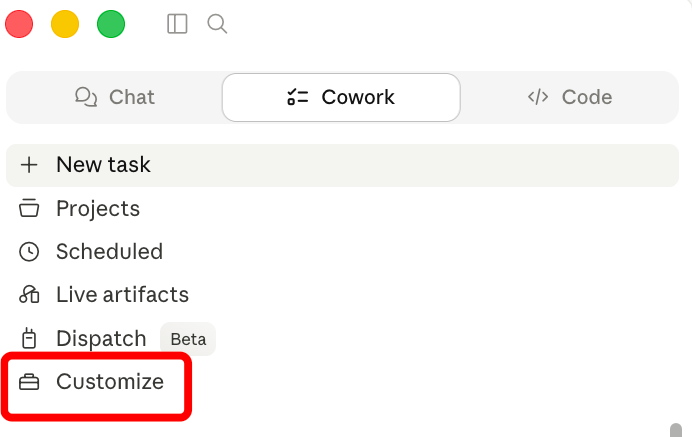
Click on "Customize." As shown above, you should then see something like this.
Step 3b: From the Customize Screen to the Plugin Mall Screen
To get to the plugins mall, click on the big "Browse plugins" button in the main panel. It's not a disaster if you click on the little plug icon on the left panel, but for now it is better if you click on the big button in the main panel.
Anthropic & Partners Skills
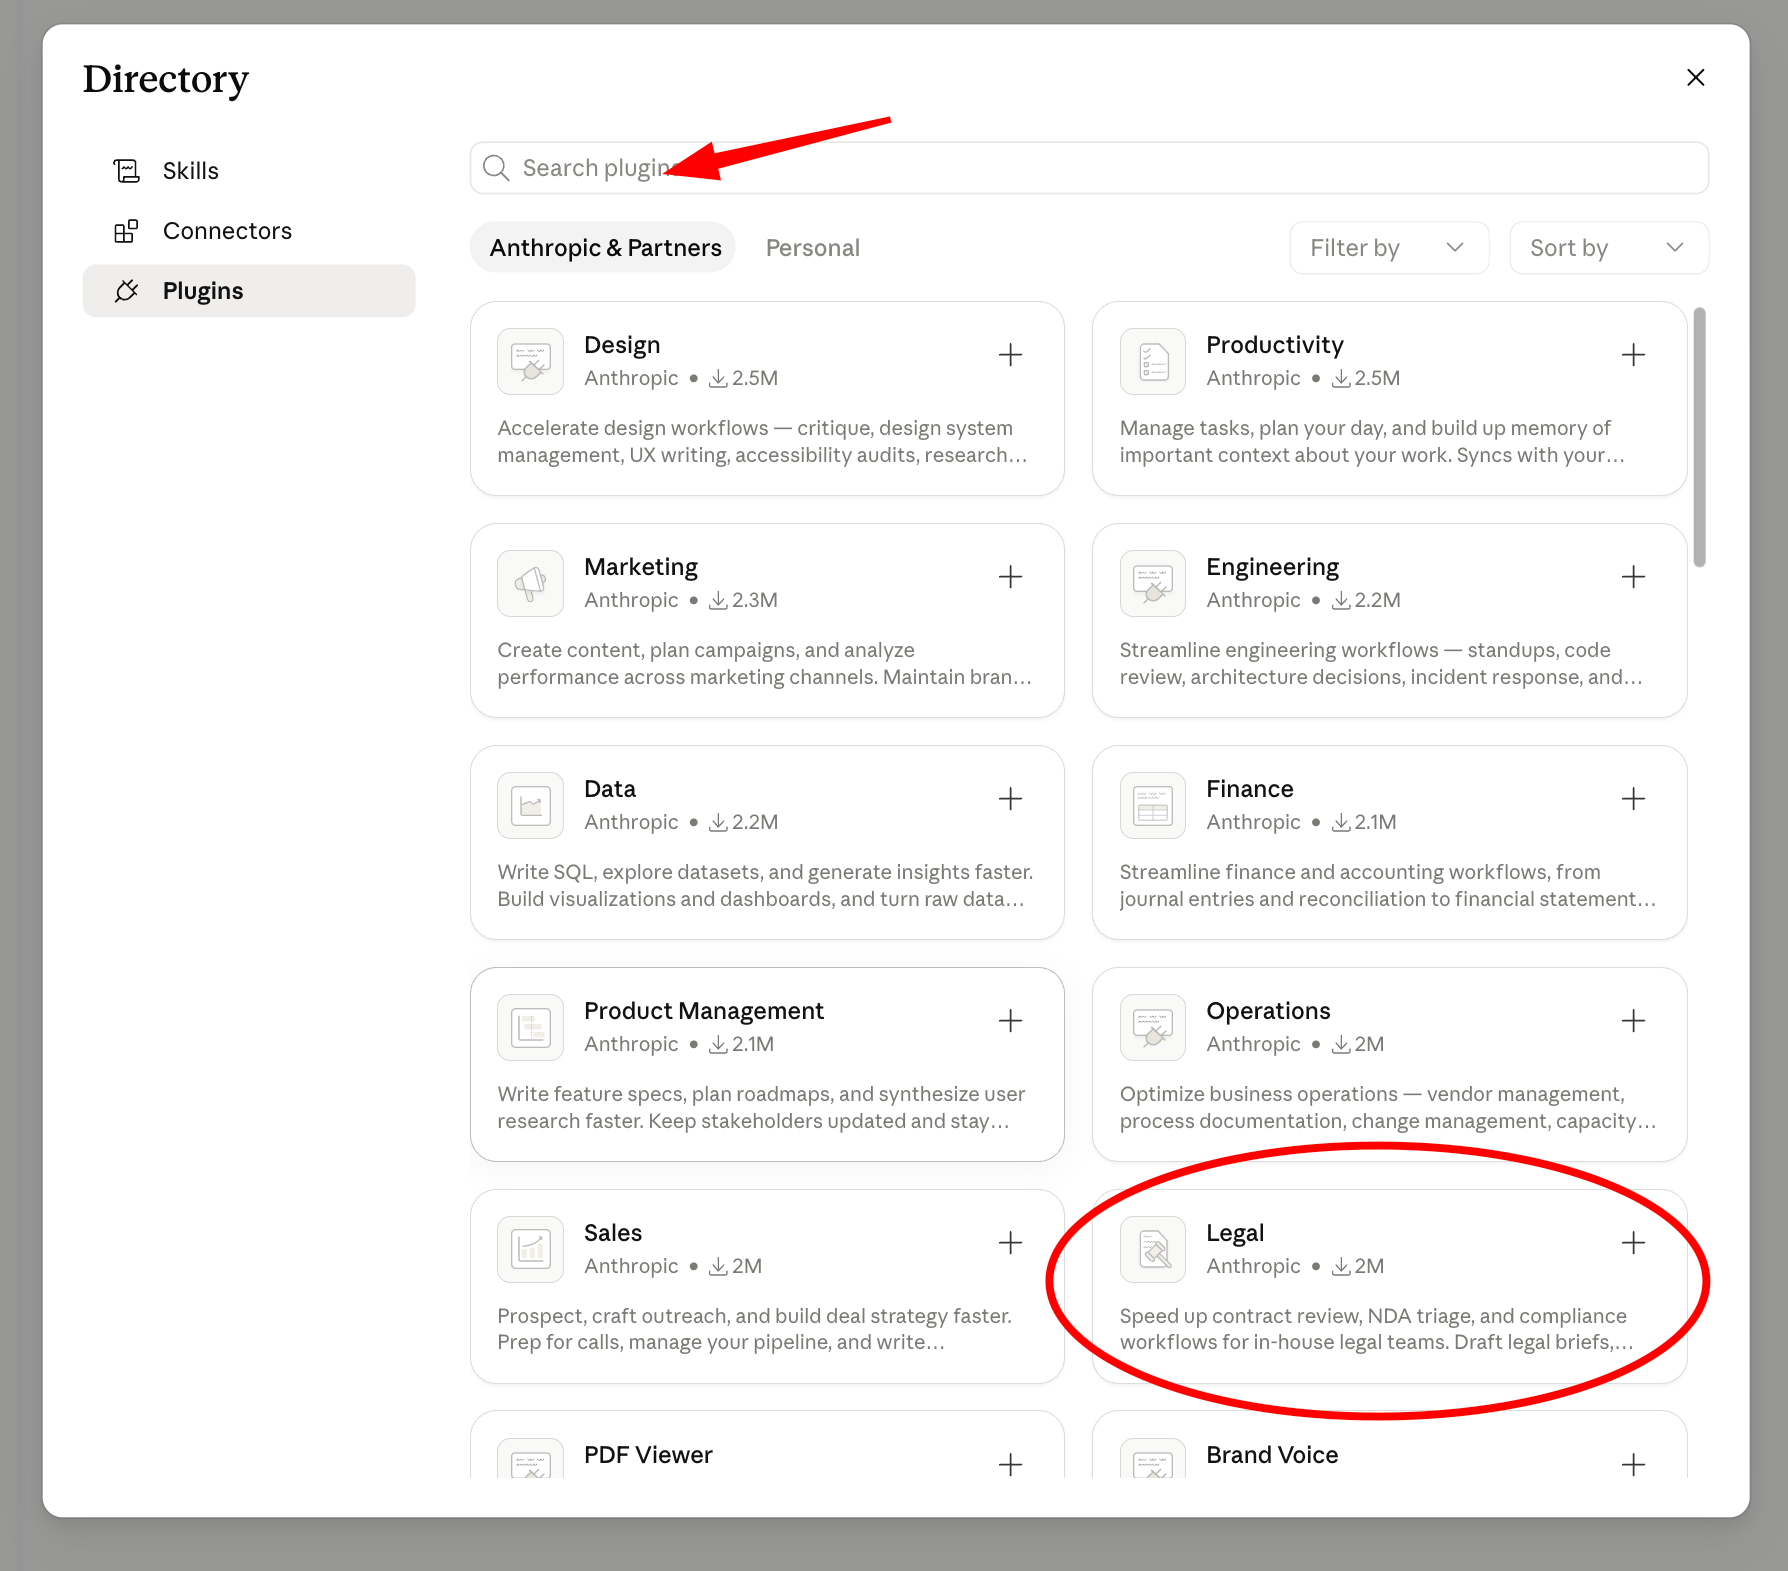
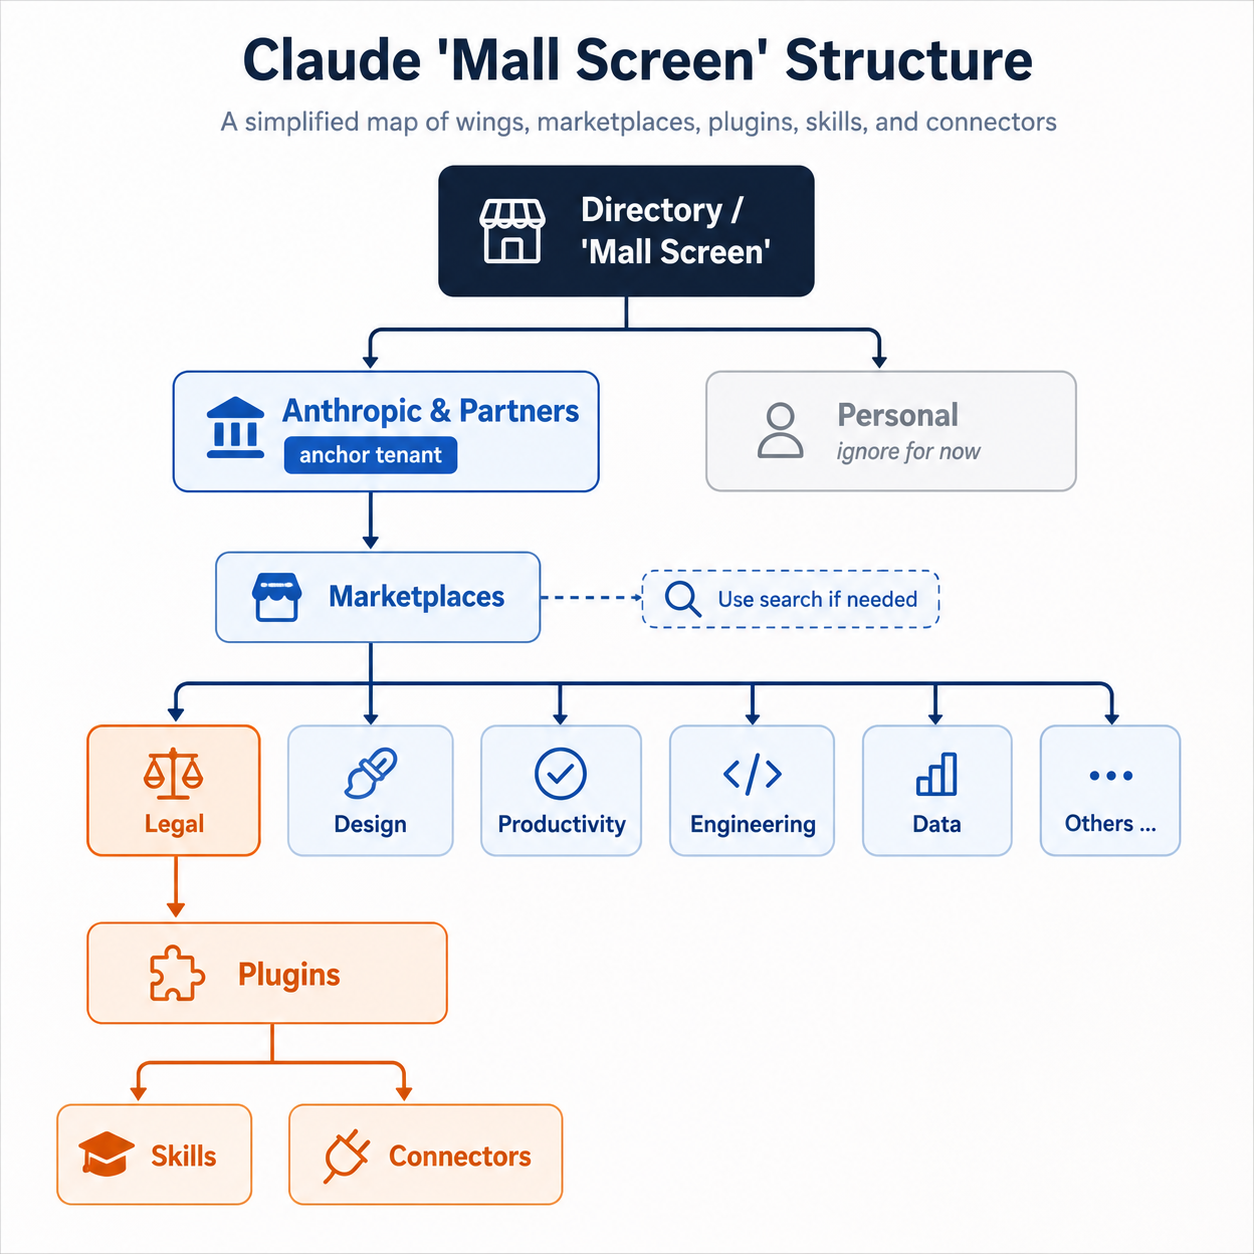
Hooray. You've made it. You will now be at the Plugin Mall screen (my term) that has a variety of "wings" (my term) that contain "marketplaces" that contain "plugins" that themselves contain "skills" and "connectors."
Initially, you will be placed in the Anthropic & Partners wing of the Plugin Mall. If you like persistent metaphors, you can think of Anthropic & Partners as being the "anchor tenant." (There is also a "Personal" wing of the Plugin Mall, but ignore it for now). You should see the "Legal" marketplace from Anthropic & Partners (sometimes listed just as "Anthropic") available. If not, use the search bar that my red arrow points to. Click on Legal.
If it helps, here's a conceptualization of how the Plugins Mall works.
You will then see the elements of the Legal plugin. You should note that the plugin contains a number of skills each named by a string prefaced with a slash (a/k/a slash commands). These are the skills that come bundled with the plugin. You will also see a list of connectors that come with the plugin such as slack, gmail, ms365. These are outside services that, with appropriate permissions, you will be able to access when invoking the plugin.
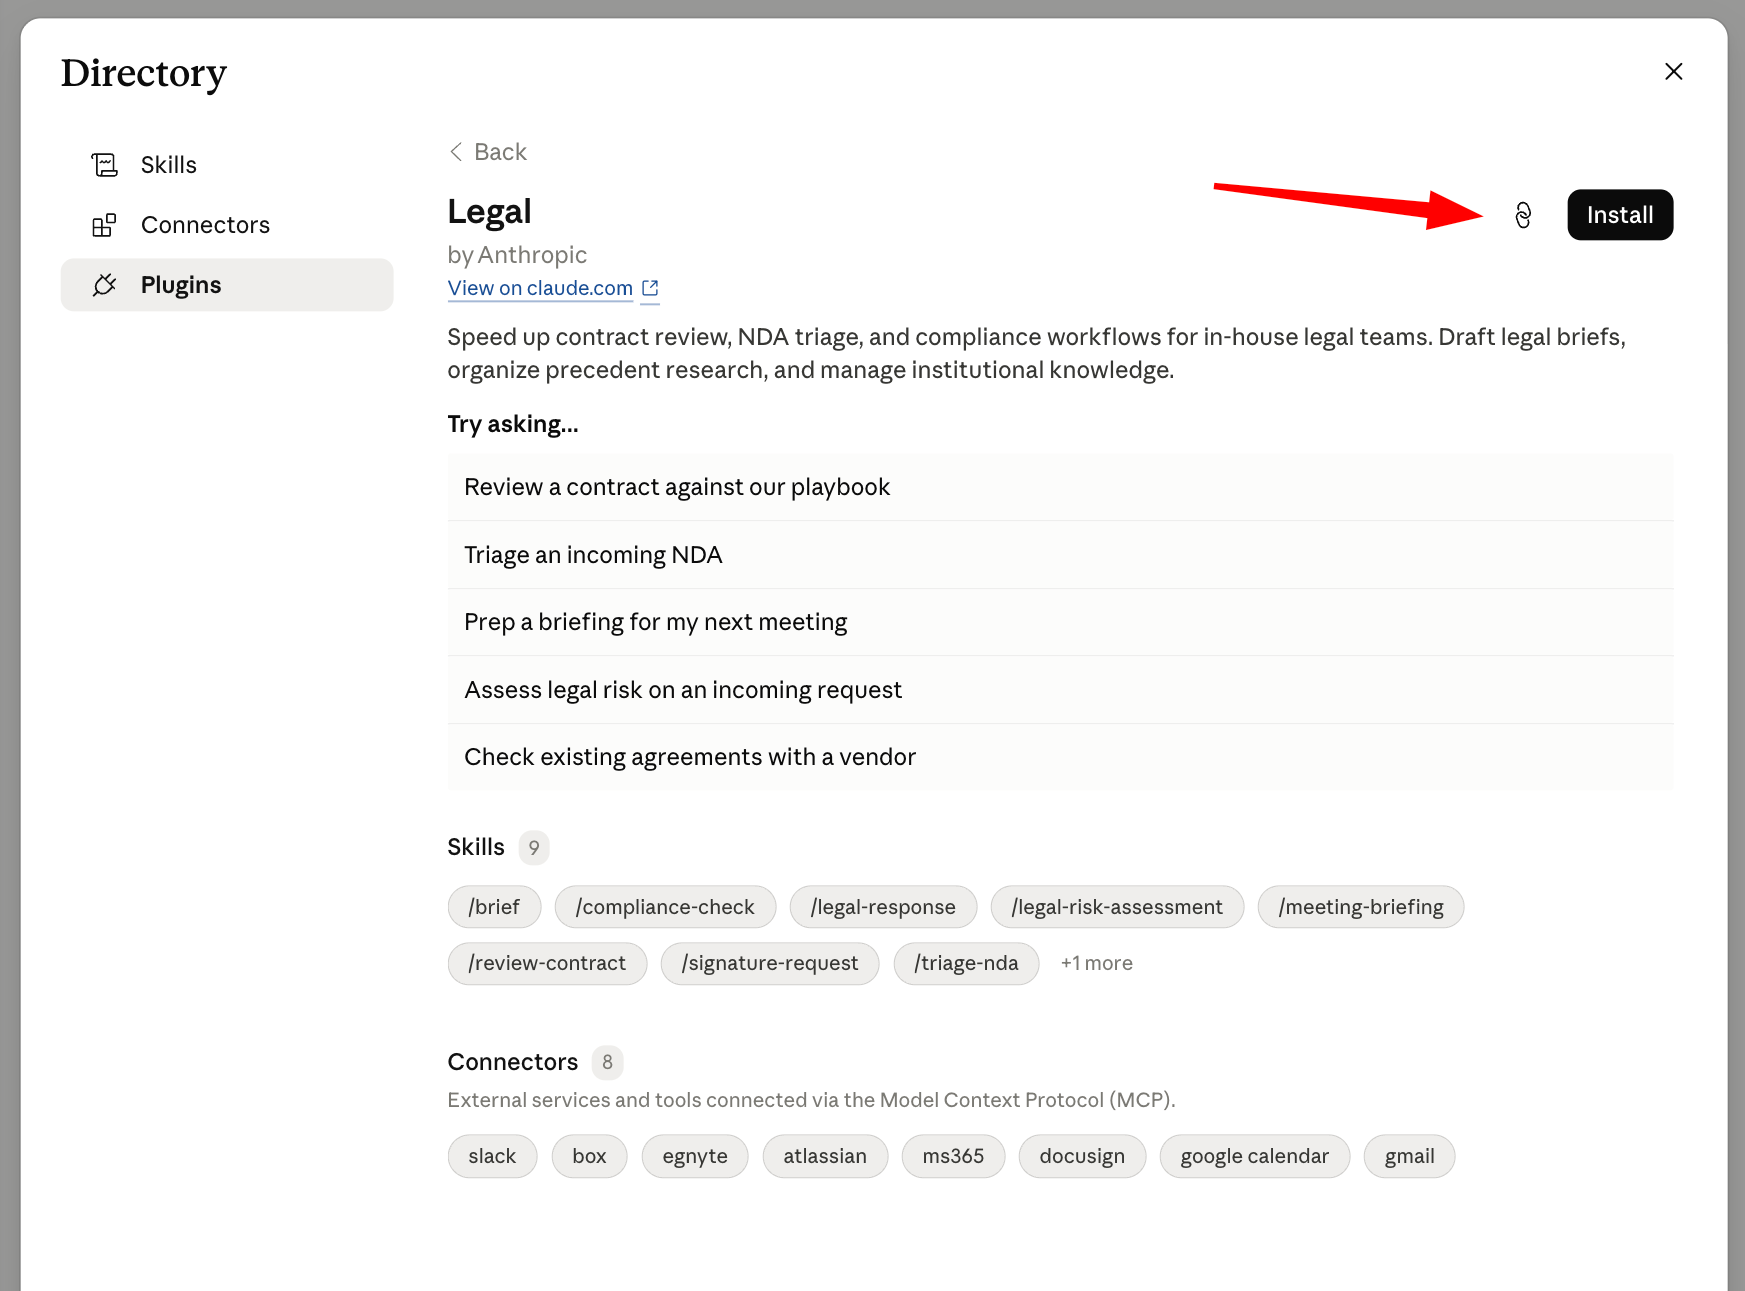
Click the "Install" button. If all goes well, you will get this popup.
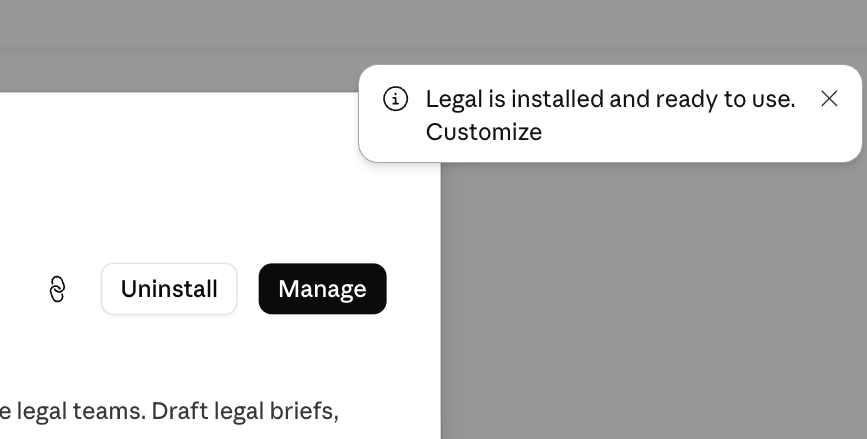
Now click that "Manage" button. You will then go to a "Manage screen" (my term) that gives you further information on the elements of the Legal plugin but that also gives you the option to customize the plugin itself and to customize and visualize its constituent skills and connectors. When you get to the Manage screen, notice a few things. You will see that the source of the plugin is a "Marketplace" created by Anthropic & Partners. Notice that it was last updated a day ago. Your plugin should automatically update itself, but, if not, there is a button to force an update. Also notice that if, for some reason, you want to temporarily "unplug" the plugin, there is a toggle switch at the right letting you do so. Clicking on the three dots at the top right of the screen lets you uninstall the plugin altogether.
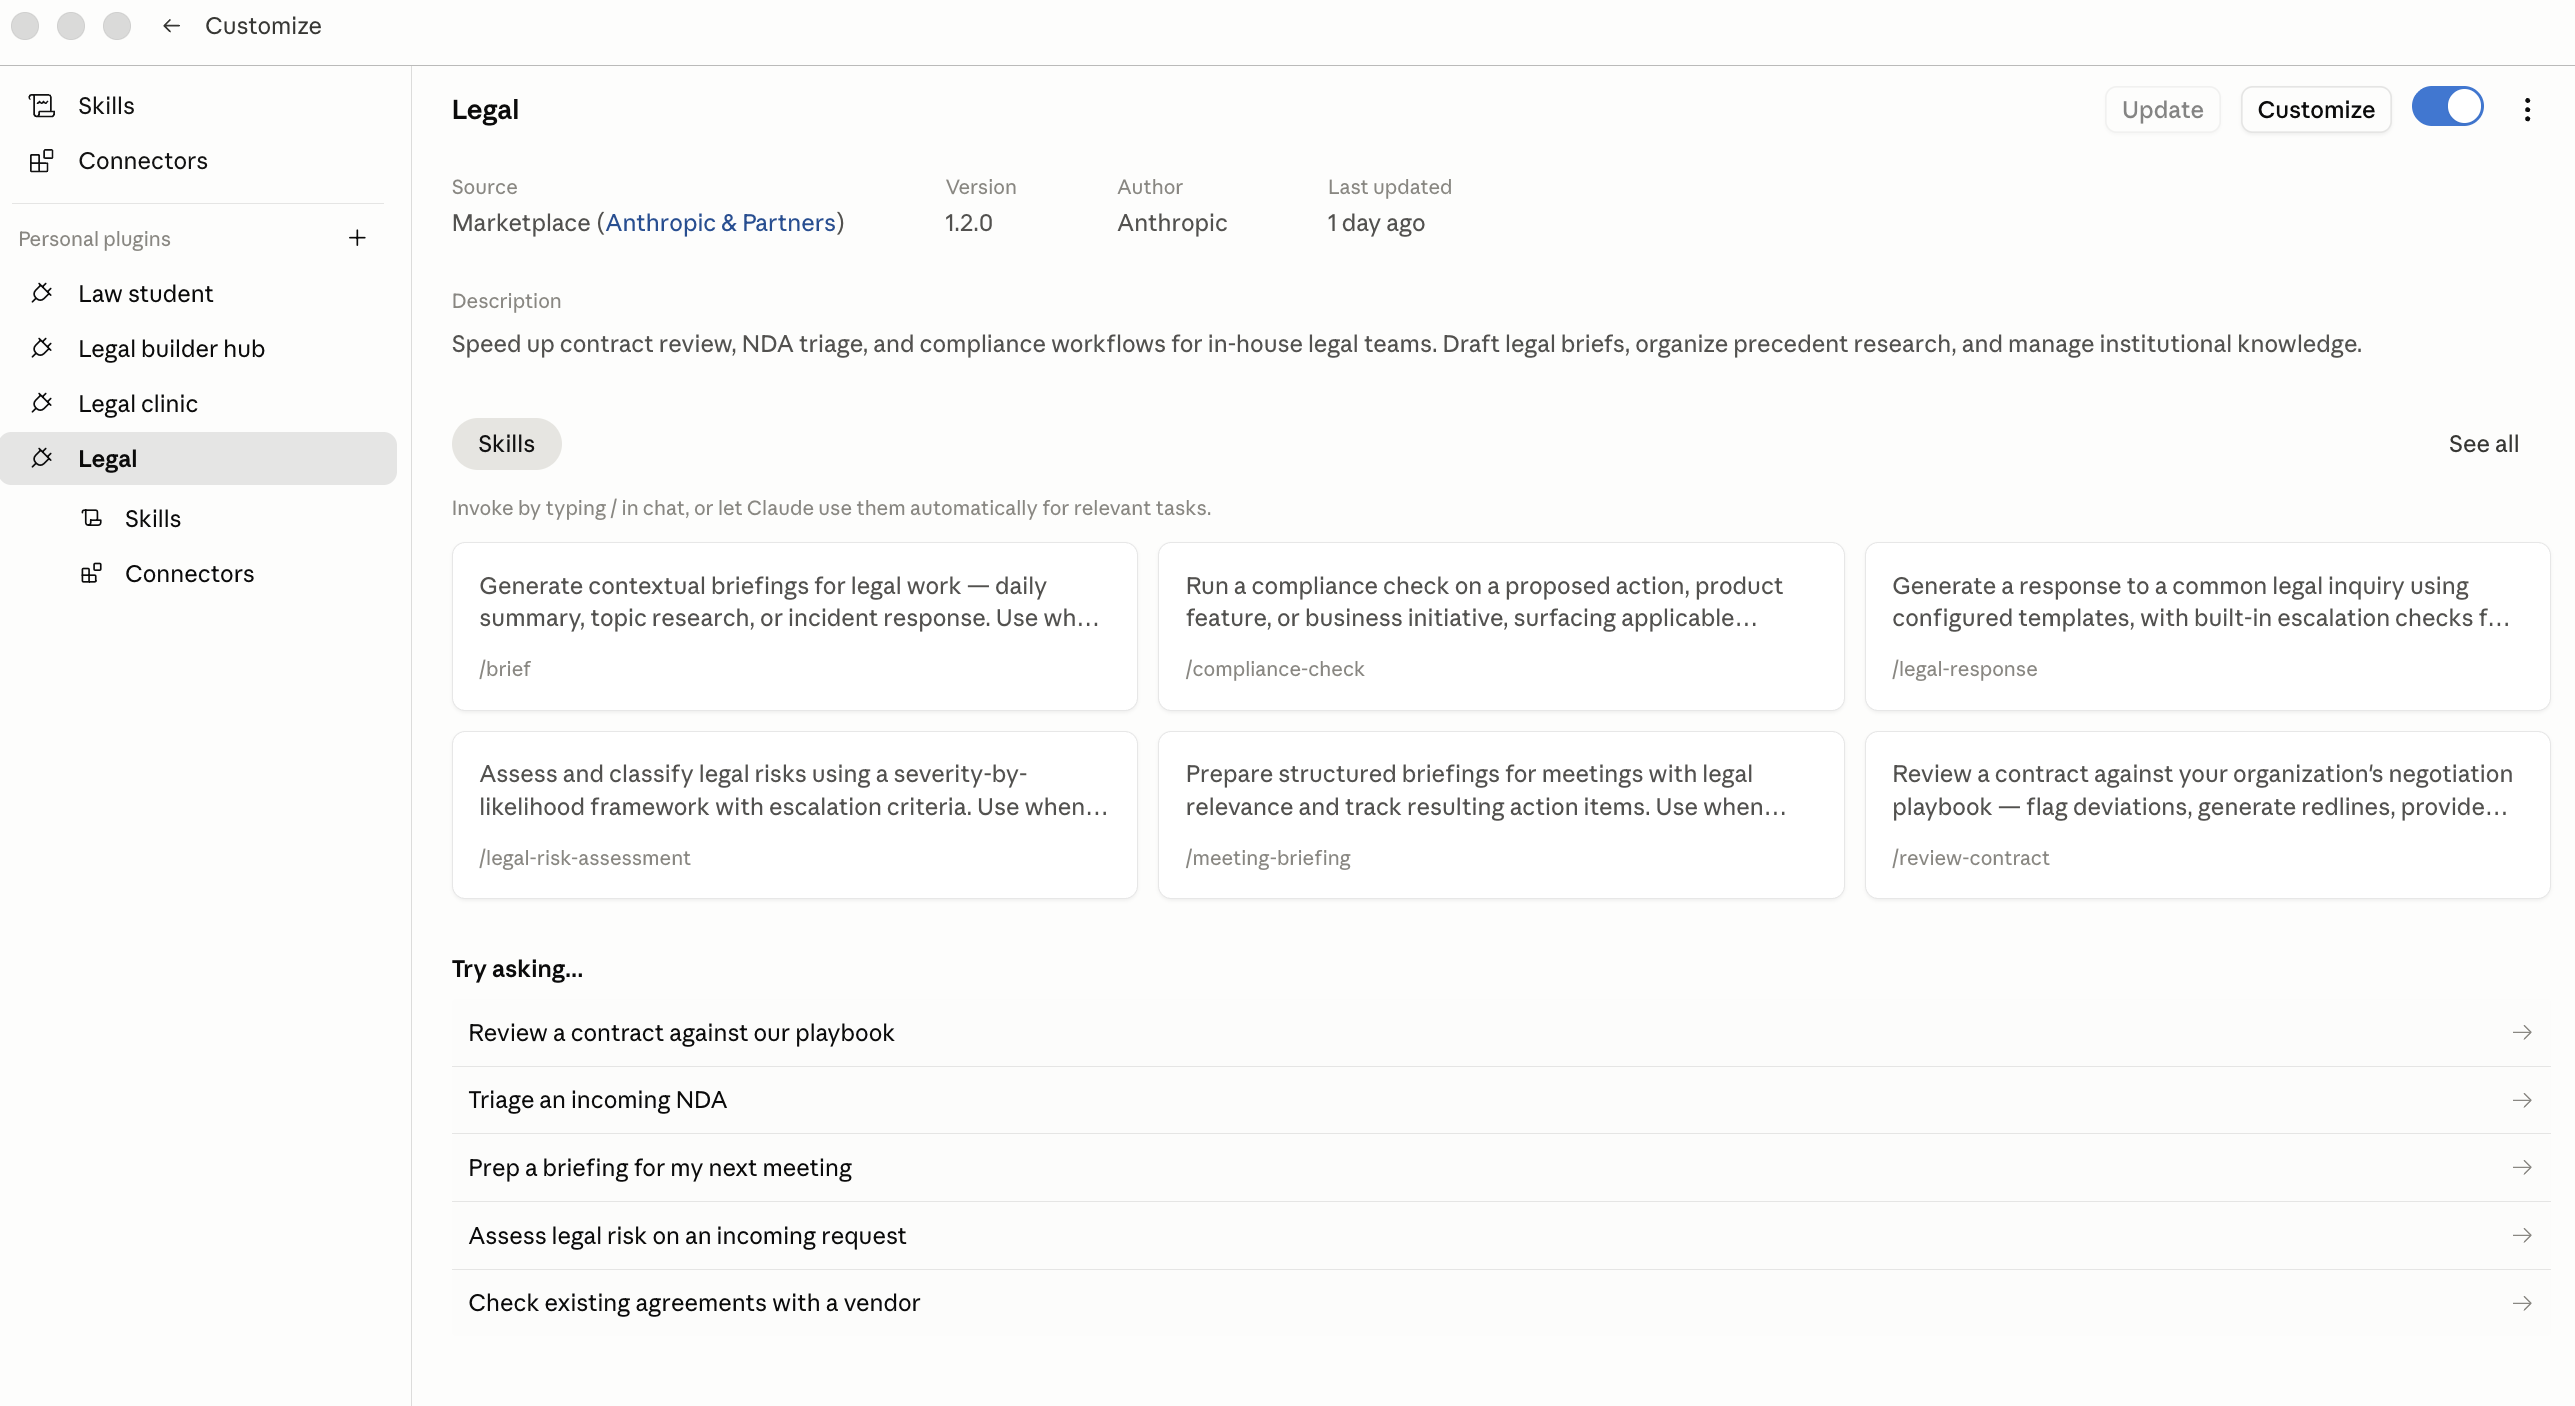
Let's do a little navigating. Click on "Skills" in the left panel, you will then see a list of Skills contained in the plugin. Here, for example, I have clicked on Skills and review-contract to see how that skill works.
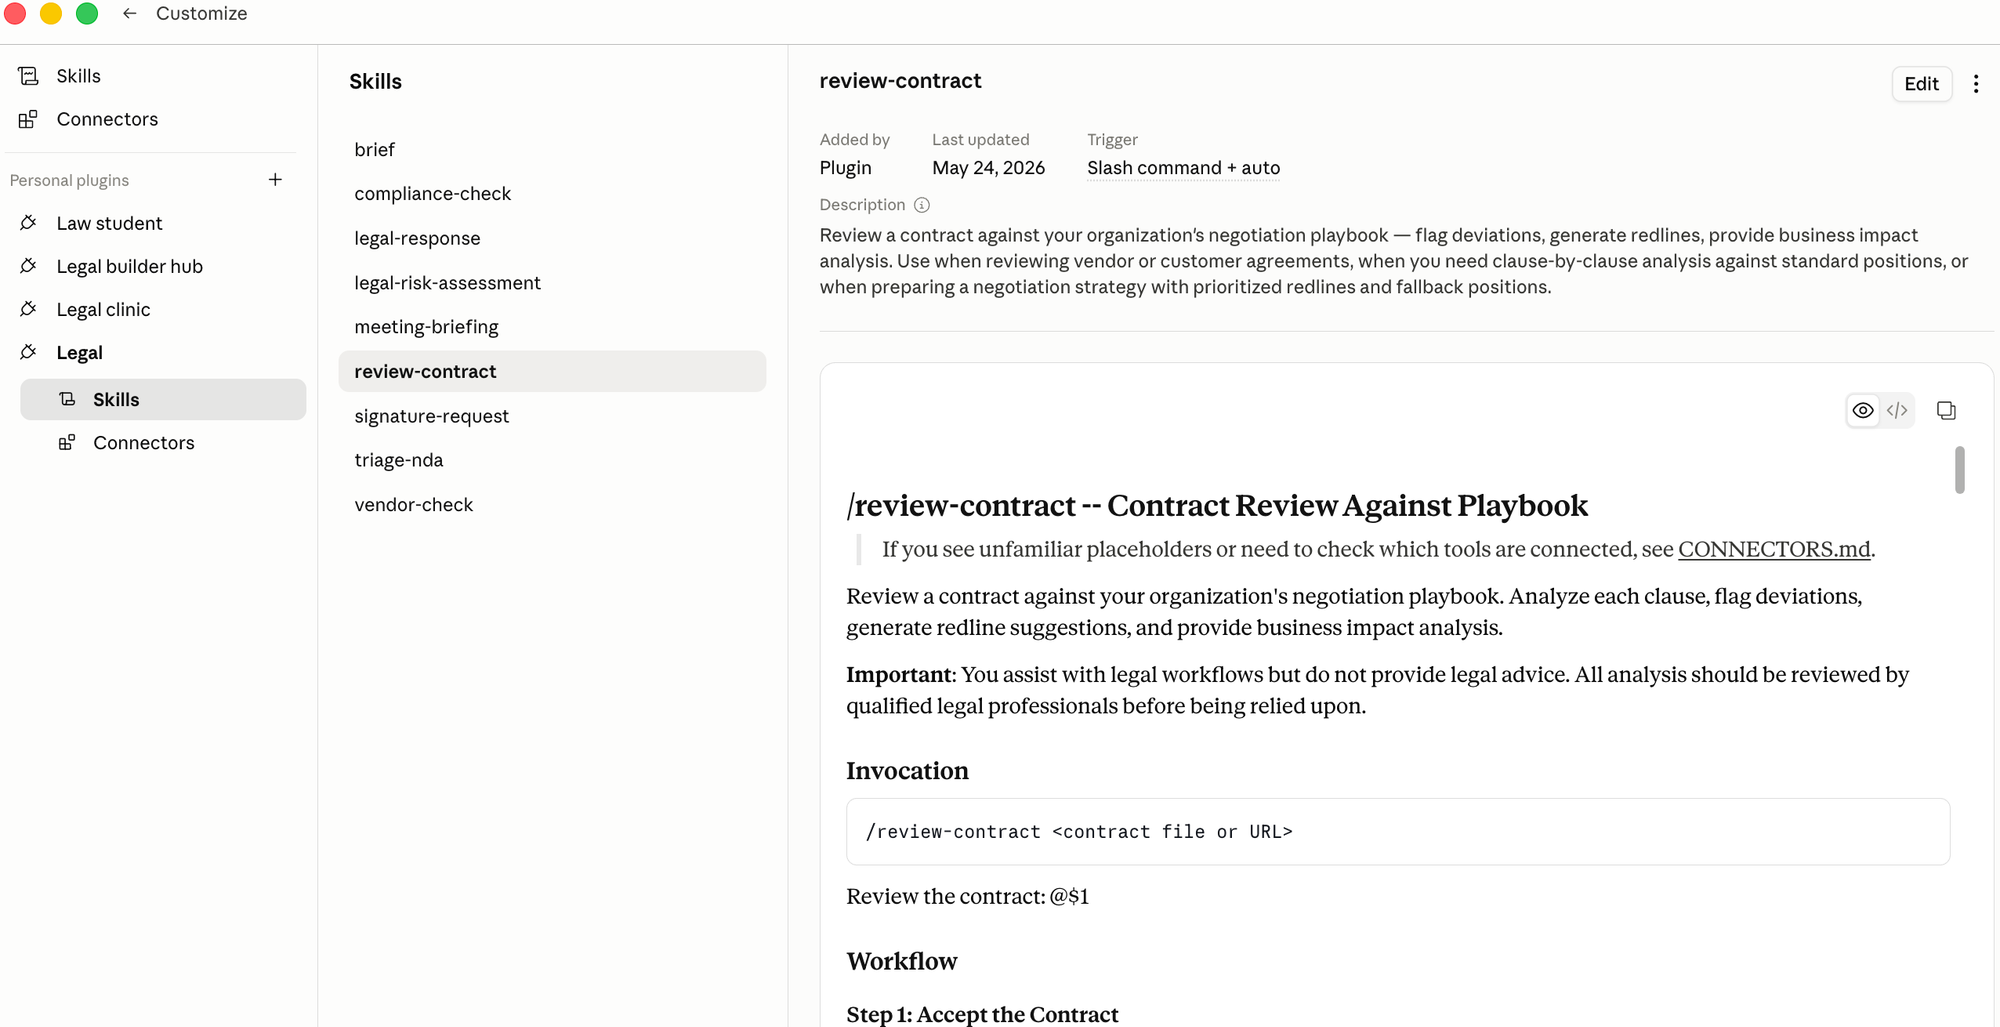
Again, notice the rich set of features available. You can edit the skill if it is not to your liking. By clicking on "</>" you can see the actual YAML/Markdown code for the skill. This tells you exactly what the skill is doing.
You are hardly limited to "Legal" plugins once you are in the Anthropic & Partners wing of the Plugin Mall. There are plugins for Data (SQL), for Finance, and many other areas. The installation process is the same as for the Legal plugin.
Step 3c: Law student and other "Claude for Legal" skills
There's at least one other plugin many of my readers may want to install: Law student. To do so, get yourself back to the Directory by Customize -> Browse plugins.
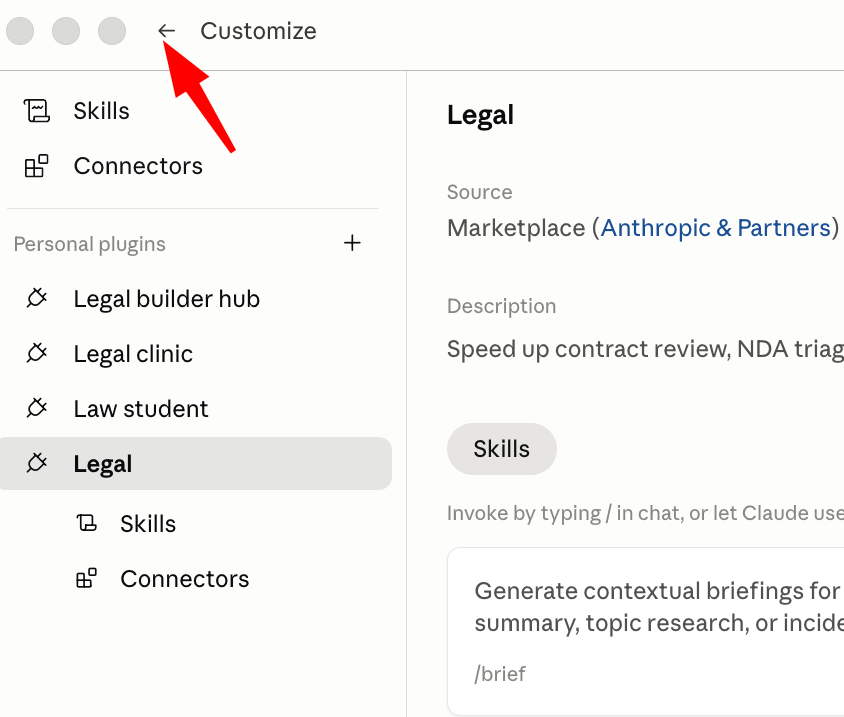
But this time, get out of the Anthropic & Partners wing of the mall and head for the "Personal" wing.
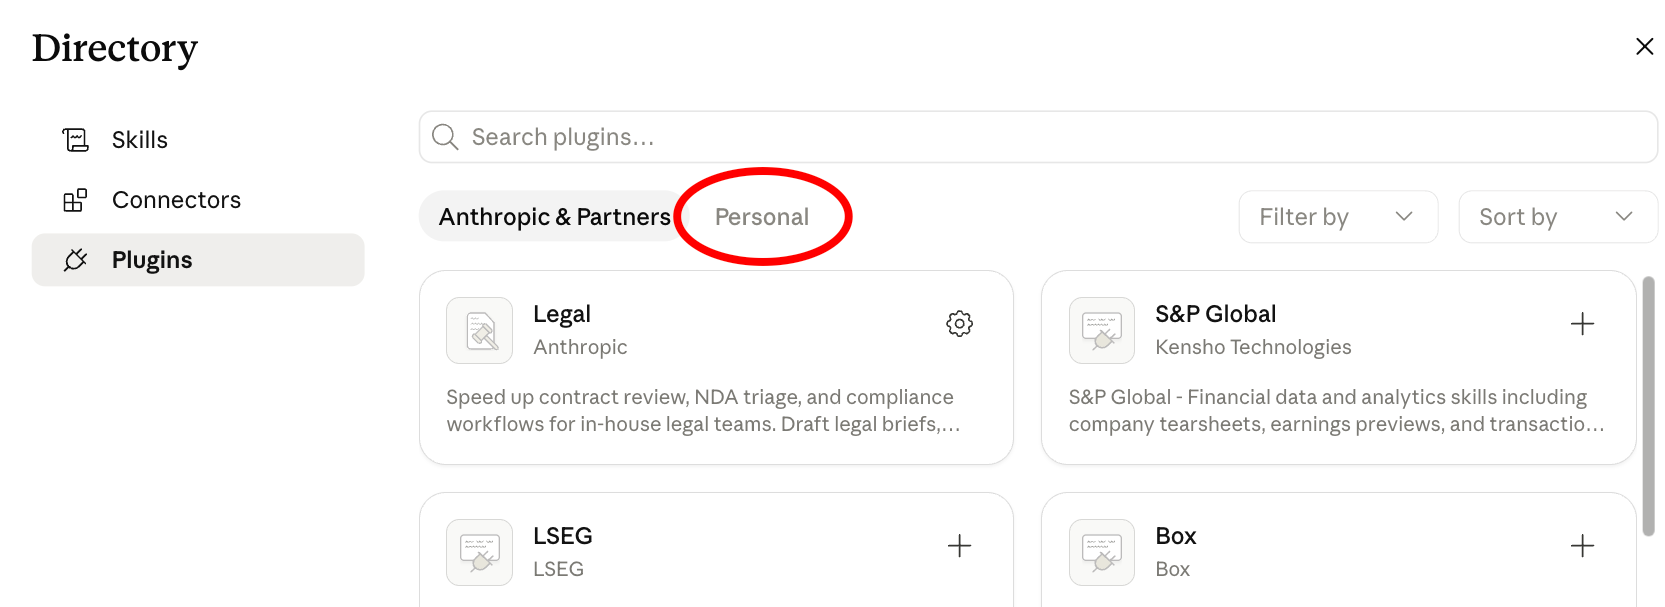
To do so, click on "Personal" and now see if the "claude-for-legal" marketplace appears in a little gray pill box. If it appears, skip ahead to the section marked "I've found the claude-for-legal marketplace." If it does not appear, we need to gain entry into the claude-for-legal marketplace.
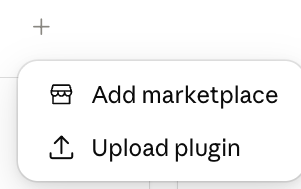
To gain entry to the various marketplaces, click the "+" button that appears below "Personal." Then click the "Add marketplace" option.
You then get the ability to select a GitHub repo that contains plugins. For now, GitHub is the only place to find these plugins. You can click on the dropdown arrow for "Select a repository." You may see some choices. Here, for example, is what I see.
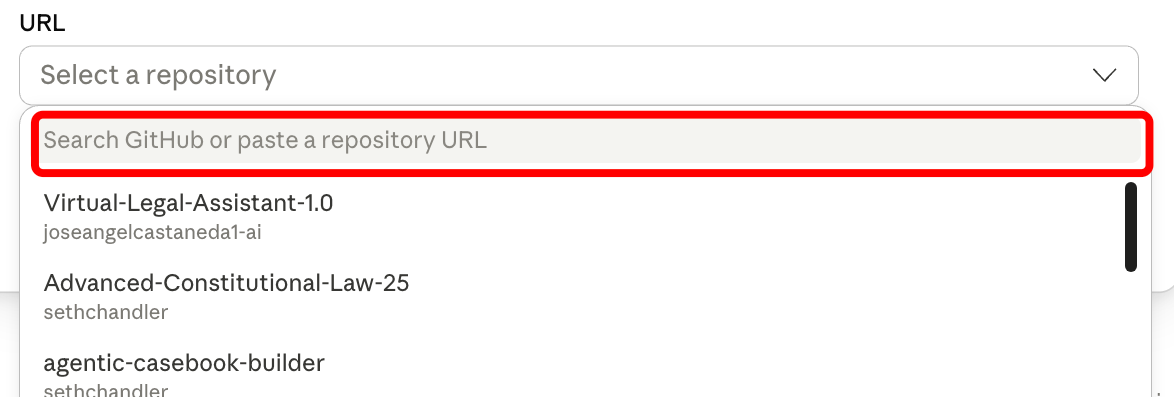
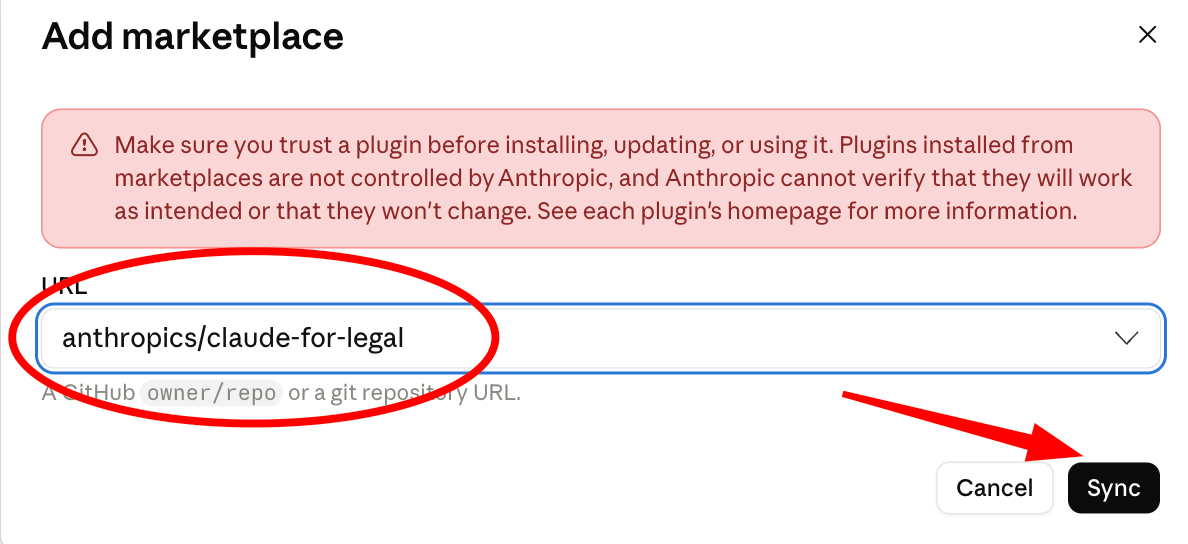
Search for the anthropics/claude-for-legal repository. Once you find it, click on the sync button.
I've found the claude-for-legal marketplace
You should now arrive at a screen that looks like this, which describes the Law student plugin.
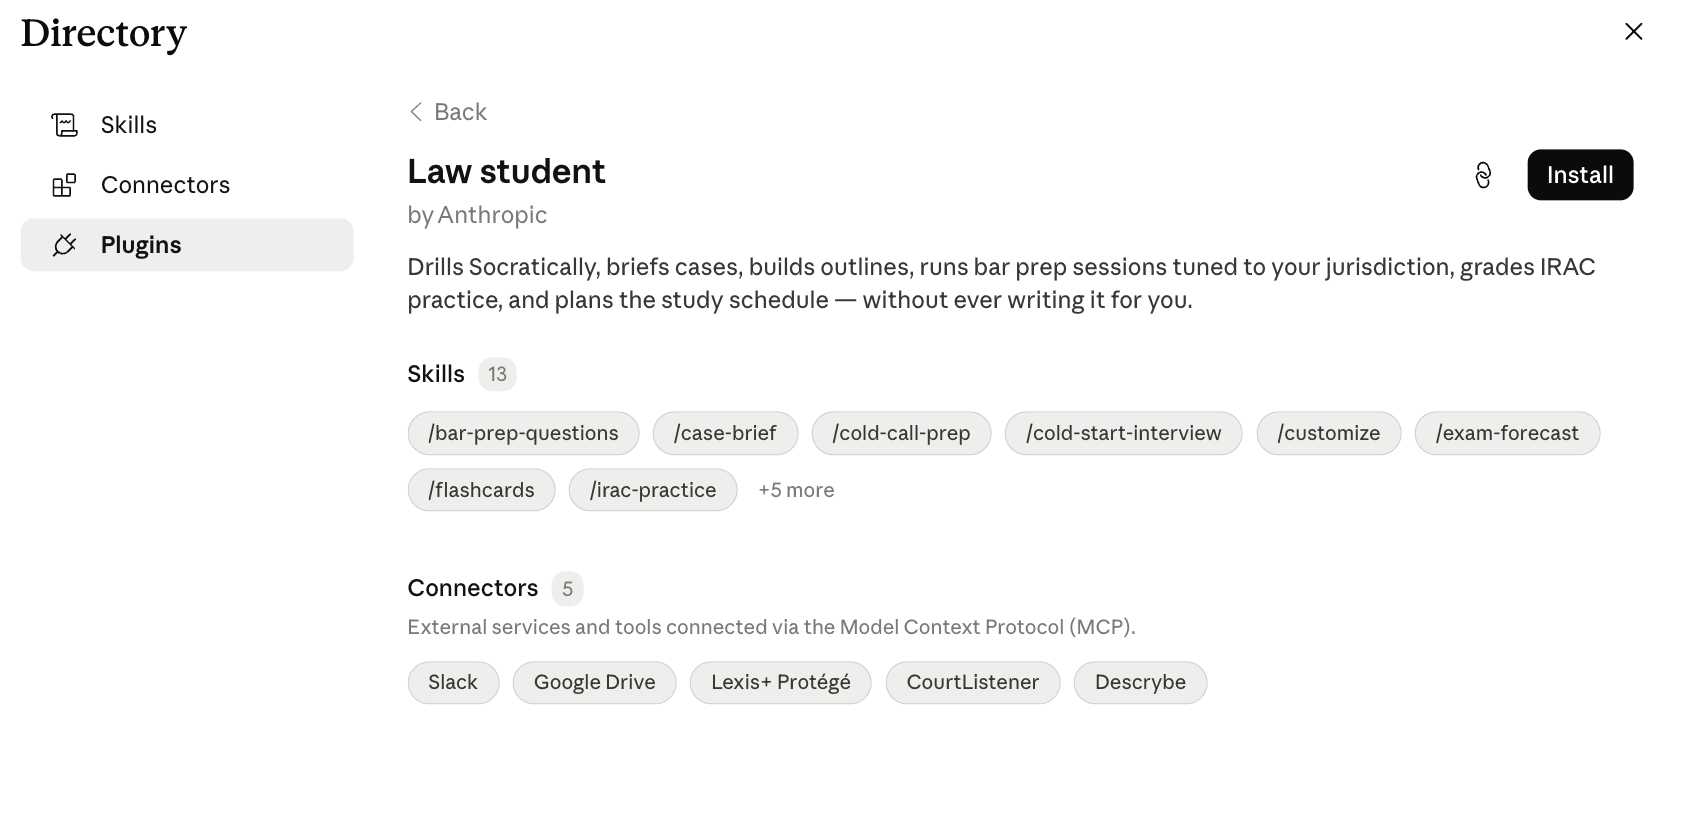
Go through the same process as above. Install it. Click on Manage. And then, if you like, click on the skills and connectors components of the plugins to see what's there and what you might need to further install. Here, for example, is what my law student plugin looks like right now.
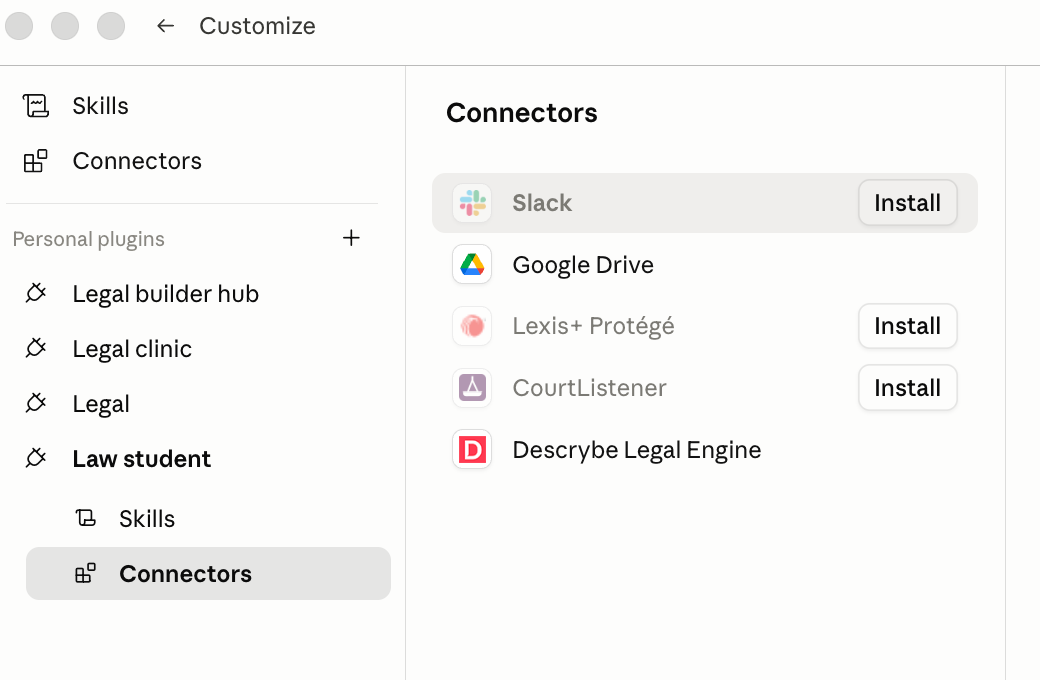
Once you've navigated your way back to the Plugin Mall screen, go back to the Personal plugins wing. You should see about a dozen other plugins available in the Claude-for-Legal marketplace: the Legal clinic plugin, the IP legal plugin, the CoCounsel legal plugin, and many more. The installation process for these plugins is the same as for the Law student plugin.
By the way, if you hear of other GitHub repositories with useful plugins, go through the same process. Add the marketplace via the GitHub search capability, select the plugin, install it, and, if need be, manage it. One third-party marketplace can be found here: https://github.com/ComposioHQ/awesome-claude-plugins. Just beware. Plugins are extremely powerful. Don't install a plugin unless you completely trust the vendor.
Step 4: Preparing for Connectors
Now it is time to add some connectors. Before they will work, however, a little preparation is required. Connectors reach outside Claude to interact with external services, and those services usually require an account. Some accounts are free; others are not. I will focus on two important components of Claude for Legal: CourtListener and Lawve. Both require account setup, but the process is straightforward and resembles the account-creation routines that, by 2026, have become familiar across most online platforms.
CourtListener
For CourtListener just go to its website and click on Sign-in/Register.
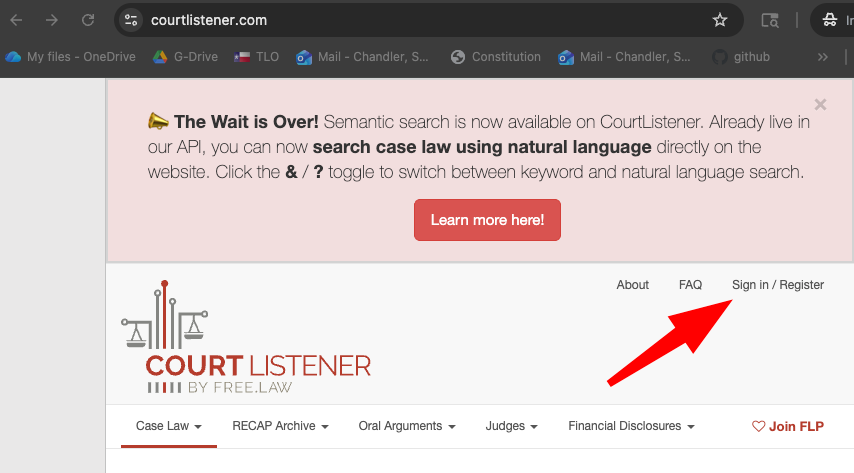
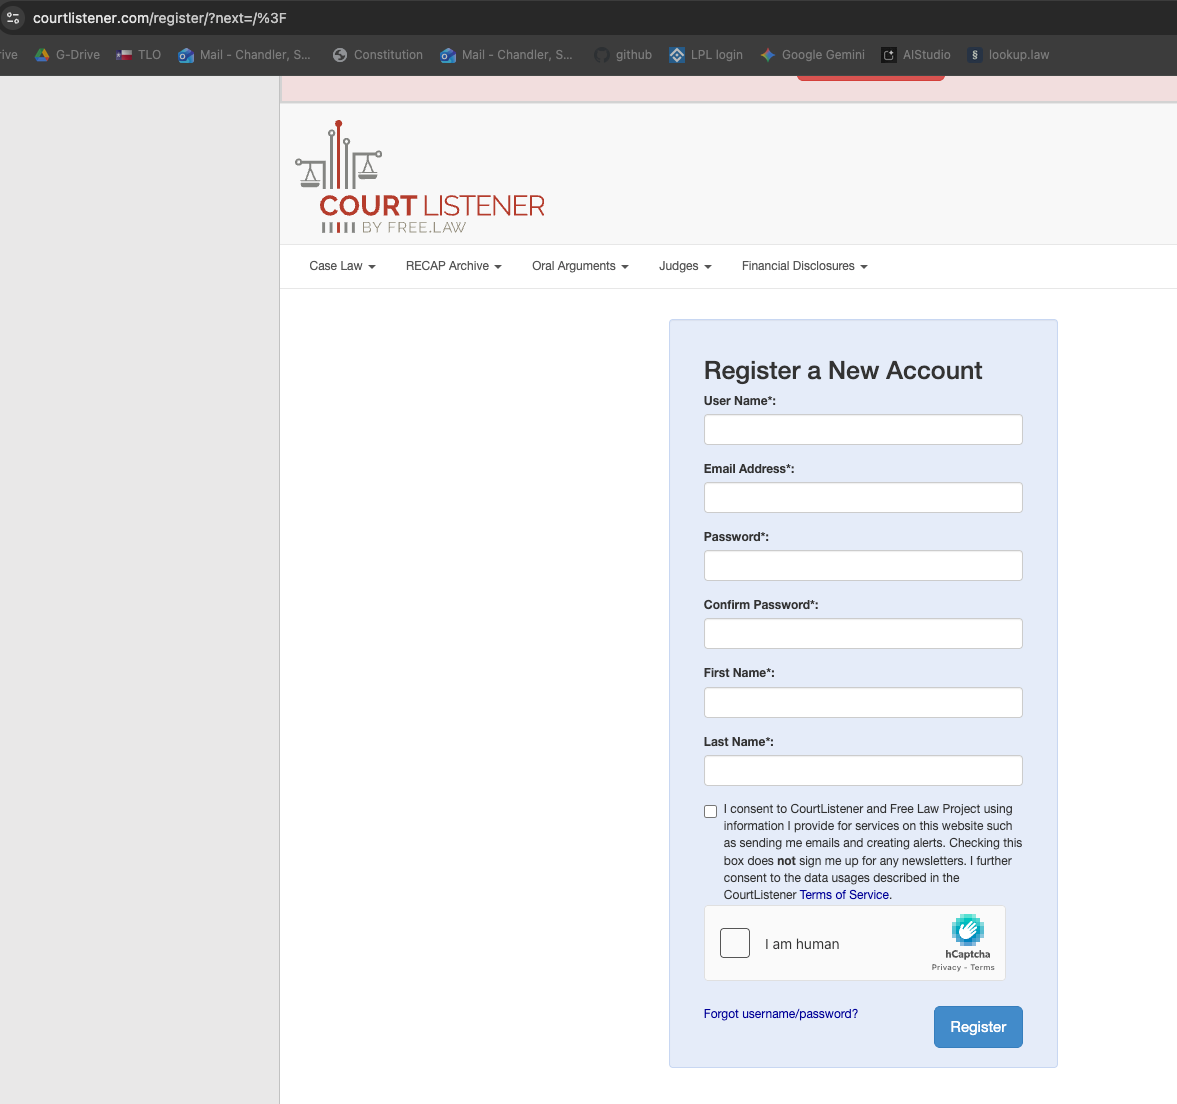
You will get a sign in form that looks like this. Fill it out and complete the authentication.
Lawve
Go to Lawve's website. You will see something like this. Click on the little button at the right.
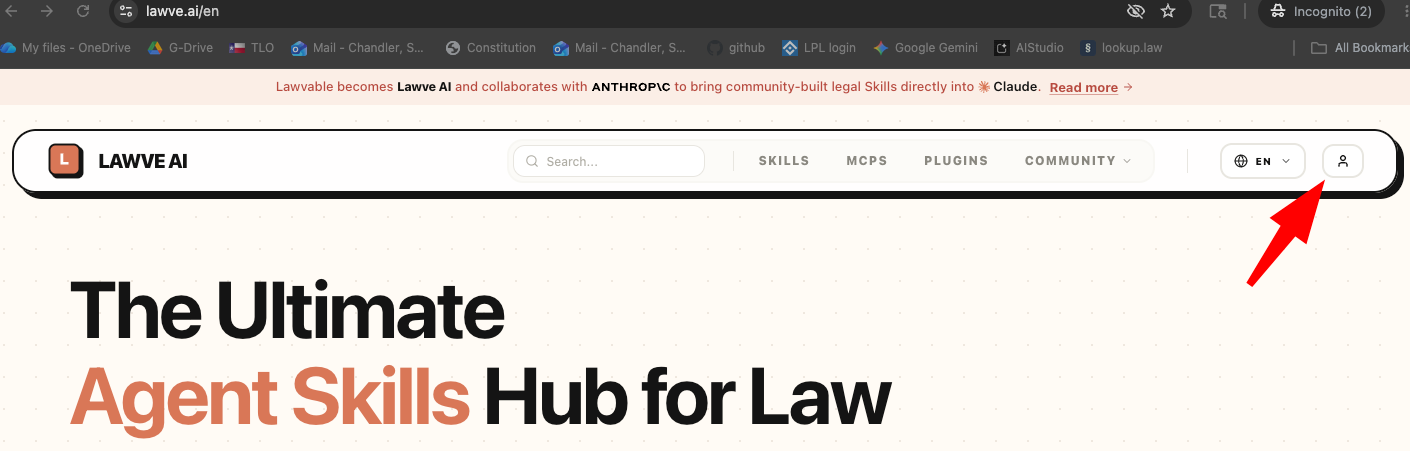
If your browser window is narrow, you won't see the icon but will instead see a little hamburger icon. Click on that and a dropdown will appear that gives you the option to sign in.

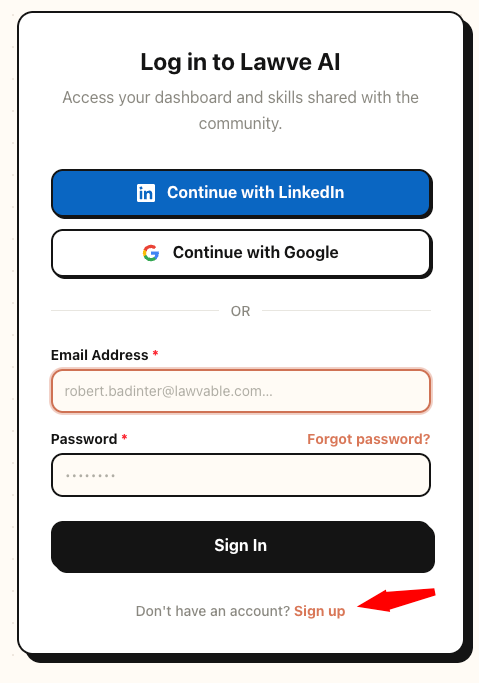
You will then see a form like this. Don't fill it out! Instead, click the Sign up link.
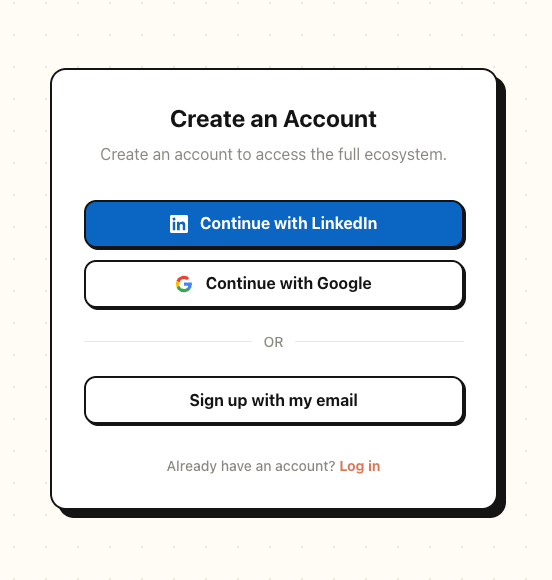
You will then get various options on how to sign up. Pick one of them and follow the conventional 2026 authorization processes.
You have now completed the prerequisites to connect Claude to these services. Now follow the instructions below.
Step 5: Adding the CourtListener and Lawve Connectors
Get yourself back to the Customize Screen as described in section 3a of this blog. But this time, instead of heading for the Plugin Mall, click on "Connect your apps" in the main panel. This series of clicks should take you back to the Directory Screen but this time the Connectors tab will have been selected in the left panel and the main panel will feature an interface – the Connector Mall – for selecting connectors. At present, the Connector Mall has only one wing, the one run by "Anthropic & Partners." It has the connectors available to you given your license. Just type the name of the connector you want into the search bar. We will start by typing "CourtListener." CourtListener is the service that has a huge collection of American case law and other legal materials. It used to be somewhat of a nuisance to access – sorry, nice people at CourtListener – but, thanks to the terrific partnership with Claude, it is now easy.
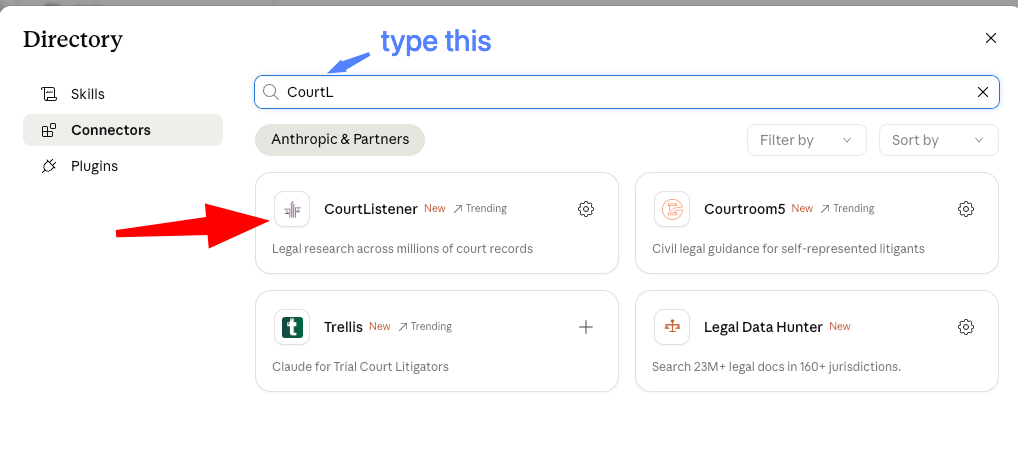
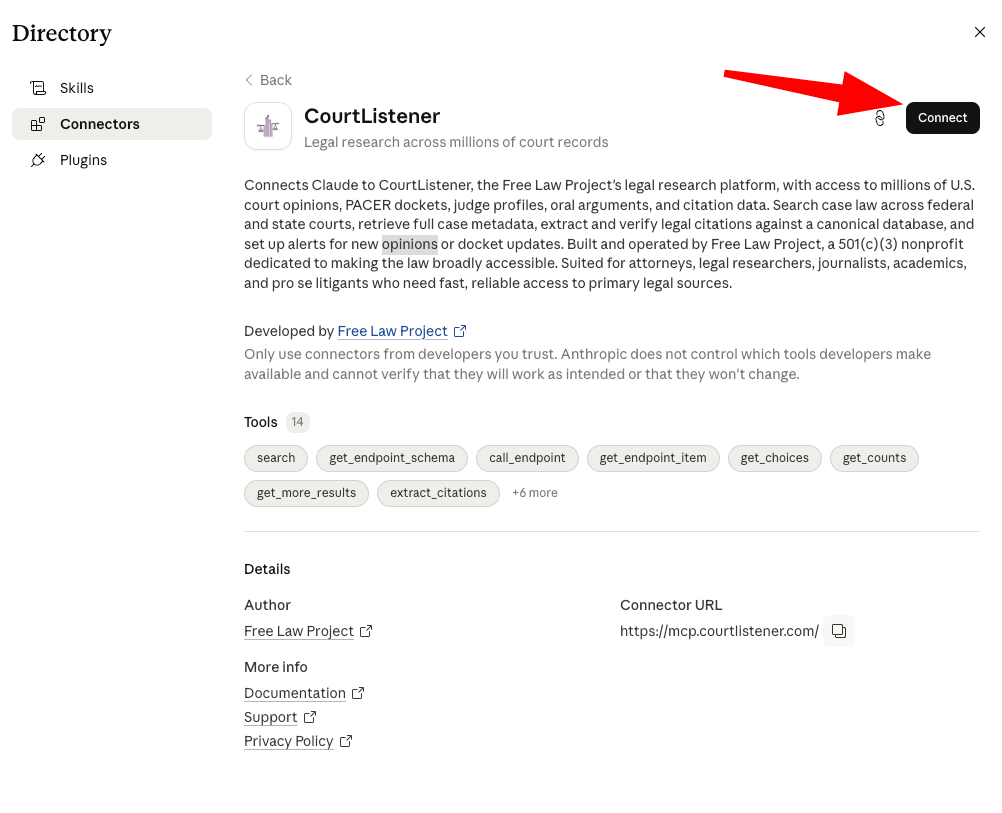
Press the CourtListener button. That takes you to a screen describing the connector. Now press the Connect button to actually connect Claude and CourtListener.
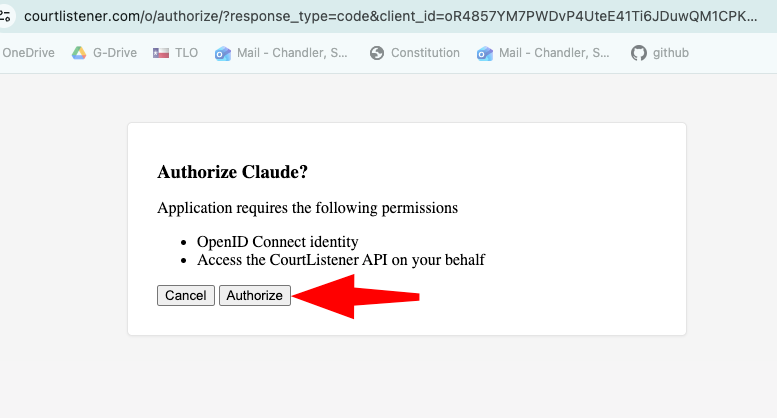
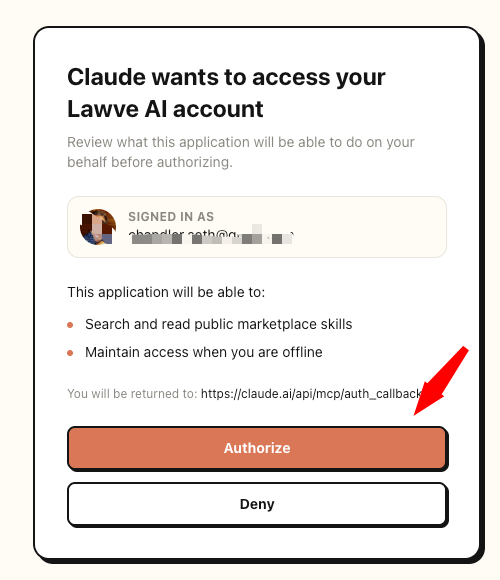
If all goes well, a new tab will open in your web browser in which you are asked to permit Claude to access CourtListener. Click "Authorize."
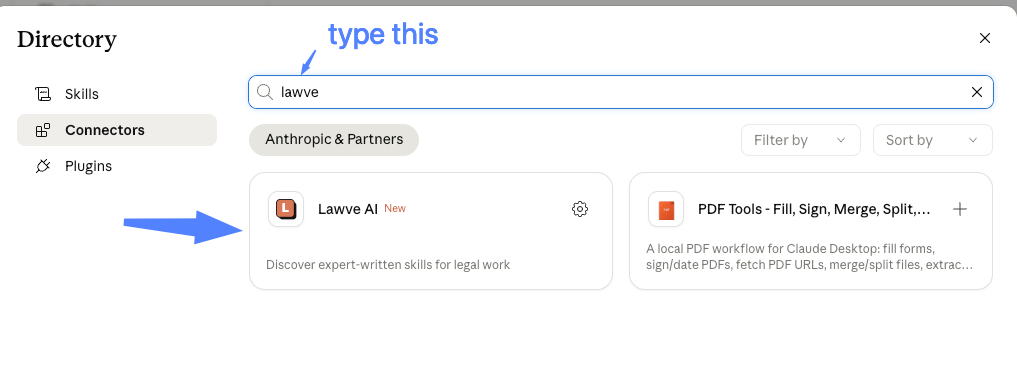
Now, if you have not already been automatically returned to the Connectors page, go back there. This time, instead of typing CourtListener, type "lawve." Lawve (formerly lawvable) is a repository of curated skills, MCPs and plugins designed for broad areas of legal practice. Want to form a company in Iceland? There's a skill for that. Want to do trendy "Tabular Review" on a document similar to what you might do in Harvey? There's a skill for that.
Once again you will need to connect Claude to Lawve. Click the Connect button.
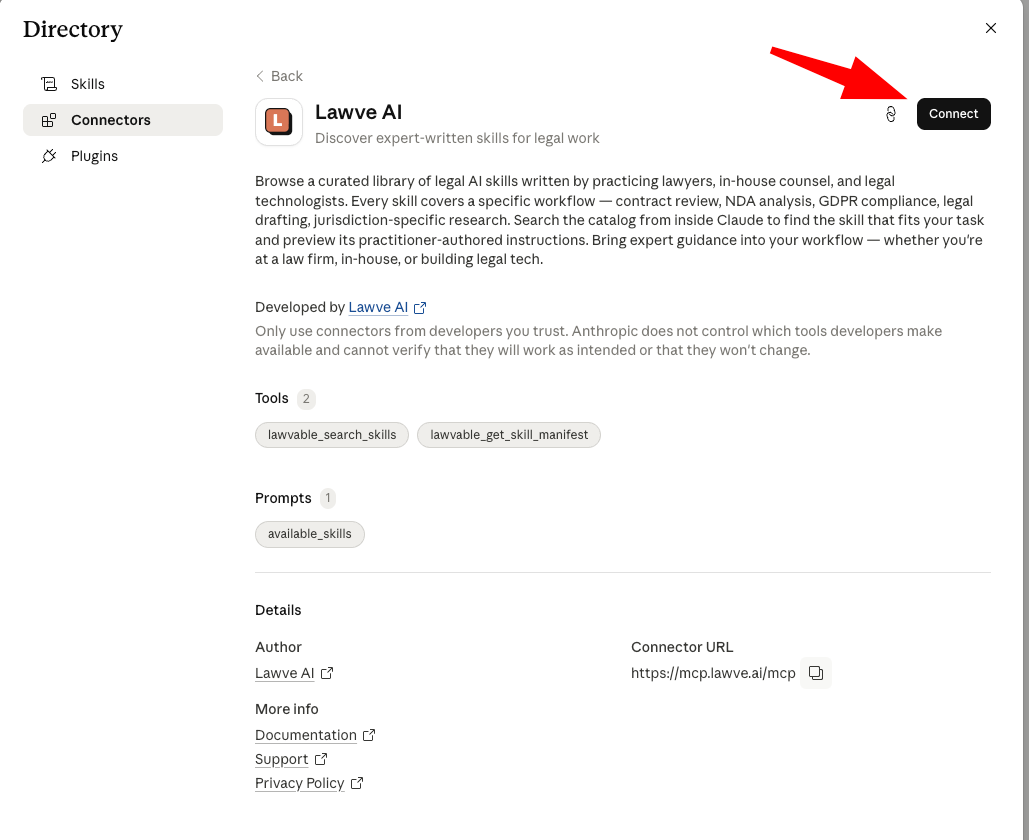
Authorize Lawve to communicate with Claude.
Step 6: Customizing Connectors
It's probably a good idea to customize the CourtListener and Lawve connectors. Get yourself back to the Customize Screen but this time, instead of clicking in the main panel, which would take you to the Directory, click the Connector icon in the left panel. I've circled the correct icon in the screen capture below.
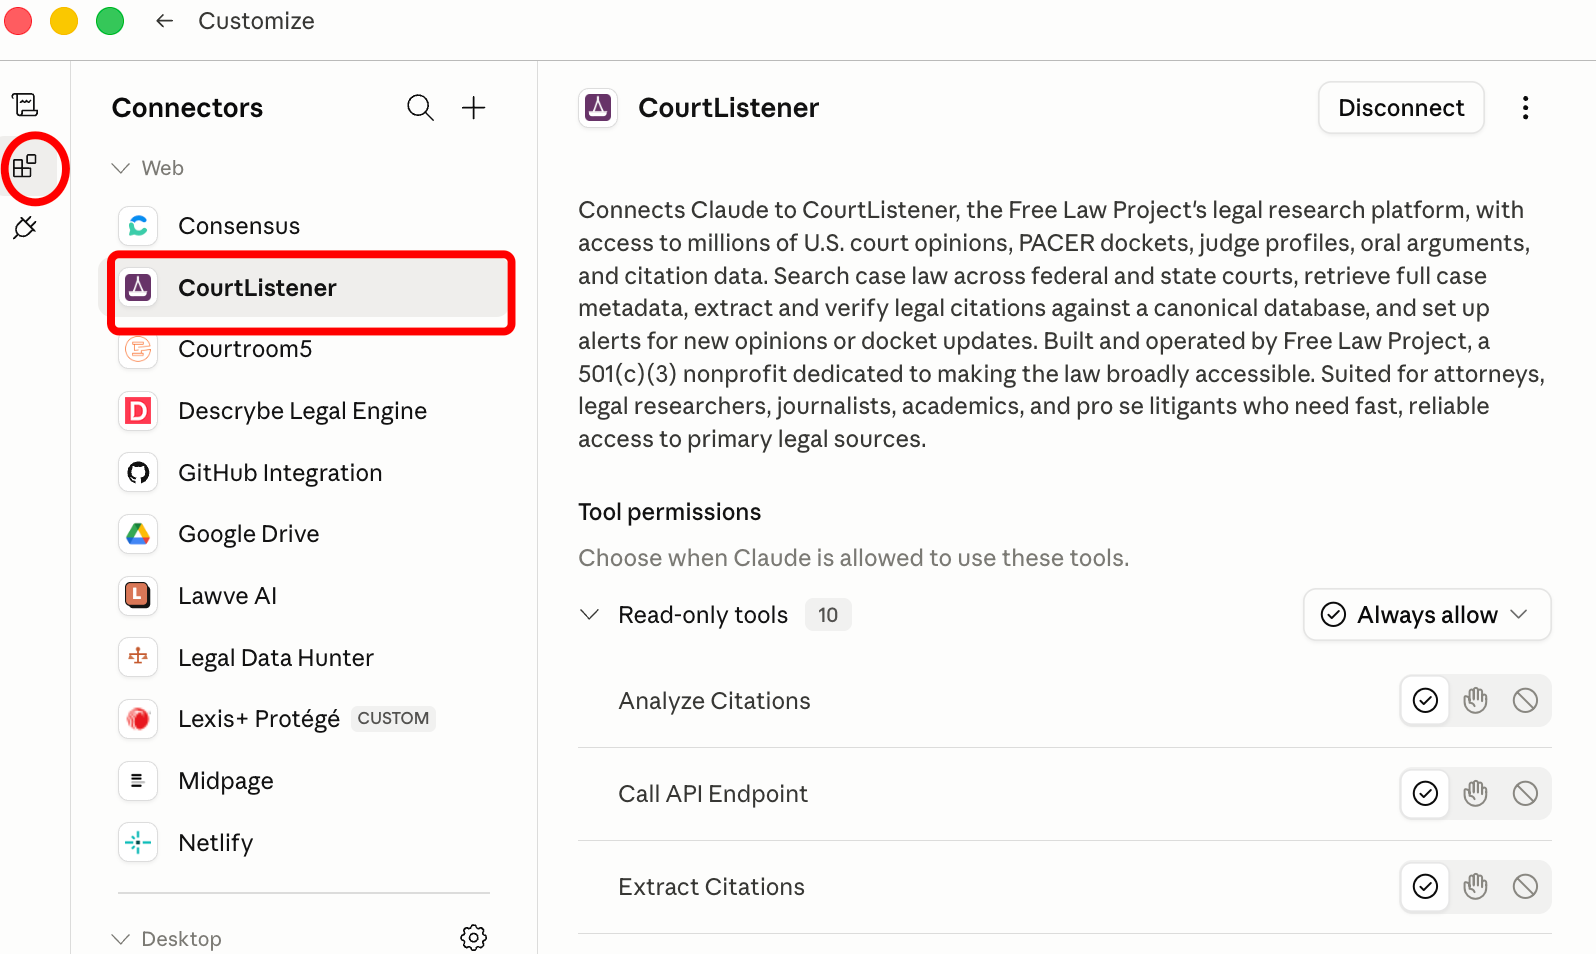
And then click on CourtListener if that is the connector you want to manage. You should now be at a screen that gives you the option to disconnect the connector, to remove the connector altogether (use the three dots at the top right) or to change the permissions given to the various tools the CourtListener connector currently provides. The latter option is the one we want here.
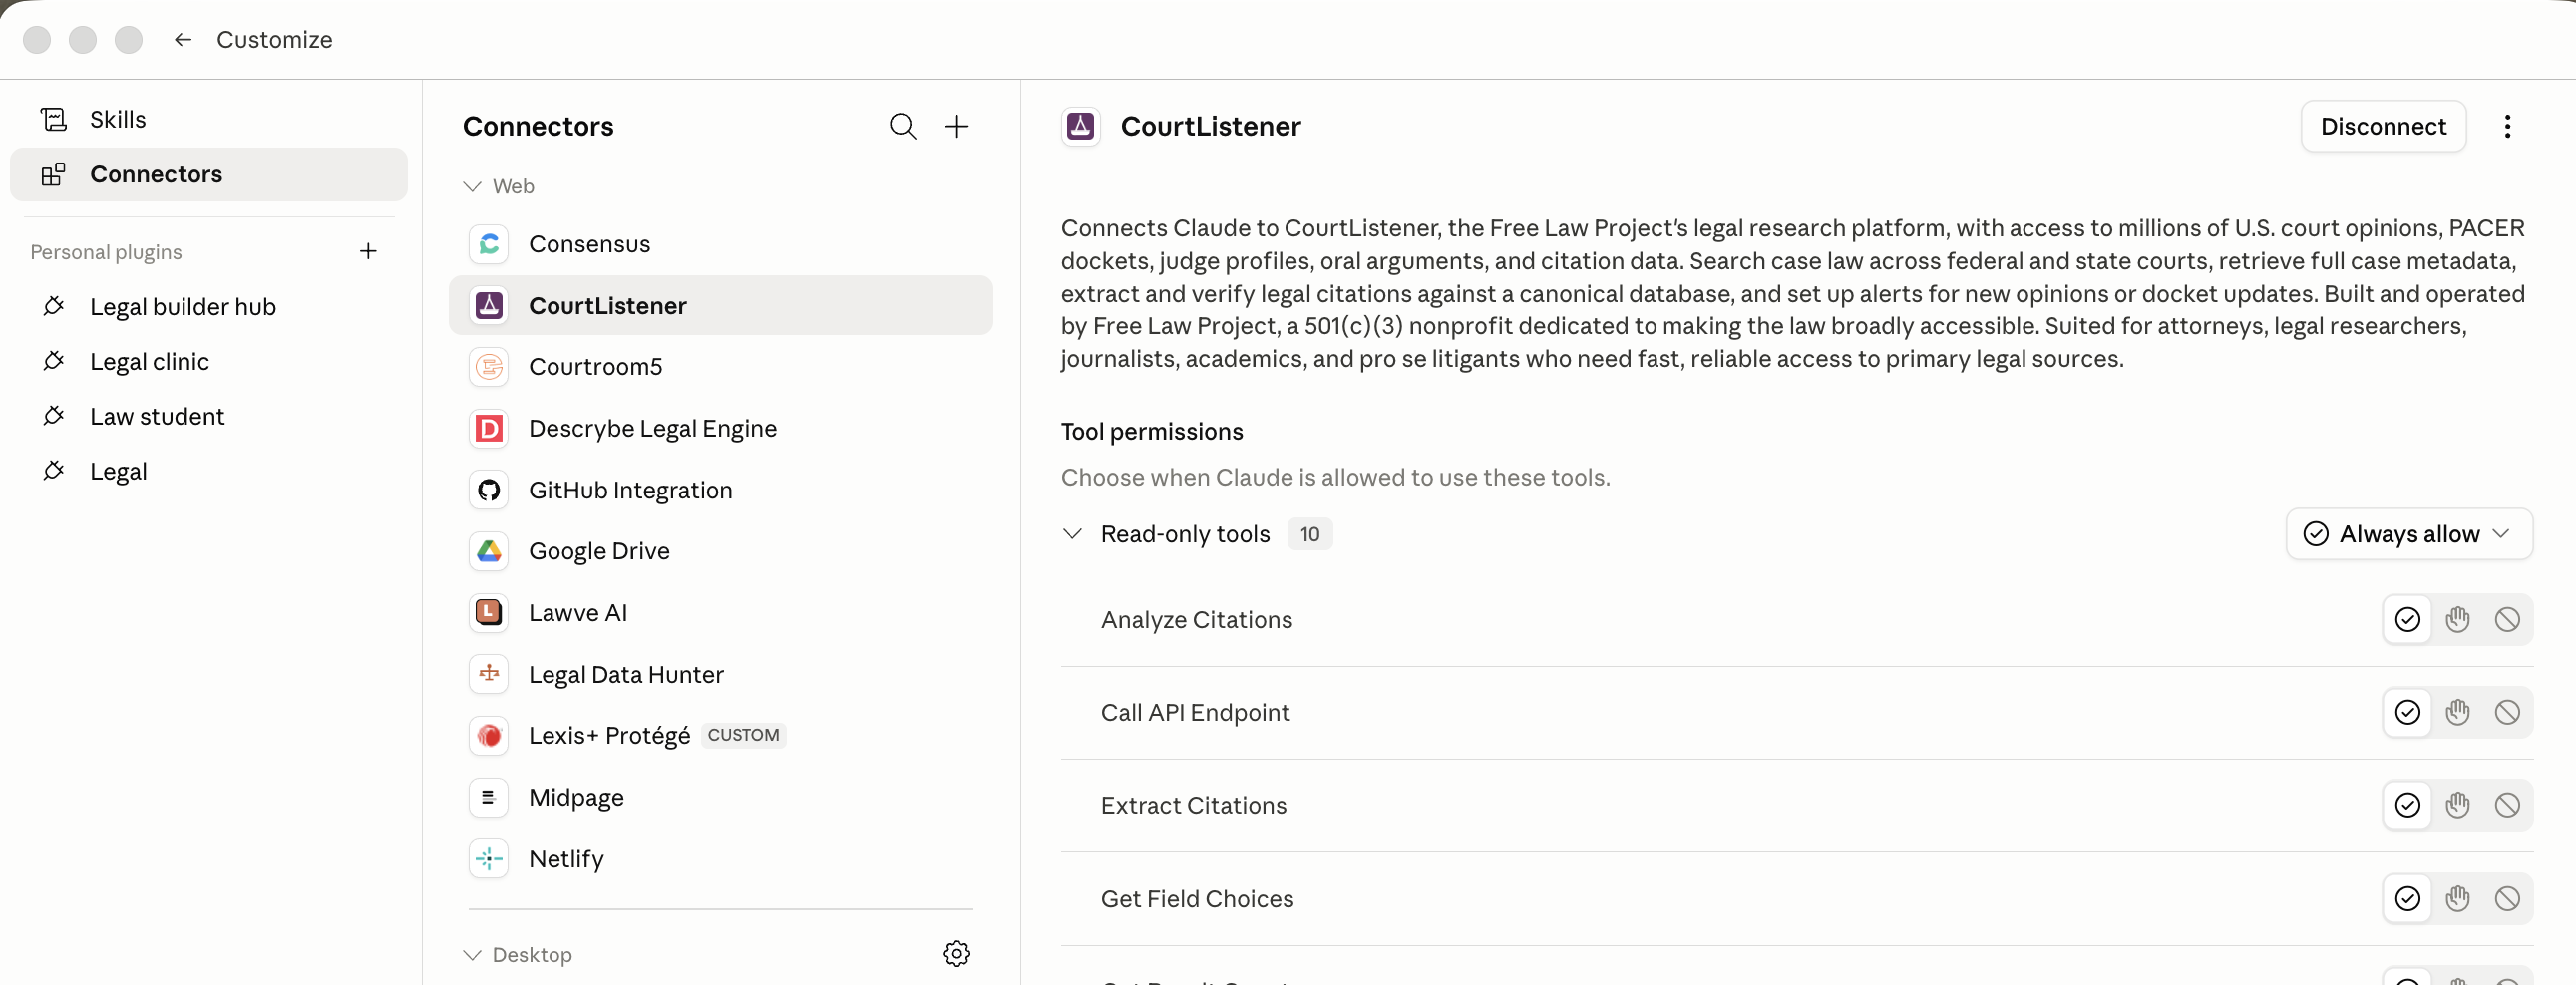
You can see that by default, for most tools you have to approve certain actions each time. You might like the extra sense of security this approval barrier creates. Or, like me, you might be more trusting. If so, click the little "Always allow" icons on the left.
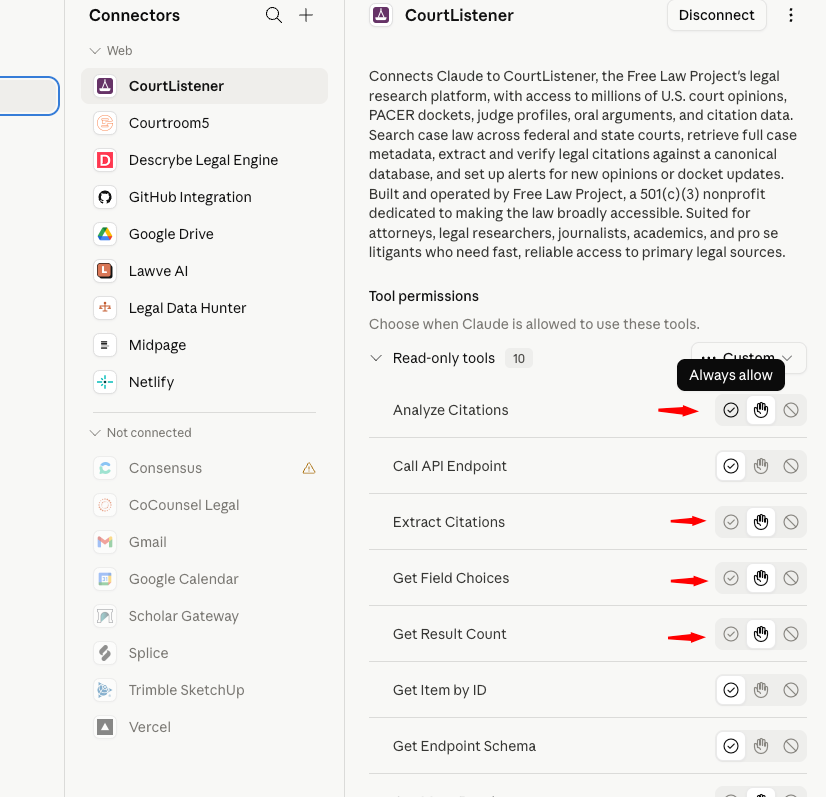
So that you end up with something like this.
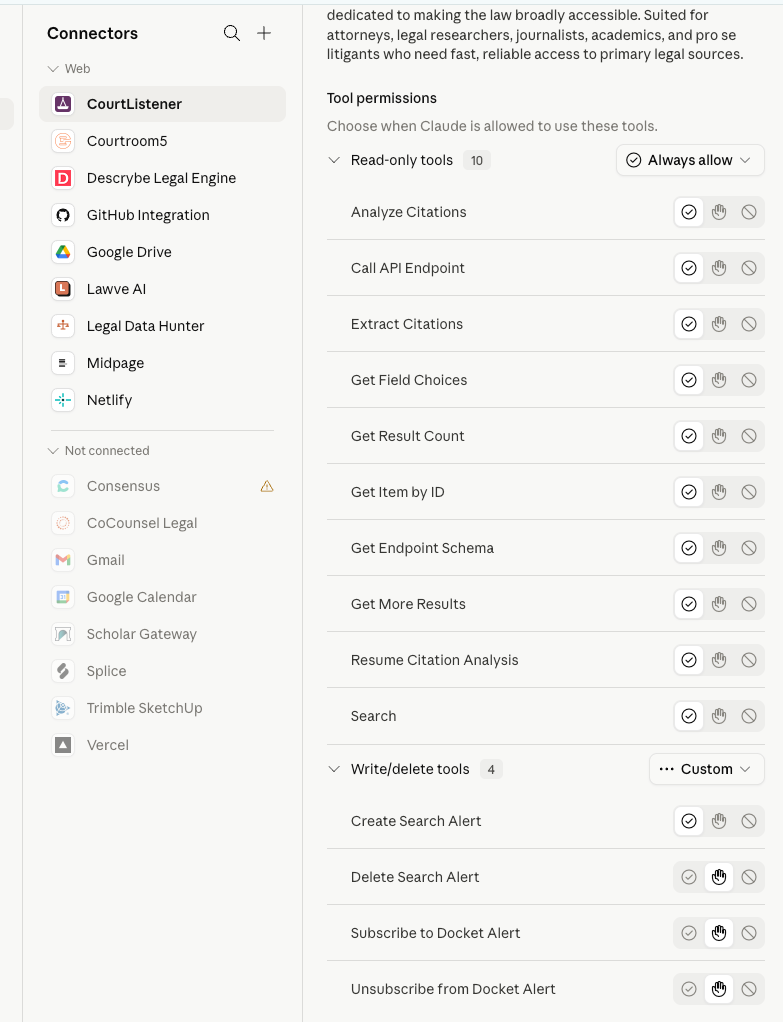
You can do the same thing for the Lawve connector. Just get back to the Customize Screen, click on the manage connectors icon in the left panel and then select the Lawve connector. Alter the tools' permissions as you see fit.
Congratulations. You are done with installation of new features in Claude for Legal.
Step 7: Adding Skills
There aren't presently any stand-alone skills that are specifically part of the Claude for Legal initiative, but it's still worth knowing how to customize Claude to add skills. Again, go back to the Customize Screen and this time select "Create new skills" in the main panel. You will then be at a combination screen that lets you manage existing skills and add new ones. Here's what mine currently looks like. (I have a lot of skills).
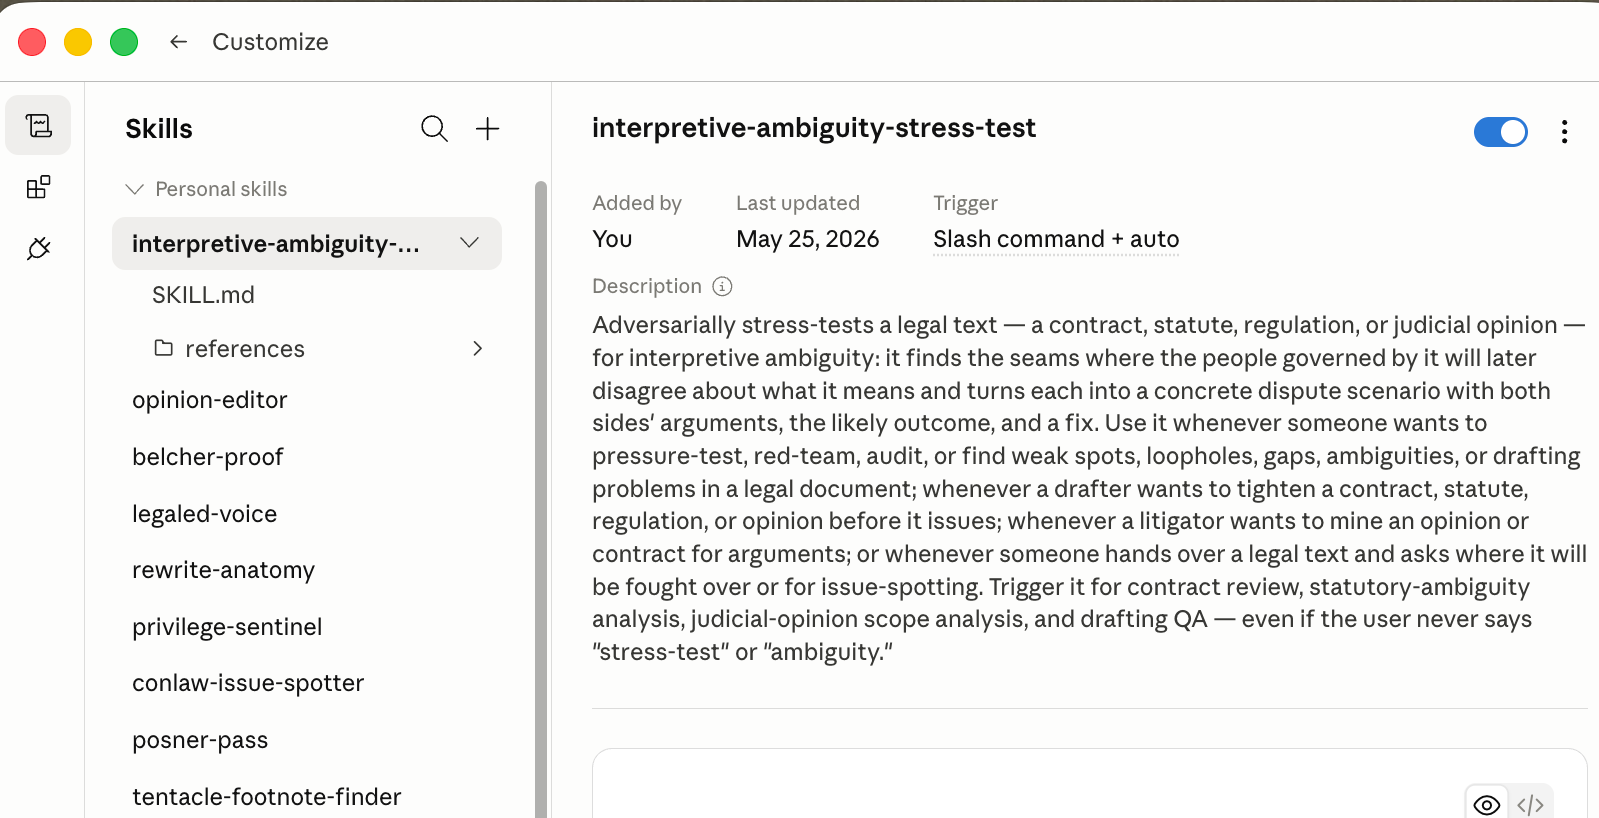
Let me first cover how to add a skill. Just press that little plus button.
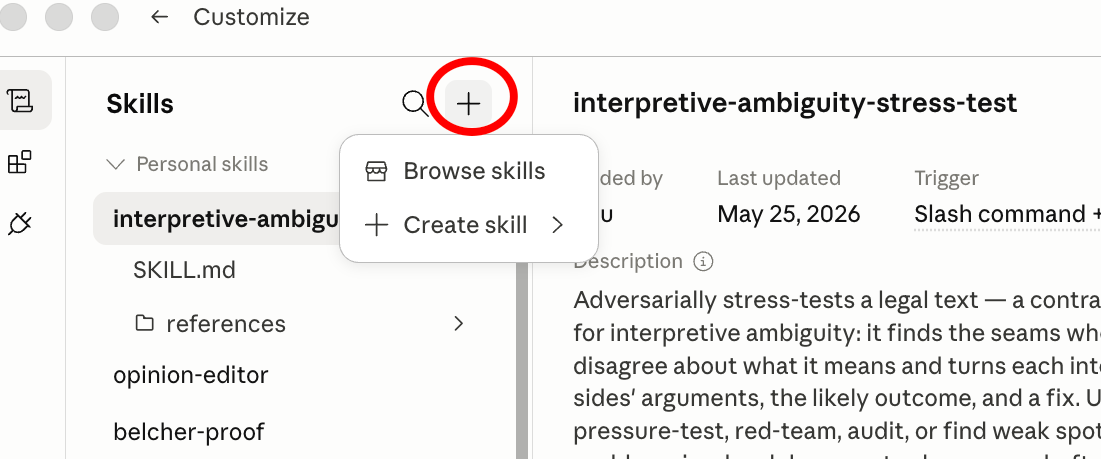
Then press Browse skills. You will get to the skills department of the Directory. Right now, there is only one marketplace: Anthropic & Partners. Here you will see a variety of general-purpose skills available. These include the very meta skill-creator skill that helps you create new skills.
You can, however, greatly expand the universe of available skills by pressing Create skill instead of Browse skills. Now you can use Claude itself to create a skill, try writing a skill yourself (not recommended for non-experts), or just upload a skill that you have acquired in some other way.
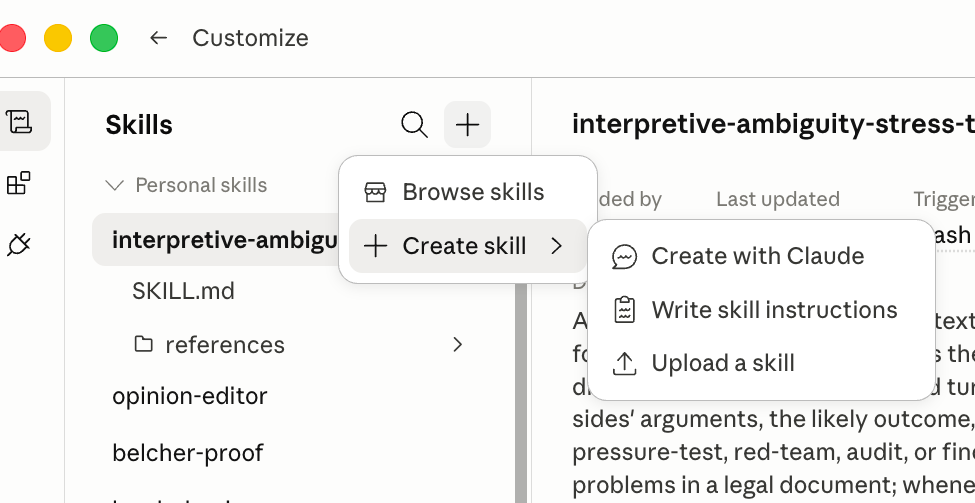
You can manage skills that you have acquired. The screen capture below, for example, shows some options with respect to a skill I have drafted called "tentacle-footnote-finder."
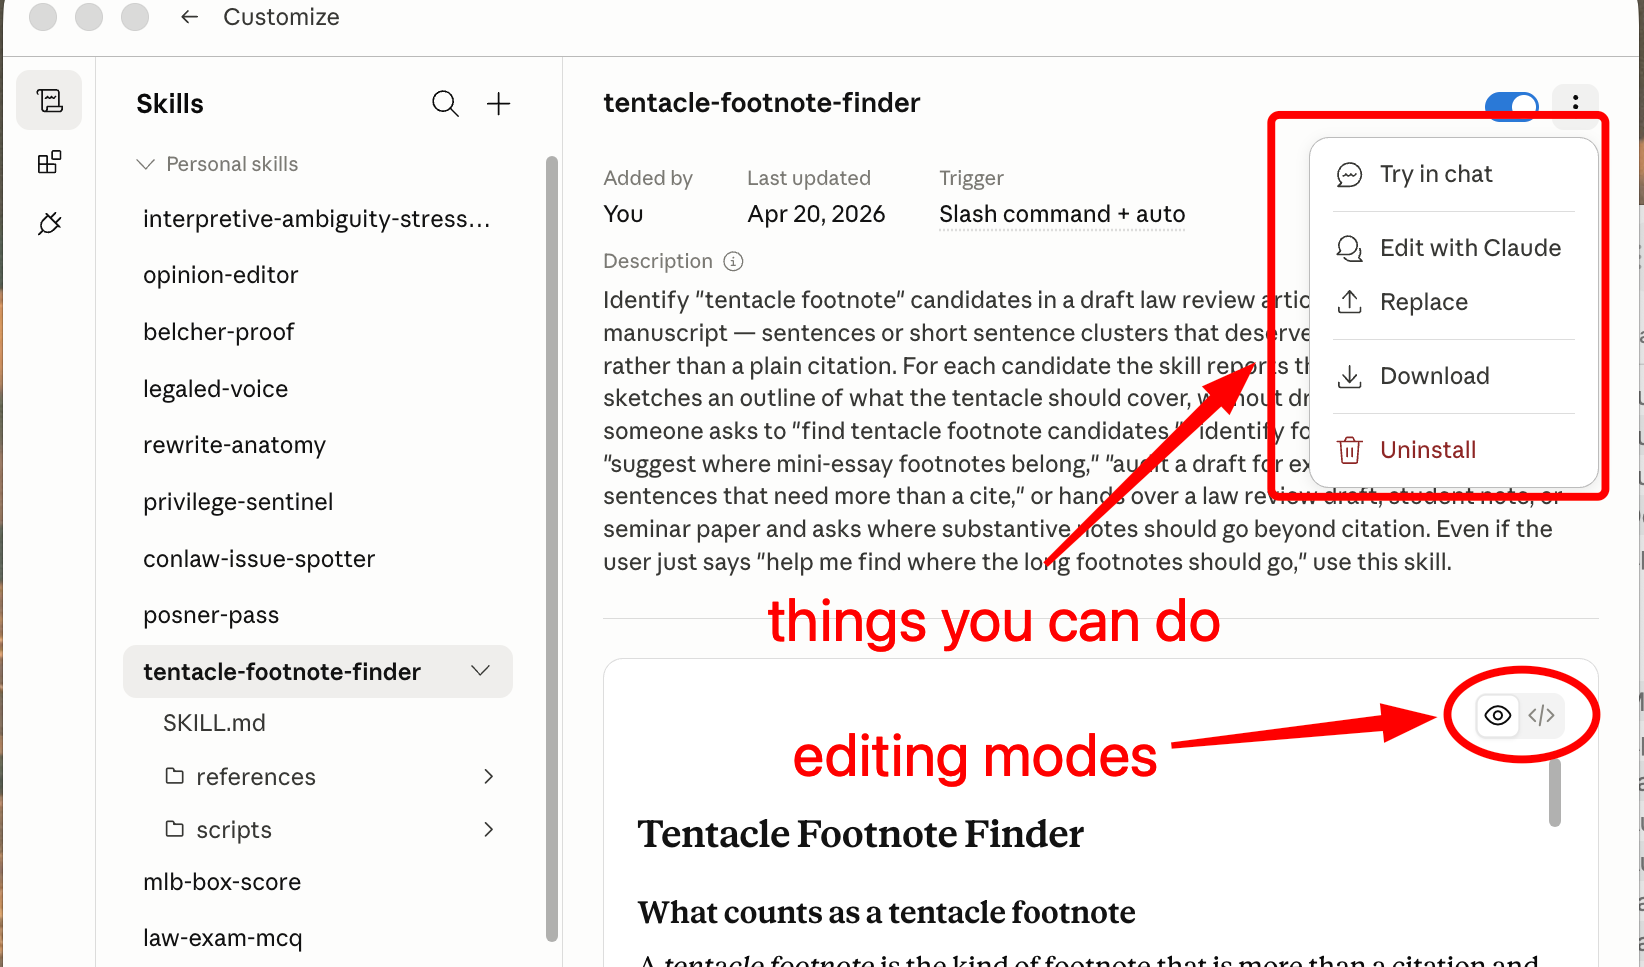
The three-dot menu at the far right exposes a number of ways you can use, modify or deploy the skill. And the "eyeball" and "code" icons I have circled let you directly edit the skill in two different modes.
Using Plugins and Connectors
That was a lot of work. Now let's make use of our investment. First, let's use the Law Student plugin. I want one of its skills, so I start by pressing the forward slash key and then start typing "law st..." By the time I get this far, Claude understands I want one of the Law Student skills and offers me some auto-completion options. I pick the socratic-drill skill by clicking on it.
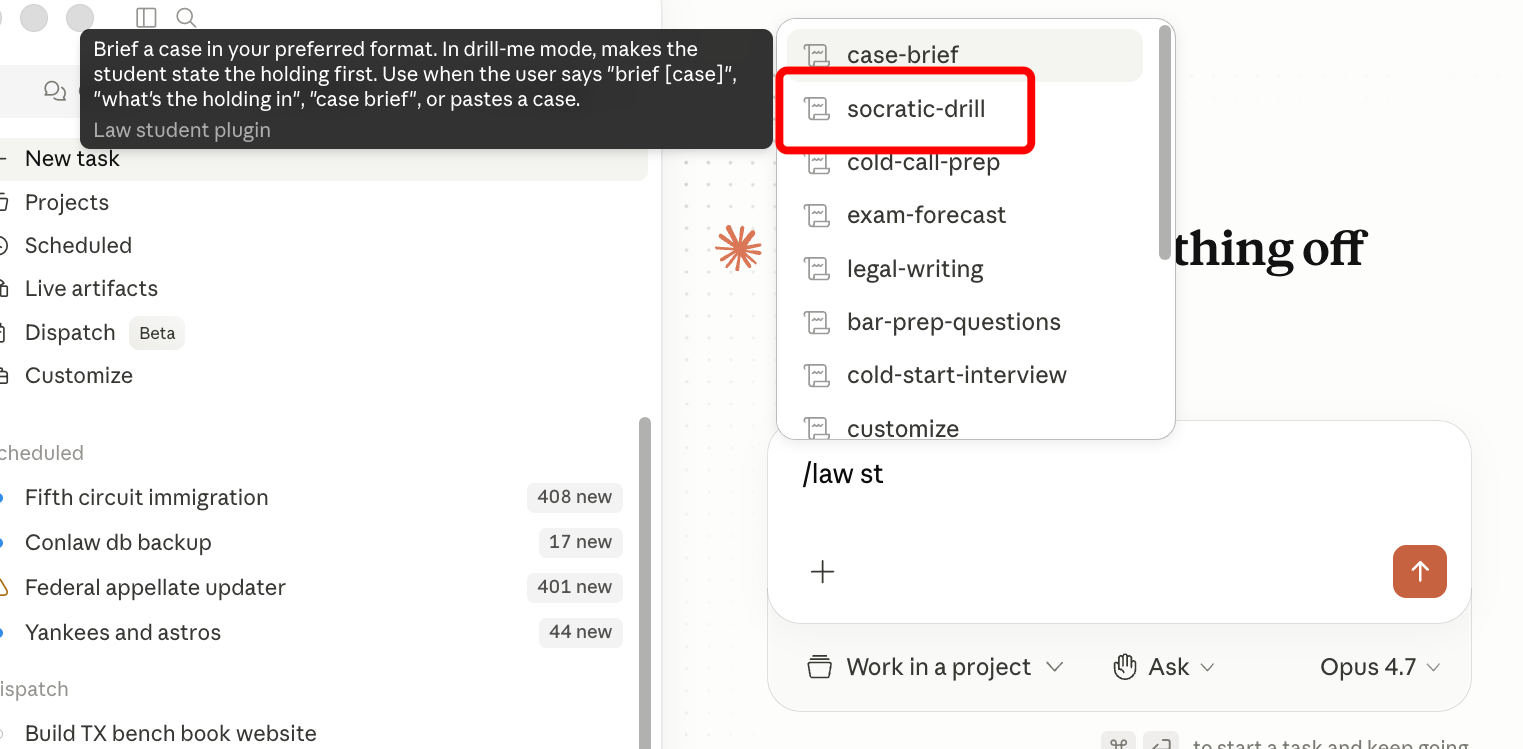
Claude confirms that I have the skill in use by writing it in blue. I can then type whatever I want to be tested on. Here I ask for a socratic drill on presidential emergency powers with an emphasis on Learning Resources v. Trump.
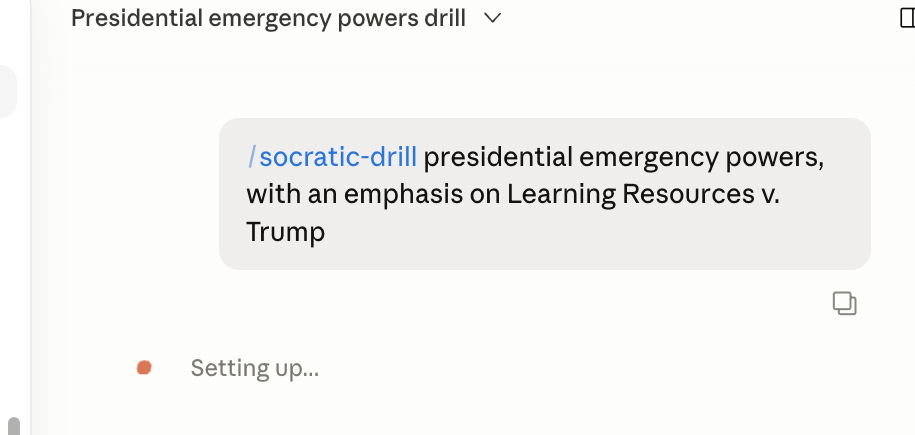
Claude then plays law professor and asks me to respond as a law student. (This is exactly the sort of educational activity that the Berkeley law policy prohibits by default in many classes).

Now let's use a connector and combine its output with a skill. Notice there's no special syntax that I know of for requesting a connection. You just ask. And sometimes, even if you don't ask, Claude is smart enough to figure out that you really need a connector.
Use the CourtListener connector to find Fifth Circuit cases from 2000 to 2003 dealing with Texas insurance law. The use the /case-brief skill to brief the most recent case that was retrieved.
Claude responds by letting you know it is loading up tools from CourtListener.
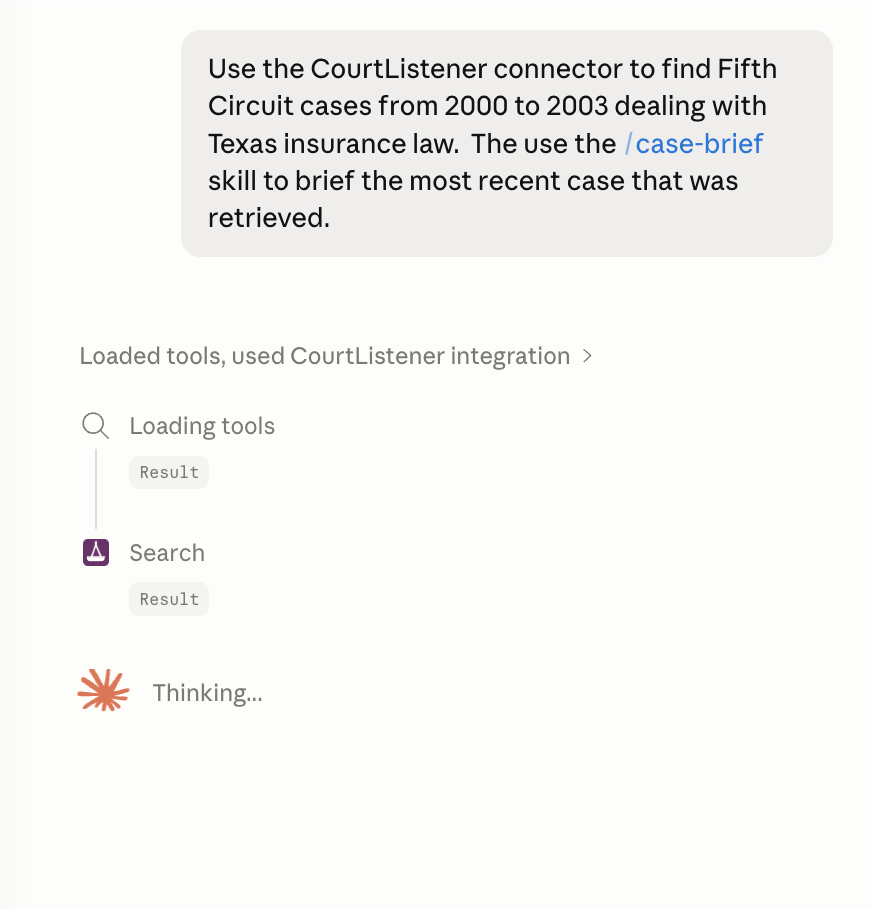
It gives a progress report.
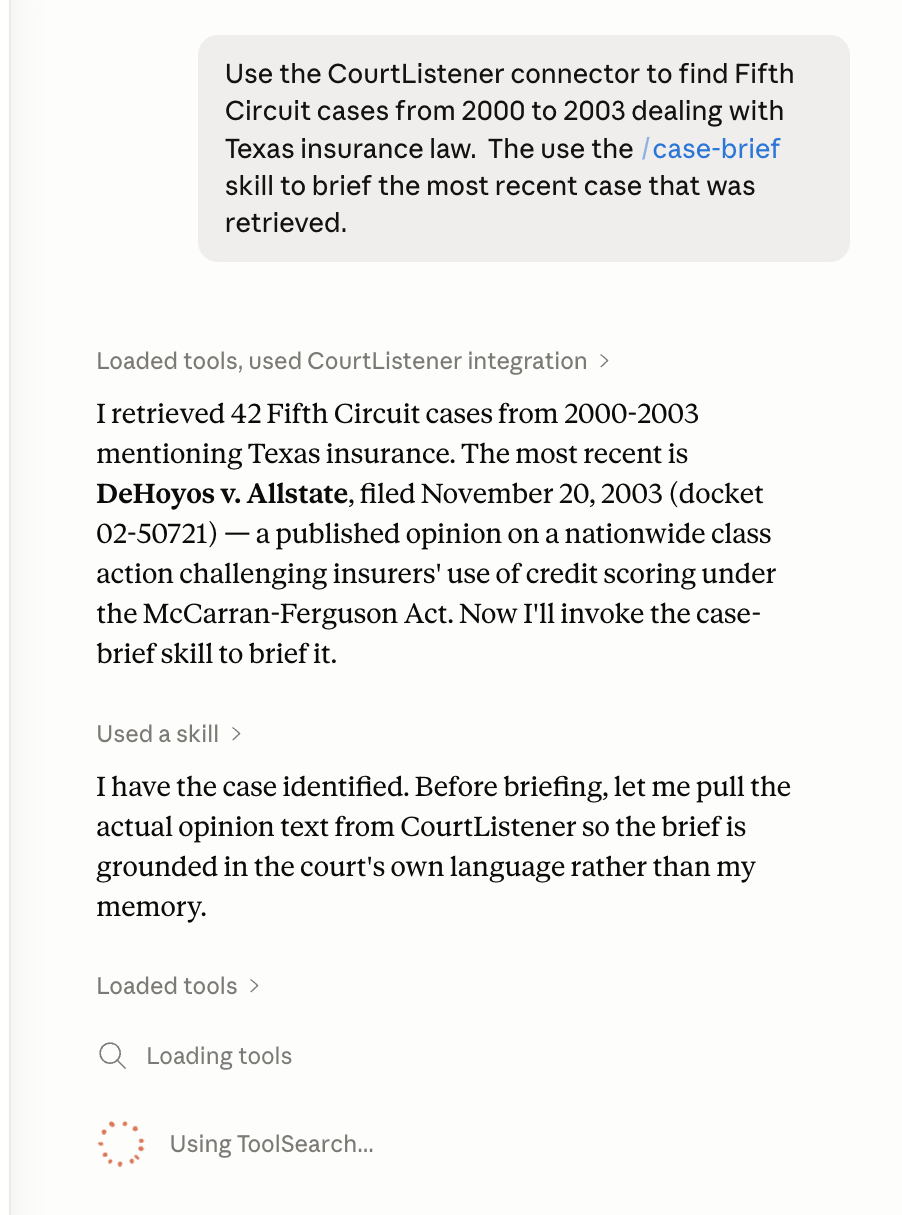
And then invokes the Law Student:case-brief skill to explain the case to me. (Again, an activity that could result in discipline at Berkeley if I did this in preparation for a class or as part of "Conceptualization" for a paper. Just saying.)
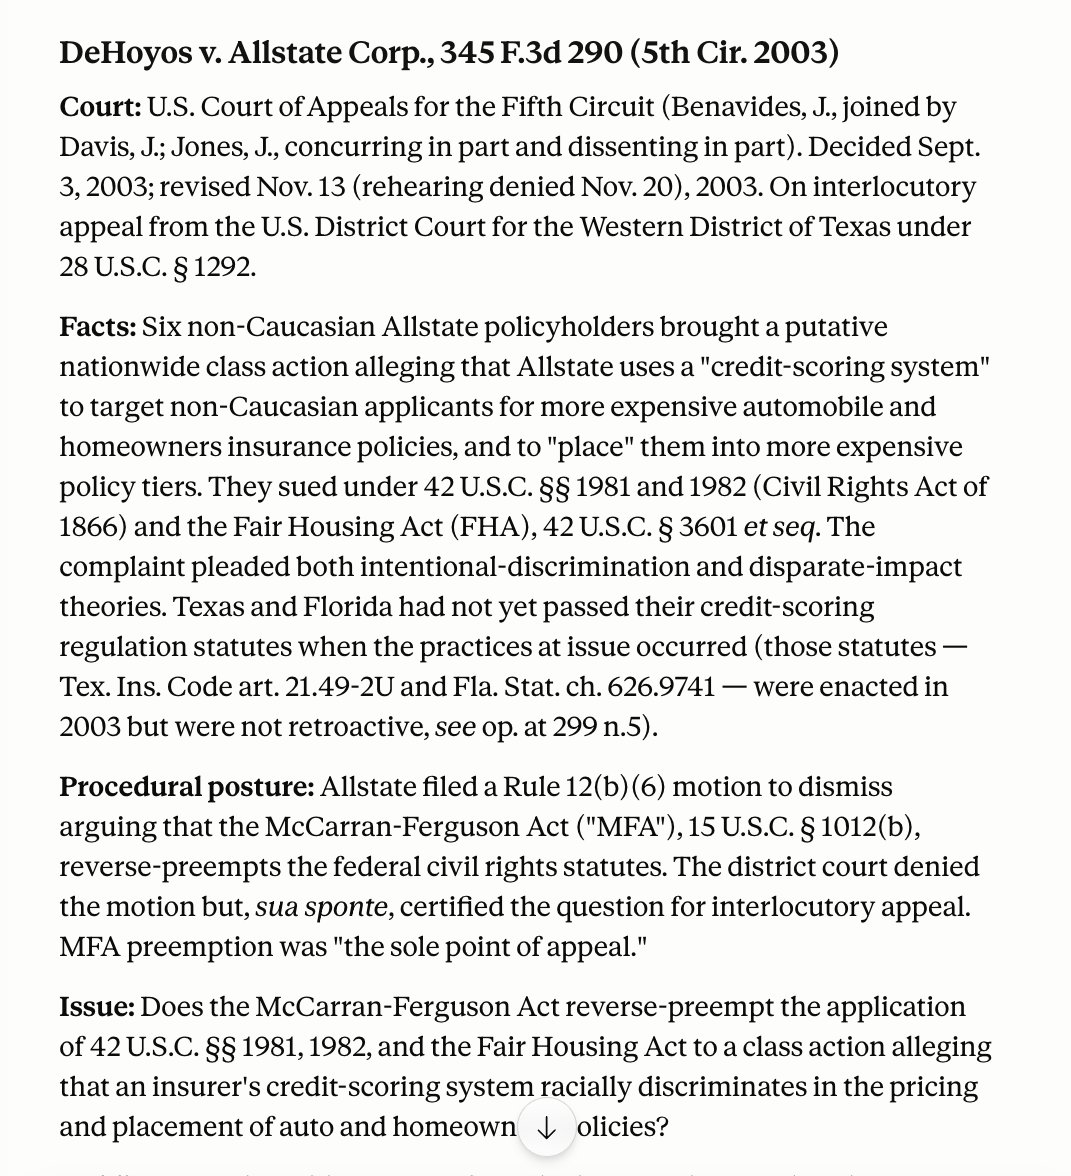
Here's a screen capture of part of the brief produced by Claude.
Let's also use the Lawve connector. It has the Opposing Counsel review skill inside it. I can't call it directly with a slash command because it isn't on my system. So watch how I do it. I write:
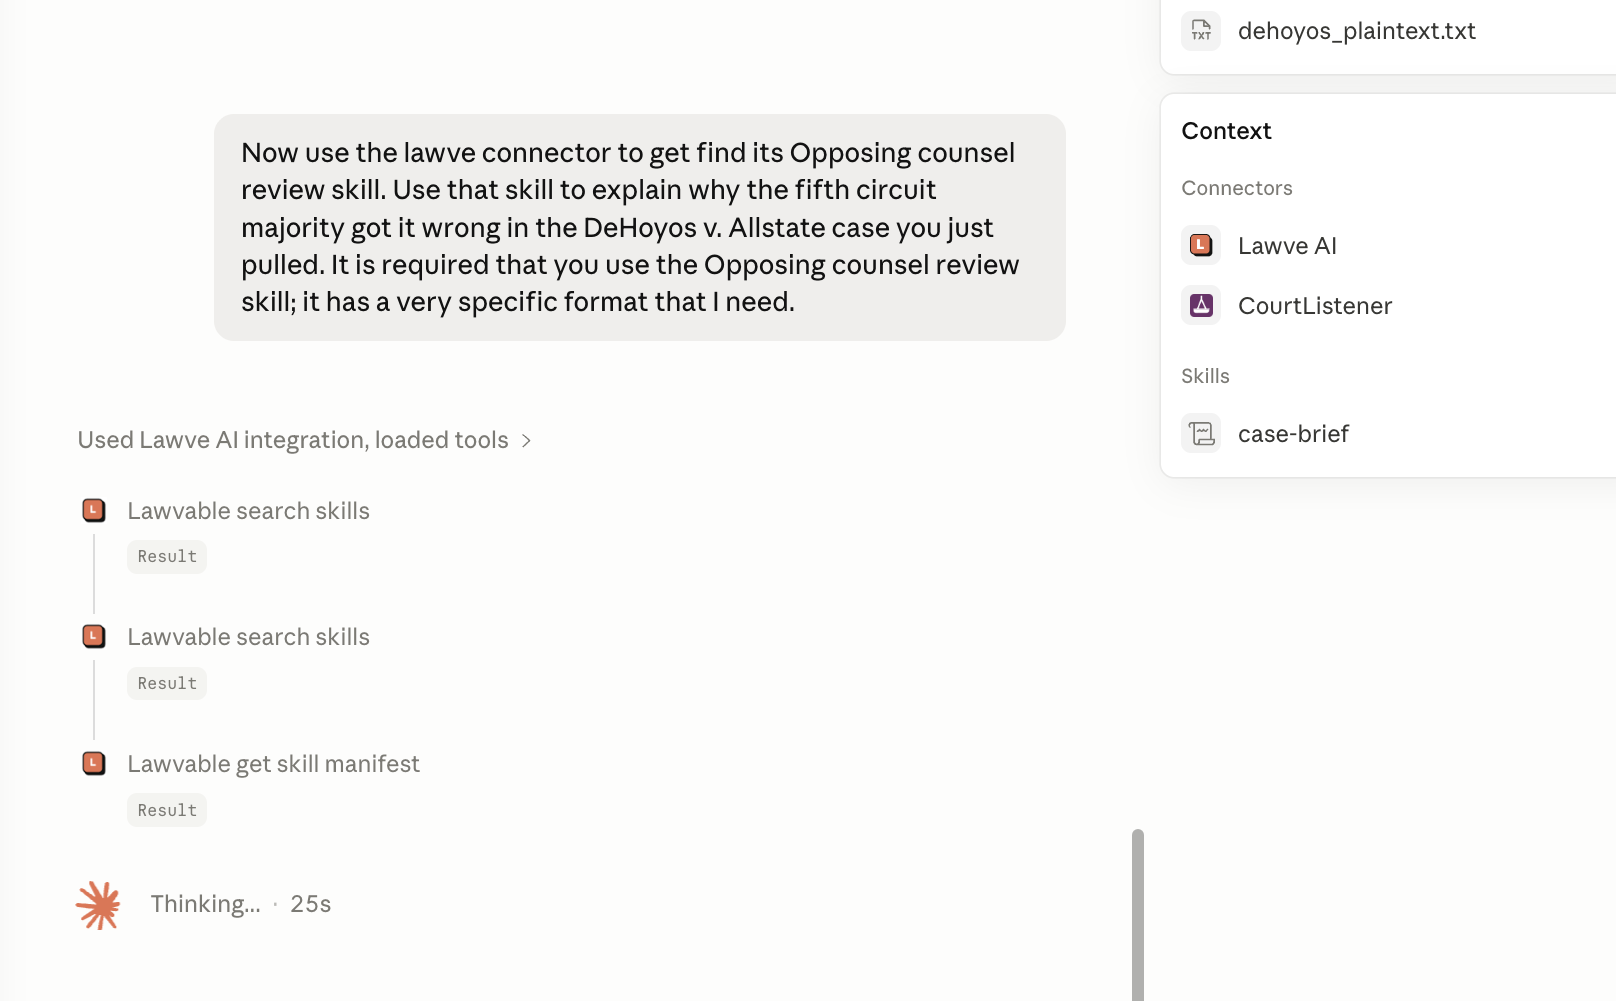
Now use the lawve connector to get find [sic] its Opposing counsel review skill. Use that skill to explain why the fifth circuit majority got it wrong in the DeHoyos v. Allstate case you just pulled. It is required that you use the Opposing counsel review skill; it has a very specific format that I need.
You can see Claude connecting with Lawve and searching its skills. You can also see a Context panel on the right showing that Claude is using both the Lawve AI connector and the CourtListener connector.
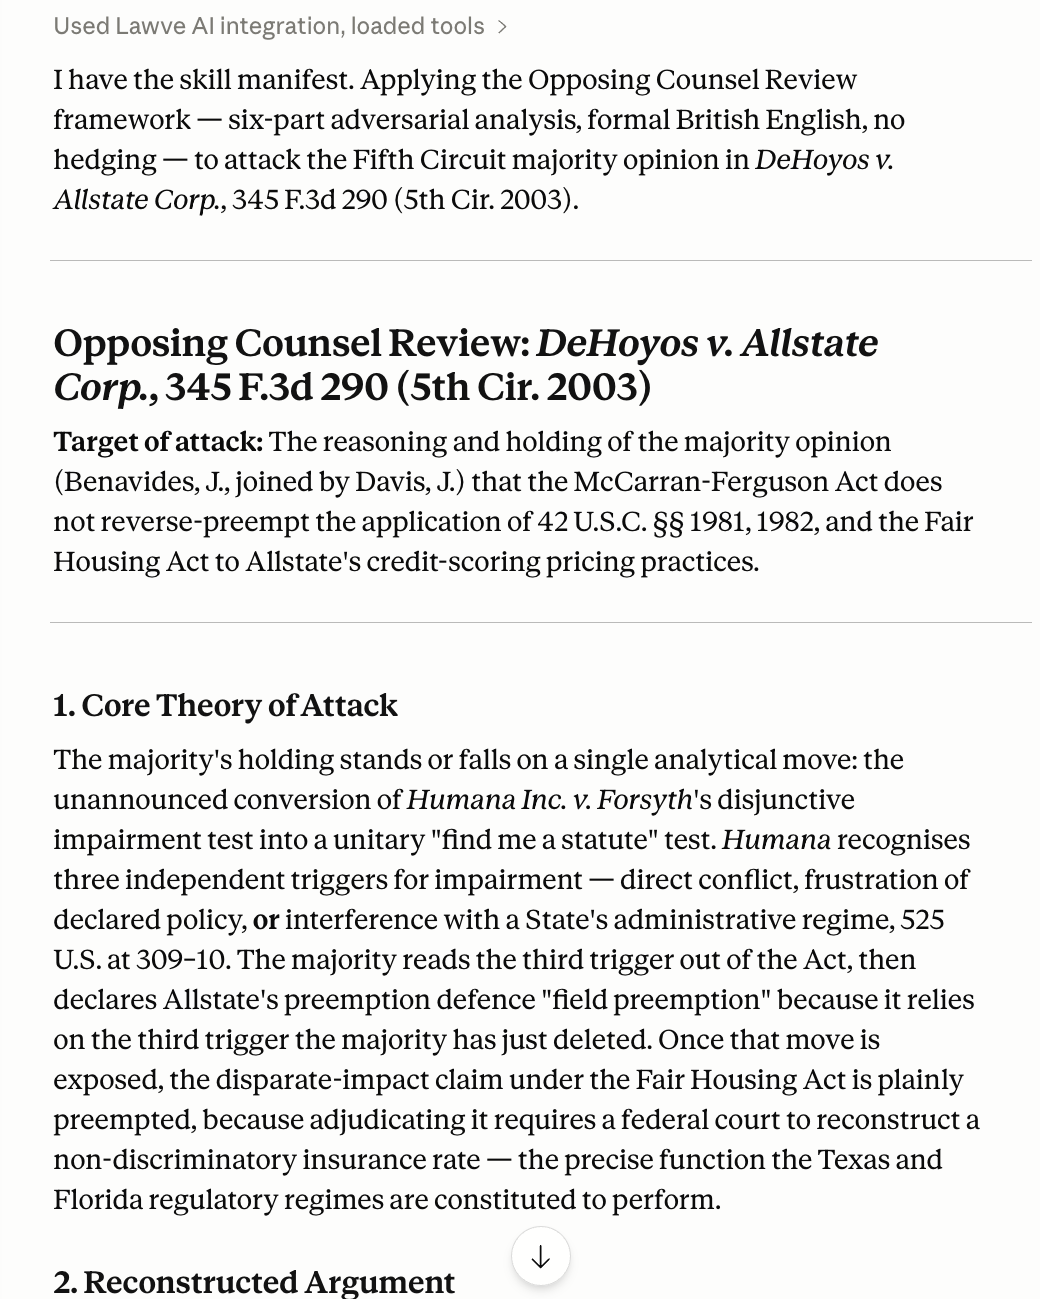
After a few minutes, Claude explains why the Fifth Circuit might have gotten it wrong in the format required by the skill.
Conclusion
The walkthrough above demonstrates something more important than any single skill or connector. It shows that grounding a frontier model is no longer an unsolved problem. Skills tell Claude how to act. Connectors give it the data it needs to act on. Plugins bundle the two together. And — this is the part that matters — they stack. Pull a Fifth Circuit case from CourtListener, brief it with a Law Student skill, dismantle it with the Lawve Opposing Counsel skill, then drop the result into a PowerPoint or hand it off to a different model entirely. The legal-AI startup pitch from 2023 — "the model is dumb, but our wrapper is smart" — has quietly inverted. The model is now the smart part. The wrapper is the bottleneck.
That inversion is why I often prefer working directly inside Claude rather than inside specialized legal applications like CoCounsel. CoCounsel and its competitors do useful work (and sometimes work that cannot be replicated inside Claude), but each is often a walled garden: a curated set of tools, a curated workflow, a curated output format, and — most importantly — a model selected by the vendor on a cost-versus-capability tradeoff that may not land where I need that day. Inside Claude, the reasoning engine is the current frontier model. The same model that briefed the case attacked the case, and the same model that attacked it can draft the memo, build the deck, and read the spreadsheet — without leaving the chat. Skills, connectors, and plugins make grounding additive. Add a connector, Claude sees your data. Add a skill, Claude knows your workflow. Add a plugin, you get both. Nothing has to be re-implemented for each new task; everything composes.
What this means for legal education: we are no longer choosing between a powerful model that cannot see our materials and a weaker tool that can. We can have both. And if this blog post does its job, the path to having both is about a thirty-minute setup.