
Use AI to make and use flashcards

Legal education has an AI problem. With generative AI making take-home work nearly impossible to authenticate, law schools are retreating to closed-book assessments. This shift demands what legal education has spent decades moving away from: memorizing black-letter law and course content. Enter flashcards, suddenly relevant again after years of obsolescence. But irony lurks. The same technology now disrupting legal education can also help solve the practical challenge it creates."
This blog entry shows how to use AI to generate high-quality flashcards. You can then use these flashcards on popular apps like Anki or, even better, on the simple, free, privacy-preserving app available to subscribers of this blog.
Table for Flashcard Types
Given the ease with which, as shown here, AI lets you produce and use custom cards, students (and professors) should think creatively about how much can be done with the venerable flashcard. It's a simple two-sided structure in which each side can contain only a limited amount of information. Still, there is a lot you can do. The table below provides a list of 18 possibilities. I've saved a file containing a more elaborate version of this table (with examples) here so you can modify it as you see fit.
| # | Card Type / Category | Front of Card | Back of Card |
|---|---|---|---|
| 1 | Description | Name and year of case, statute, regulation or legal event. | Concise description of the case facts, holding, or legal principle established. For non-case material, a concise description of provisions and import. |
| 2 | Inaccuracy | A statement of a legal rule (constitutional, common law, statutory, regulatory) containing a deliberate mistake or inaccuracy. | The corrected rule of law with a brief explanation of the error on the front. |
| 3 | Naming | An evocative description of a case, statute, regulation or other legal event. | The name of the case and its year or decade, |
| 4 | Flaw | A flawed short legal or factual argument. | The primary logical, legal, or doctrinal problem with the argument on the front. |
| 5 | Bad Statute | A misstatement or incomplete quotation of a statutory provision. | A list or description of the misstatements or omissions from the front. |
| 6 | Objection | Description of proposed testimony, physical evidence, or a courtroom action. | The most likely objection (e.g., hearsay, relevance) and its likely disposition. |
| 7 | Policy Rationale | A specific legal rule or doctrine. | The underlying policy reason or justification for the rule's existence. |
| 8 | Nearest | A fact pattern. | The case or statute that most closely resembles it. |
| 8 | Test Elements | The name of a specific legal test. | The elements or prongs of the test. |
| 9 | Terminology | A legal term of art. | A concise definition of the term and its area of law. |
| 10 | Interpretation | A specific, ambiguous phrase from a statute, contract or regulation and a brief factual context. | The likely judicial interpretation of the phrase, citing a relevant canon of construction. |
| 11 | Remedy | A short fact pattern describing a legal wrong | The most probable remedy a court would grant. |
| 12 | Distinguishing Cases | The names of two similar, often confused cases. | The key factual or legal distinction that separates the two cases' outcomes or reasoning. |
| 13 | Factual relevance | A type of a case and a fact | How the fact is relevant |
| 14 | Computation | A fact pattern for which there is a numeric answer such as tax owed or damages. | The correct numeric response. |
| 15 | Quotation Source | A famous quotation from a case or statute. | The case of statute from which the quotation comes. |
| 16 | When | When did an event happen, a case get decided, a statute enacted, a constitutional amendment passed, | The year of the event; also provide a decade or period, |
| 17 | Who | Who did something, can be a court, a justice, a jurisdiction. | The identity of the court person or jurisdiction, |
| 18 | Jeopardy | A question in the style of those asked on the famous television quiz show. | An answer in the form of a question, please! |
Producing the Flashcards
AI Produces the Deck
Now let's create a flashcard deck using AI. If you already have a flashcard deck exported as CSV from Anki or other programs or just enjoy whipping up CSV files on your own, skip this step. First, choose your AI model—I recommend using the best one available to you, including a Deep Research model if you're covering extensive material. Then use the sample query below. It consists of a baseline part with general instructions and a custom part that you will vary depending on your needs. If you want to piggyback on my work describing types of flashcards, you also need to upload the file containing flashcard types with examples. The base template is stored in this Google Doc. Or, if you want to use ChatGPT, it is available within this CustomGPT. You don't need to upload the flashcard type file or provide the base template. It is all included.
Baseline Part
Task:
Create the number of flashcards I specify at the end of this prompt in a CSV-like string based on the materials and/or topics set forth below per the instructions I provide at the end of this prompt. Except as I may set forth at special instructions at the end of this prompt, the flashcards should be a mix of the types of cards identified in the attached document. Use the examples in that document to help you form good questions and answers.
Output Requirements and Constraints:
Exclusive Output: The only output should be a single code block containing a CSV-like string. Do NOT provide any introduction, summary, or any other text outside of the code block.
CSV Structure: The CSV string must contain exactly two columns.
Column 1: This column must contain the "Question." It should be formatted as a single string, enclosed in double quotes, that combines the card type and the question itself, separated by a colon and a space. Do not use Markdown or other formatting unless specifically requested.
Column 2: This column must contain the "Answer." It should likewise be formatted as a single strong, enclosed in double quotes. Do not use Markdown of other formatting unless specifically requested.
80-words of fewer. Neither Column 1 nor Column 2 may contain more than 80 words. Usually, they will contain far fewer.
Style for answers:
Tense: Present tense (e.g., "Upholds" instead of "upheld")
Grammar: Concise sentence fragments or simple sentences, omitting unnecessary words
Content: Focus on key points and outcomes, avoiding extraneous details
Tone: Neutral, objective tone
Usually short, telegraphic-style phrases separated by periods, conveying essential information efficiently.
Formatting Example:
Here is an example of a two correctly formatted rows for the CSV string:
"Case Identification:
"Statute Description": War Powers Act of 1973", "Requires the president to notify Congress within 48 hours of deploying military forces and obtain congressional authorization for actions exceeding 60 days, with a possible 30-day extension, aiming to curb executive war-making power through legislative oversight, though its enforcement is weakened by executive non-compliance and judicial hesitance, as seen in debates over cases like *The Prize Cases* (1863)."
Custom Part
%%%. <Number of cards>100</Number of cards><Topic>Separation of powers under American constitutional law</Topic><Types>All types except Objection and Computation.</Types>
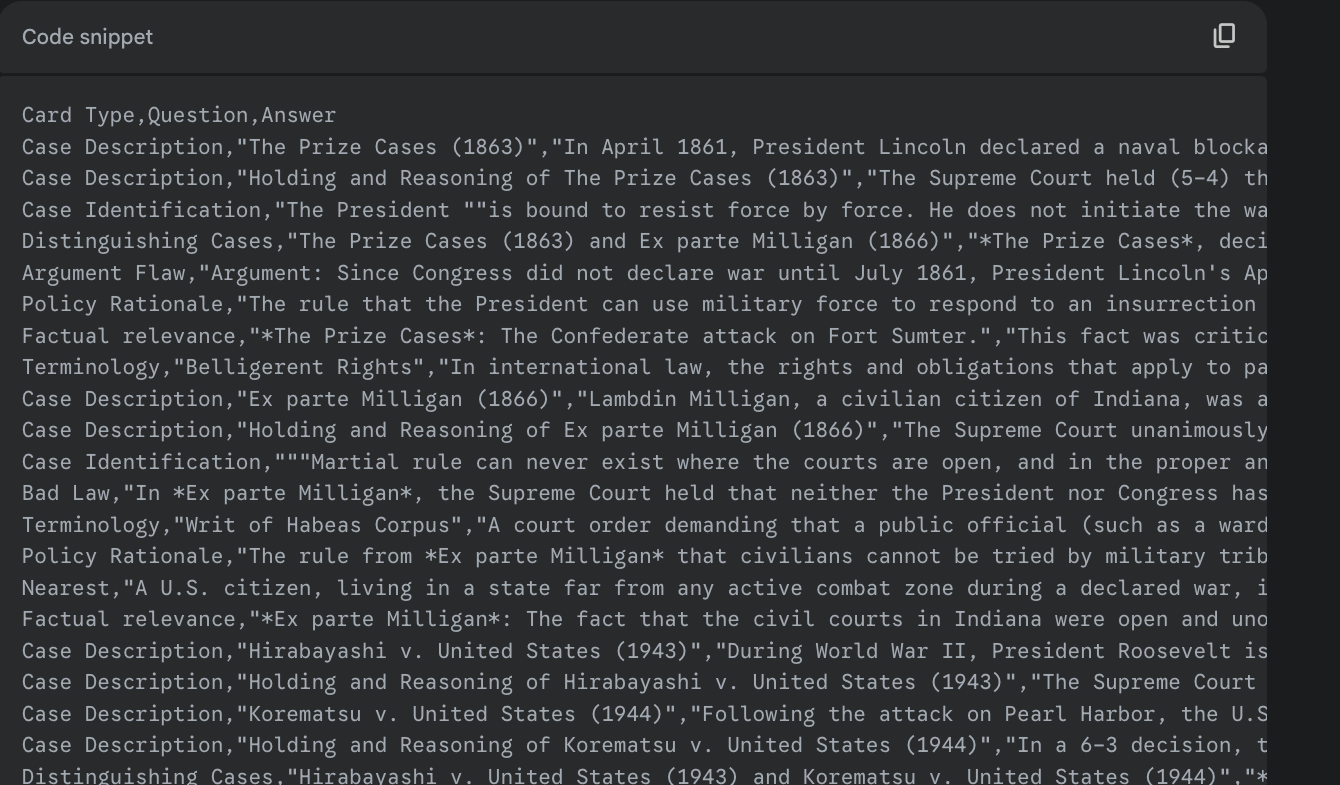
Here is a screenshot of an excerpt of the results to my query.
And that's the hard part. Your deck is created.
Optional: Save the Deck to A File
If you are
(a) going to use the deck in a program such as Anki, Brainscape or some other popular flashcard program, or
(b) do not think you will be able to recycle the output just generated
then you need to save your deck as a CSV file. The Appendix to this blog post explains the simple steps required to go from a CSV-like string produced by the AI to a permanent CSV file.
Working with your Deck
Now let's make use of the flashcards generated by AI using my app. I created this app using AI. It was not particularly difficult. Yes, I have a self-taught programming background, 34 years with Wolfram Language, a superb book on data science, and intermittent use of Python, R and few other dalliances of which we do not speak. But I don't know much about Javascript, which is the language used by the app. And I have no idea how to create a graphical user interface within a browser. Instead, I did what is called vibe coding. I told AI what I wanted and had it to the heavy lifting of writing the code. It did take a few iterations and a little bit of insight (like why the program was filtering cards improperly because the card ratings had been stored as a string). But it was not more than a morning's work to go from zero to working app loaded onto this Ghost site. (In the next month or so I hope to have a blog entry on how law students (and even faculty) can and should turn into programmers using the new programming language: English.)
Two notes
(1) The CSV file can come come from anywhere. It does not need to have been produced by AI. You can still use my AI-generated app and rightly feel that you are using AI.
(2) I couldn't help myself. I had a text-to-music AI (Suno) create a fun and possibly viral song about my programming limitations.
Using My Flashcard App (free for subscribers)
If you are going to use my app, which is available only to blog subscribers, you don't need to save the AI output to file at all. You can use simple cut and paste. Here's what to do.
Step 1: If you haven't subscribed to this blog already, do so using the form below. (There has to be some reward for subscribing!) Otherwise, go to Step 2.
Step 2: Copy into your system clipboard the CSV-like string the AI has generated.
Step 3: Go to this website. It's hosted on Ghost, the same as this blog, but is available only to subscribers, which you now are. You should see something like this.
You can either read the fascinating discussion of the app or you can scroll right down to where you see this:
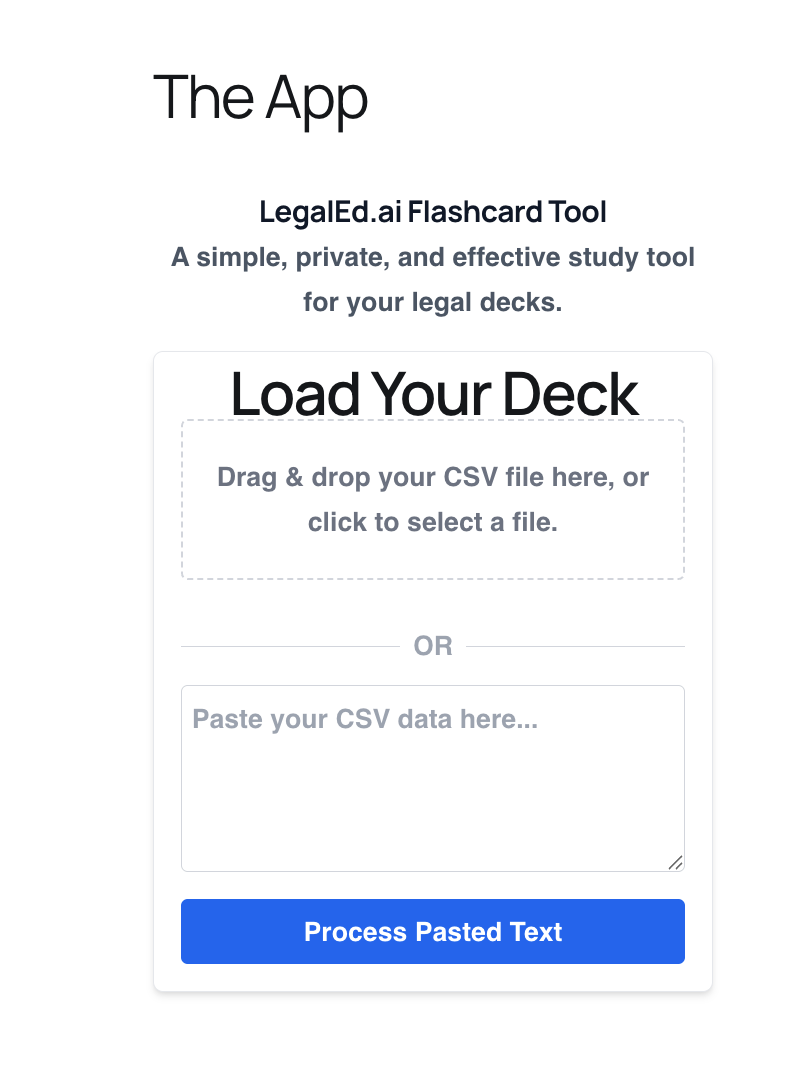
Step 3: Paste the contents of your clipboard into the area where it says "Paste your CSV data here.
Step 4: Press the big blue Process Pasted Text button.
Step 5: Use the app!
Here is what you should see on the "question" side of the card.

You can see a number of features. But for now let's just leave everything at their default values and focus on the basics. First is the big blue show answer button. Press it. And you should see something like this.
At this point you have a number of options. The simplest is to just press "Next Card (Skip)" and not provide the app with any feedback. But if you want the spaced repetition feature to work, you need to mark whether you got it correct or incorrect. (No cheating! Just consider what was in your mind and whether it sufficiently resembles the model answer on the back of the card). You can also rate the quality of the card. I think this one is a 4. You can use this rating if you export your deck to file and then use that rating to filter out "bad cards" the next time you use the deck.
Advanced Topic: AI mode
You can use the app without its special AI features. To enhance your experience with AI, however, you need a Google/Gemini API key (kind of like an account). Instructions on how to get an API key can be found in the Appendix to this post here. Once you have a valid API key, paste into the "Enter your key" input window. You can then
- Ask AI to explain simply the topic covered by the card.
- Create a mnemonic to help you learn the material (this does not yet work particularly well), or
- Create a hypothetical based on the content of the card
Advanced Topic: Study Strategy
Which flashcard you see next is determined by the "Study Strategy" employed by the app. The code implements four different scoring systems for selecting the next flashcard, each with a distinct strategy. Regardless of the scoring system you use, you see cards with higher "scores" more often
Standard Mode
This is a simple random selection fallback that doesn't use intelligent scoring.
Obsessive Mode
This mode relentlessly targets your weak spots. It calculates a base score using your incorrect rate multiplied by 100, making cards you frequently get wrong highly likely to appear. If you've gotten a card wrong more times than you've gotten it right, it adds an extra 20 points as a penalty boost. This mode essentially keeps hammering you with your most problematic cards.
Recent Failings Mode
This focuses on cards you've struggled with recently rather than historically. It starts with a moderate incorrect rate score (× 50), but then adds significant bonuses for recent activity:
- If you saw the card within the last 2 days, it gets a time-decay bonus (more recent = higher score)
- If you got the card wrong during your current study session, it immediately adds 50 points
This mode catches you when you're "hot" on mistakes and tries to fix them while they're fresh.
New First Mode
This prioritizes completely unseen cards with a massive score of 1000, essentially guaranteeing they'll be selected first. Once you've seen all new cards, it falls back to a standard incorrect-rate scoring system (× 50). This mode ensures you always work through new material before reviewing.
The temperature slider
The temperature parameter in softmax controls how "picky" or "random" the card selection becomes.
Low Temperature (close to 0): Makes the system very decisive and focused. It strongly favors the highest-scoring cards and rarely picks lower-scoring ones.
High Temperature: Makes the system more random and exploratory. It gives lower-scoring cards a much better chance of being selected.
Advanced Topic: Saving to File and Loading from File
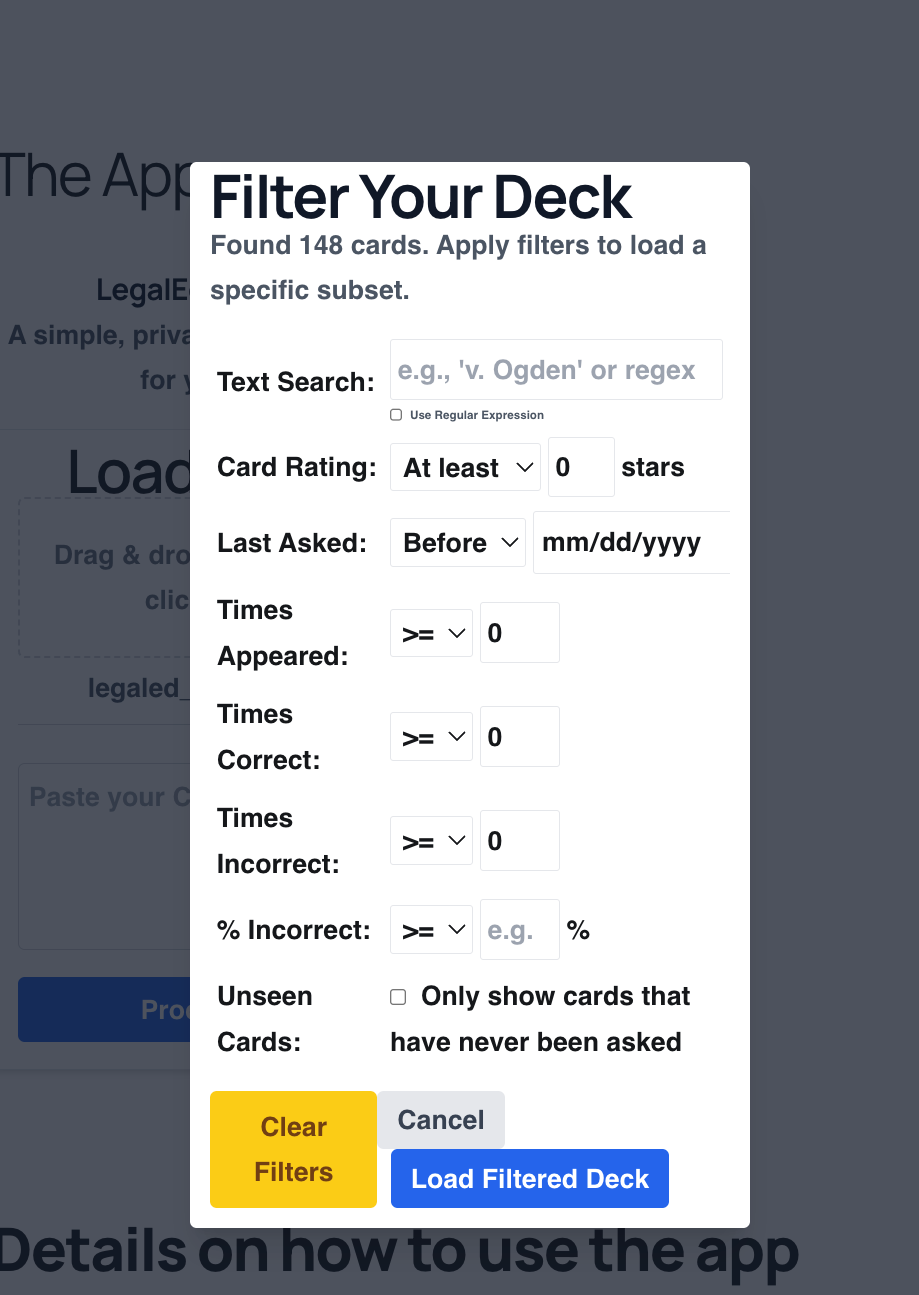
There's another way to get your flashcards into my app: loading a CSV file. First, you may have conventional CSV files lying around. So long as they are rows of data in which each row contains two columns, a front and a back, you should be fine. I've linked up a sample CSV file so you seen the needed format. Just drag and drop or select the file using standard procedures and everything should be fine.
Alternatively you may have generated a CSV file using the app's export button. If so, you have an augmented CSV file that has five additional columns shown below.
|
times_appeared |
times_correct |
times_incorrect |
user_rating |
last_asked |
The meaning of the columns should be self-explanatory. You can then use Excel, Google Sheets or other programs to edit the augmented CSV file if you choose to do so. And you now import the augmented file. If you do it this way, you get to filter the cards that you will be tested on. You can, for example, ask only for cards that have appeared fewer than seven times. Or you can ask only for cards with a user rating of 3 or more. Or you can ask for cards that have the word "immunities" in them. You can even do regular expression filtering of the flashcards, if you are familiar with that powerful tool. Here's what the GUI looks like when you import this way.
Feedback Appreciated
This app has not been bullet proofed or subjected to rigorous testing. The QC department here at legaled.ai is somewhat understaffed at present. So, if you find problems, please shoot me an email at aiforlegaled @ gmail. Emails with effusive praise and thanks also appreciated! Don't be afraid to cc this email address if you send positive feedback on this or other posts (lbaynes @ central dot uh dot edu) 😉
Appendix: Creating a CSV File
If you want to import your flashcards into Anki, Brainscape of other popular flashcard programs, you need to save the CSV-like string produced by AI into a true CSV file. Fortunately, doing so is easy. I'll go through the steps for Mac and Windows and then make a funny joke about Linux subscribers.
Mac
- Copy the CSV-like string using the copy icon atop the code snippet or some other sensible method. All you want is the CSV-like string. Nothing else.
- Open a new TextEdit document.
- Paste the contents into the TextEdit document
- Crucial: Go to the Format menu and hit "Make Plain Text"
- Save the file. Give it a name that ends in .csv.
Windows
Here are steps on a Windows machine (according to Grok3)
Saving a CSV File Using Notepad
- Open Notepad:
- Click the Start button (Windows icon) in the bottom-left corner of your screen.
- Type
Notepadin the search bar. - Click Notepad to open it.
- Paste Your CSV String:
- Click inside the Notepad window.
- Right-click and select Paste, or press
Ctrl + V, to paste your CSV-like string (e.g.,"Name,Age,City\nJohn,25,New York\nJane,30,Los Angeles"). - If your string includes
\n(indicating new lines), replace them with actual line breaks:- Press
Ctrl + Hto open the "Find and Replace" window. - In the Find what box, type
\n. - In the Replace with box, press
Enter(this adds a line break, and the cursor may move down).
- Press
- Save the File as a CSV:
- Click File in the top-left corner of Notepad, then select Save As.
- In the Save As window:
- File name: Type a name for your file, followed by
.csv(e.g.,data.csv). The.csvextension ensures it’s recognized as a CSV file. - Save as type: Select All Files (.) from the dropdown menu to prevent Notepad from adding a
.txtextension. - Encoding: Choose UTF-8 from the dropdown menu to ensure compatibility with programs like Excel.
- Save location: Pick a folder (e.g., Desktop or Documents) by navigating using the left sidebar or double-clicking folders.
- Click Save.
- File name: Type a name for your file, followed by
- Check the File Using Excel:
- Go to the folder where you saved the file (e.g., Desktop).
- Find the file (e.g.,
data.csv). It may have an Excel icon if Excel is installed. - Double-click the file to open it in Microsoft Excel (if Excel is your default program for CSV files).
- In Excel, verify that the data appears in columns:
- You should see
Namein one column,Agein another, andCityin a third, with rows forJohnandJanebelow.
- You should see
- If the data appears in one column or looks incorrect:
- Open Excel first, then go to File > Open, select your CSV file, and use the Text Import Wizard to set the delimiter to a comma (
,). - Alternatively, open the CSV in Notepad to ensure commas separate the data and there are no extra spaces or incorrect delimiters.
- Open Excel first, then go to File > Open, select your CSV file, and use the Text Import Wizard to set the delimiter to a comma (
Click Replace All. Your string should now look like:
Name,Age,City
John,25,New York
Jane,30,Los Angeles
Troubleshooting Tips
- Data in one column in Excel: If Excel doesn’t split the data into columns, commas may be missing or another delimiter (e.g., semicolon
;) was used. Check the file in Notepad or use Excel’s Text Import Wizard to specify the correct delimiter. - File opens as text: Ensure you saved it with a
.csvextension and selected All Files in the Save As dialog. - Special characters look wrong: Verify you used UTF-8 encoding when saving to handle special characters correctly.
Linux
If you are advanced enough to use Linux, you don't need my help 😃
Appendix: Why not just use Anki or a commercial app?
You certainly can. If you have experience with another flashcard product and like it, by all means stick with it. If it accepts CSV files as input, you can use AI to help generate the flashcards and ignore my little app. But I have not yet been impressed by any commercial app. Anki is apparently the market leader. Yet, in my opinon, the Anki interface is ugly and, far worse, confusing. And the idea of paying for software that simple just bothers me. And if you are willing to forgo saving your decks on someone else's server (and thus deprive them of the opportunity to train on your work), you can get almost equivalent content for free. Faculty and students should be conserving their funds to spend on general purpose AI services, not specialized mediocrity. I couldn't even figure out how to get Brainscape to work.
Appendix: How to get an API key so you can use the AI features of the app
The flashcard app uses Google's powerful Gemini AI to provide its features. To prevent misuse, Google requires users to have their own personal key. This key is free for personal use within the free tier and ensures your usage is private and secure.
This guide will walk you through the entire process. It may look like a lot of steps, but it should only take about 10-15 minutes. You will only have to do it once.
Step 1: Create or Sign In to Your Google Cloud Account
First, you need to go to the Google Cloud Console. This is the central dashboard for all of Google's advanced services.
- Navigate to the Google Cloud Console.
- Sign in with your standard Google (Gmail) account. If you don't have one, you'll need to create one first.
- If it's your first time, you may be asked to agree to the Terms of Service.
Step 2: Create a New Project
Your API key must live inside a "Project," which is like a folder that keeps all your settings organized.
- At the top of the page, click the project selector dropdown menu. It might say "Select a project."
- In the window that pops up, click the "NEW PROJECT" button.
- Give your project a simple name (e.g., "My AI Project" or "Flashcard App Key") and click "CREATE".
Step 3: Enable the "Generative Language" API
You now need to "turn on" the specific AI service that your key will be allowed to access.
- With your new project selected, click the navigation menu (☰) in the top-left corner.
- Go to APIs & Services > Library.
- In the search bar, type "Generative Language API" and press Enter.
- Click on "Generative Language API" from the search results.
- On the next page, click the blue "Enable" button.
Step 4: Set Up a Billing Account
This is the most important and often confusing step. Google requires a payment method on file to prevent abuse, even for their free services. You will not be charged unless your usage goes far beyond the generous free tier.
- Click the navigation menu (☰) again and go to "Billing".
- You will likely see a prompt to "LINK A BILLING ACCOUNT". Click it.
- Follow the on-screen instructions to create a billing account. You will need to provide a credit or debit card. This is for identity verification and for any usage that might go beyond the free limits in the future.
Step 5: Create and Secure Your API Key 🔑
Now you can finally create the key itself.
- Click the navigation menu (☰) and go to APIs & Services > Credentials.
- At the top of the page, click "+ CREATE CREDENTIALS" and select "API key".
- A new key will be generated and displayed in a pop-up window. This is your key! Click the copy icon to copy it to your clipboard. You should also file it away in a place you can retrieve as needed.
- Paste this key into our application's API Key input field.
That's it! Your API key is now ready to use in the application.
Special Note
The original flashcard app had a bug that prevented the AI feature from working. I had neglected the fact that when you press buttons such as "Explain simply," the program requested a response from a Large Language Model. (Gemini). But Gemini wants an "API key" to authenticate the user. So the revised version of the app permits you to input an API key. I have revised this blog entry to reflect that change.