
Confidentiality solved
The big picture
This lengthy blog post explains how lawyers can use powerful AI language models like ChatGPT and Claude without violating legal ethics rules that prohibit sharing confidential client information.
The solution involves combining two technologies: OpenRouter (which routes your queries to AI models without storing your data) and LibreChat (software you run on your own computer). Together, they create a private system where your conversations never leave your control or get stored by AI companies.
The setup requires some technical know-how—installing software, creating accounts, and configuring settings—but the payoff is significant: lawyers can use cutting-edge AI tools for legal work while maintaining client confidentiality. The system supports features like web search and document uploads, costs only pennies per query, and keeps all conversations on your local computer where they're protected by attorney-client privilege, just like your other work files.
A caveat: The following is not intended as legal advice. Do your own due diligence to determine whether the methods described here provide privacy sufficient to satisfy relevant ethical rules.
A request: I am not a professional software developer or systems engineer. I do not have the capabilities of testing these installation and configuation instructions on every set up. I tested them on my Mac and used a Windows friend as a beta tester (which led to substantial revisions). If you encounter problems, put them in the comments or email me and I will see what I can do. No promises. legaled.ai has a very, very small staff.
The leading impediment to lawyers more extensively using large language models are ethical rules prohibiting from revealing "information relating to the representation of a client." That ethical rule imposes a huge cost on clients. It compels attorneys frequently to use inferior and far more costly methods of getting their work done. And while attorneys can avoid this disciplinary barrier to efficiency by at least two methods: (a) getting ironclad guarantees from the LLM provider that they won't retain or train on your data or (b) obtaining informed client consent to LLM disclosures, both of those methods have some complexities attached to them.
This blog post explores a technology-based alternative for managing the confidentiality challenges associated with Large Language Models (LLMs). While this solution isn't perfect—it requires some technical proficiency and may be slightly expensive for the most intensive LLM users—the cost remains manageable for the majority of attorneys. The result is a comfortable user interface that enables lawyers to leverage the best available language models (including features like web search and document upload) while maintaining robust assurance against the unethical disclosure of client information. Ultimately, this approach aims to democratize the power of LLMs for smaller firms and law school legal clinics.
How It Works: The Privacy Architecture
Before diving into the arduous installation process, let's understand the system we're building and why it protects client confidentiality.
The Flow
Here's the flow we are looking for: Your web browser connects to a LibreChat server running on your own computer (localhost:3080). When you submit a query, LibreChat sends it via API call to OpenRouter. OpenRouter then forwards your request—under its own account—to the large language model of your choosing: GPT5, Claude Sonnet 4.5, Google Gemini Pro 2.5, GLM-4.5-air:free, and hundreds of others, some housed in the United States, others housed overseas. The response travels back through the same path: from the LLM provider to OpenRouter to LibreChat to your browser.

OpenRouter's Role: The Anonymous Aggregator
Think of OpenRouter as a website aggregator that serves as your privacy shield. The way we are going to set it up, OpenRouter will only you let you select models that pledge Zero Data Retention (ZDR) on calls made through it: no storage, no training. And OpenRouter itself pledges that if you access it via API calls, it will not store or train on your materials. It's just a conduit.
This creates powerful anonymity. Even if a nefarious adversary tried to learn information about your client from the language model provider or OpenRouter, they would be unable to do so. There wouldn't be any information available. The LLM providers like Anthropic, even if they retained the conversation in violation of their contract with OpenRouter, would know only that it, like hundreds of thousands of others, came from OpenRouter. They would not know it came from you.
Even if LLM providers were to retain conversations, their ability to zero in on your conversation is questionable. Right now, OpenAI processes six billion tokens per minute. That is 3 quadrillion tokens per year. If a conversation averages 10,000 tokens (probably high), that means OpenAI processes over 300 billion conversations per year from its 800 million users. Modern computer search is good, but that is a very big haystack in which to find a needle. But even if an LLM provider like OpenAI or Anthropic were able to find a conversation based on some semantic or keyword search, figuring out who sent it would be challenging. Perhaps OpenAI could trace the conversation back to OpenRouter. But if law enforcement or a civil litigation adversary were to then ask OpenRouter who actually sent a particular query, OpenRouter would not know.
Let me repeat that. So far as I can figure out, if you set up OpenRouter correctly, your information is never disclosed. The FBI, the state attorney general's office, litigation adversaries can subpoena or search with or without warrants to their hearts' content and still get nothing because ... there is nothing to get.
LibreChat's Role: Your Local Server
LibreChat is open source software that serves as a router you run locally on your machine. It's not a fly-by-night operation. It is one of the top-listed repositories on GitHub, having been "starred" over 30,000 times and "forked" (meaning designated for revision by enthusiasts) almost 6000 times. It has a rich set of features that will create a querying environment similar (sometimes better) than you may be used to as a ChatGPT, Gemini or Claude user.
The basic idea is that your local computer serves as a front end for your interactions with the large language model, but the actual work is done by a ZDR model after having passed through the OpenRouter aggregator to further assure anonymity. Notice the URL in your browser: localhost:3080. For the non-technical, this means you are using a web server located on your own computer. Your browser is not using any third parties' web server.
The Double-Layer Protection
To whet your appetite for what follows—no, setting up LibreChat is not something a total neophyte can do—let me at least show you the reward for having made the effort. Here is a screen capture of a hypothetical query transmitting information that it would be absolutely crazy to feed into an LLM that either retained information or trained on your conversations. It recounts a devastating confession by a potential client. You might as well make your next call to the Texas bar and turn in your license.
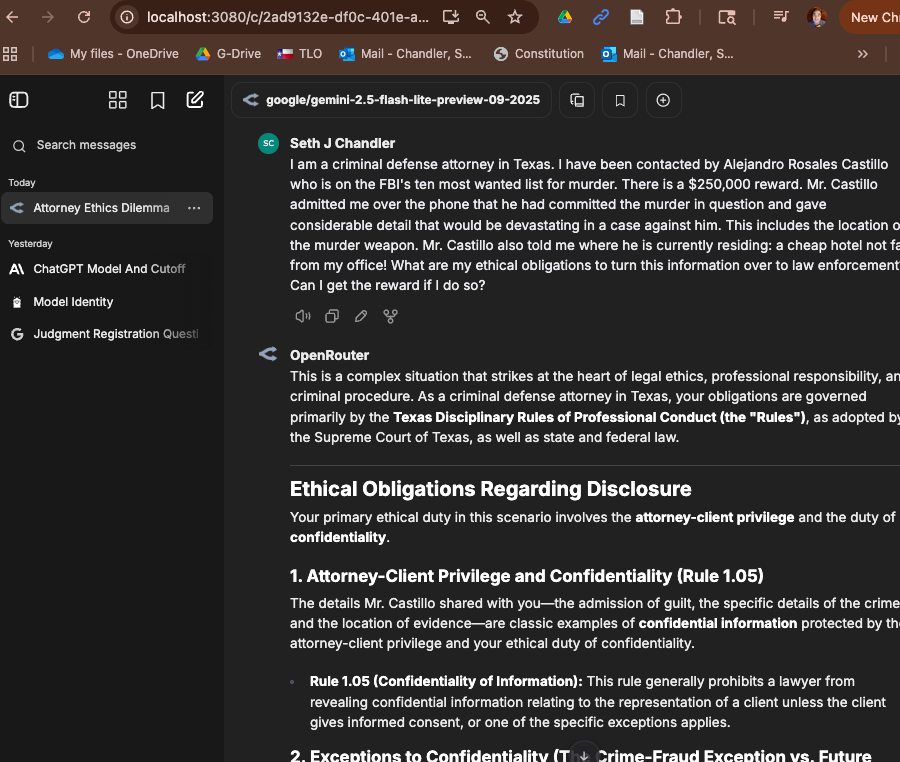
But my belief is that this query, probably the most dangerous I can imagine, is perfectly fine to submit to an LLM—although I sure as heck would double check the answers! (By the way, no, you can't claim the reward).
The safety comes from a double security. First, notice the URL to which the browser was directed: localhost:3080. The queries are directed to OpenRouter, which itself has ZDR and which has blocked itself from sending them to any large language model platform that does not itself implement ZDR.
If you use LibreChat on your own computer, the only way the FBI or an adversary can get your conversations is if they get your computer itself. Any attempt to do so will be met with massive resistance by most attorneys. It would be no different than if a litigation adversary sought the notes you kept in Microsoft Word or other software regarding conversations with a client. Moreover, if you truly fear a lack of success in fighting any such effort, there is a procedure described in an appendix that lets you wipe out even your local chat history. (Be aware that such destruction could constitute obstruction of justice or other crimes; consult an attorney before proceeding). For most attorneys, however, these issues are likely to be academic. When you have a particularly sensitive chat, make it a "temporary chat" as described below. These chats are not stored at all, not even locally.
The Result
Moreover, LibreChat has the usual features users expect in 2025, at least so long as the underlying models can handle it and you have set up LibreChat correctly: web search with clickable links, file attachments, artifacts/canvas for side-by-side editing, and the ability to create "Agents" (the equivalent of CustomGPTs and Gemini Gems).
Now that you understand what we're building and why it protects client confidentiality, let's walk through the installation process step by step.
Types of tasks
There are going to be three types of tasks you perform during the installation:
- creating accounts with various component providers (most are free but one will require a credit card);
- installing software on your machine in one of three ways:
- conventionally;
- via git (using the terminal); and
- via Docker;
- tweaking various setting files either on
- your own file system (using a system text editor)
- within the Docker internal file system (using Docker's text editor)
Should you be attempting this?
If you have never used "the terminal," if you have zero idea what commands like cd or mkdir mean, if the concept of "cloning" something from GitHub is beyond imagination, you probably should not try to install LibreChat and prerequisite software yourself. The instructions are clearer than many you will encounter in the computer arena and you might in fact succeed. Still, there are a lot of steps; if something goes wrong, which it inevitably will, the risk of frustration is high. For such folks, I would hire a smart college computer science major (possibly desperate for work precisely because of the AI revolution) to do it for you. It does not take Linus Torvalds to do this. It just takes someone with experience with
- the terminal,
- GitHub
- a smidgeon of Docker, and,
- above all, an ability to read documentation CAREFULLY and to know when to ask AI for help in cases of ambiguity or apparent non-applicability.
Actually, it also takes someone you trust with your credit card because you may need to sign up for some services. If you are at an academic institution, there should be someone on the tech staff who can get this done for you. Either way, a competent student should be able to get this on a laptop in about two hours. And having done it once, they should be able to shave at least 30 minutes off that time. Privacy for a couple of hundred dollars might be a very good use of money.
Accounts
Let's start by getting accounts from the various providers needed for this project. While we are at their websites, we will get the needed "API keys" (sort of similar to passwords) and tweak some settings on the acounts.
Step 1: Create a GitHub Account (free)
A GitHub account is the entry ticket these days for so much in advanced uses of large language models and computer science generally. Here's the elevator pitch: "Git is a tool that tracks every change in your files, like a time machine for your work so you can't lose anything. GitHub is the website where you store those projects online. It lets you back up your work, collaborate with others, and showcase your skills." For what we are going to be doing, a free account on Github will work just fine. The learning curve is not bad. I actually learned to use it by going to the Gemini Learning Coach (a Gemini Gem) and simply saying "Help me learn about Git and Github." Hopefully, however, your smart college student already knows how to use Github. Odds are they use it all the time. So, step 1 is to go to github.com and sign up for an account. Keep that password handy; we'll be using it a lot.
Step 2. Open Router (credit card needed)
2a. Get an OpenRouter Account (credit card needed)
For this to workflow to succeed, we need an OpenRouter Account and an OpenRouter "api key." (An api key is similar to a password, but (a) it is mostly used by computers rather than humans and (b) it may only get you access to some of the "endpoints" offered by a service).
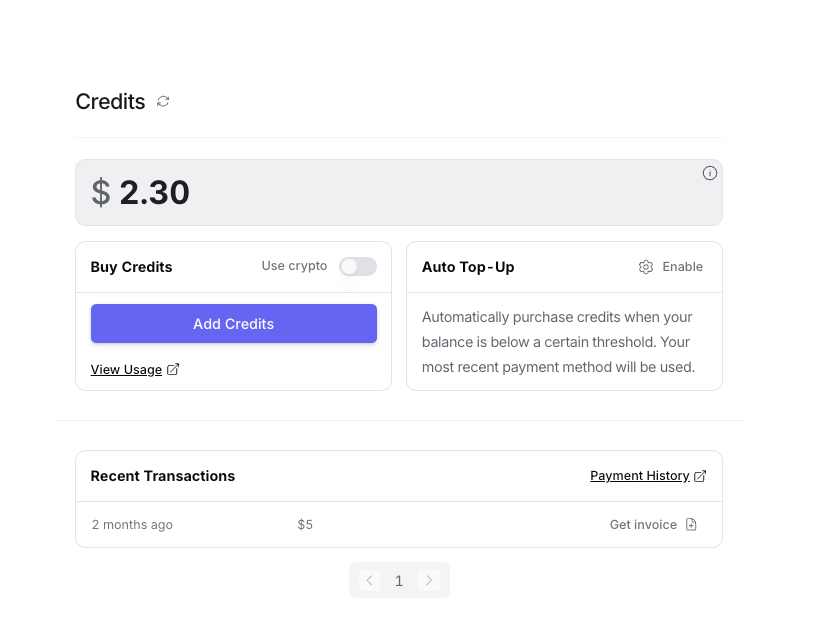
This is not hard. Go to openrouter.ai and click the Sign up button. You will again be given some choices as to how you wish to authenticate. I would again choose Github. Once you have authenticated you need to fund your account. Go to Settings and select the Credits section. You should see something like this, except that yours is likely to have no money in it. If you're really paranoid or have a lot of Bitcoin lying around, I guess you can fund your activities with crypto, otherwise I suggest Add Credits. You will see a screen that asks for your credit card information and the usual associated data. Acquiesce to the inevitable and give it to them. Start small: perhaps $10 and don't press the Auto Top-up button. If you find yourself using OpenRouter a lot, you can then decide on a regularized funding mechanism. Once the funding is successful, you can obtain an invoice that perhaps can be used for reimbursement purposes.
2b. Get an OpenRouter api key
Now the main point. You are going to be asking LibreChat to contact OpenRouter and have OpenRouter forward your requests onto particular model. OpenRouter is obviously going to incur charges on your behalf when it does so. It only gets reimbursed by debiting your account. OpenRouter wants to make sure that when someone asks it to do work, they are really you. Thus, you need an API key.
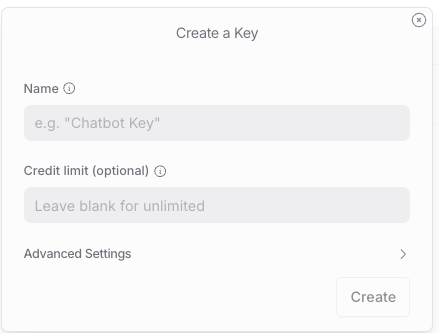
To get the API key, go back to Settings in OpenRouter. You will see a choice cleverly labeled API Keys. Click on that and you should see a screen like the one below that gives you a blue Create API Key button. Press it.
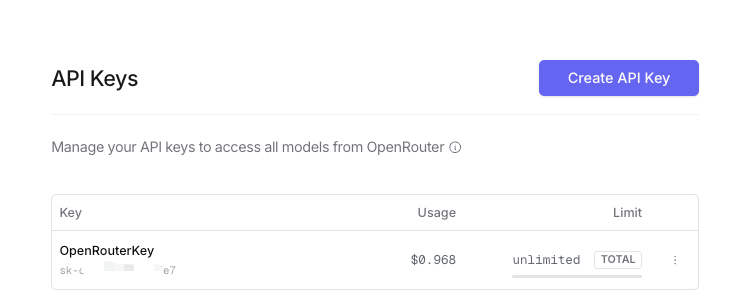
You should now see a screen that looks like this. Give your key a name. Maybe "LibreChat access." But it doesn't really matter. Just something that makes sense to you. Leave everything else blank.
Now for the reward. You should see something like this:
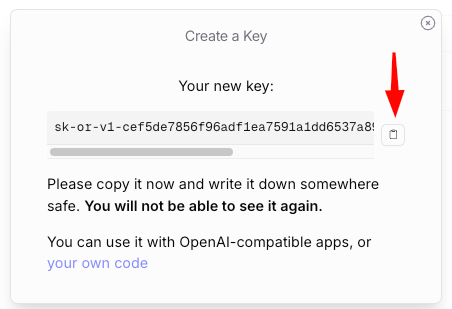
Click the copy icon by my red arrow and paste the result into a very safe place. Do you see the warning "You will not be able to see it again." Take that warning seriously. Do not lose that API key! But do not worry that if someone gets your API key, they will be able to see everything you have told OpenRouter. That's not true. They may be able to get some gross information like how much you have been spending and the times and lengths of your communications. But as for the contents, no, even if you are tortured to reveal your API key, the adversaries should not be able to get the contents of what you discussed via OpenRouter.
2c. Enforcing ZDR
While we are in OpenRouter, we need to make sure that OpenRouter never sends information to a model that does not maintain ZDR, Zero Document Retention. To ensure this click on the little gear icon in the top right of the OpenRouter home screen. Click on Settings. You should see something like this on the left side of the screen:
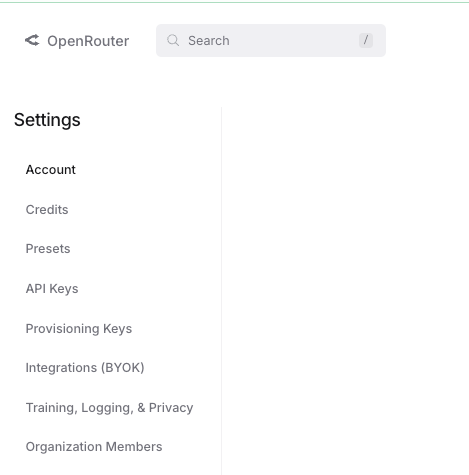
Click on Training, Logging, & Privacy. You will then see a panel that looks like the one below. Move the ZDR Endpoints Only toggle to the right. Here are the settings you need in OpenRouter to achieve maximal privacy.
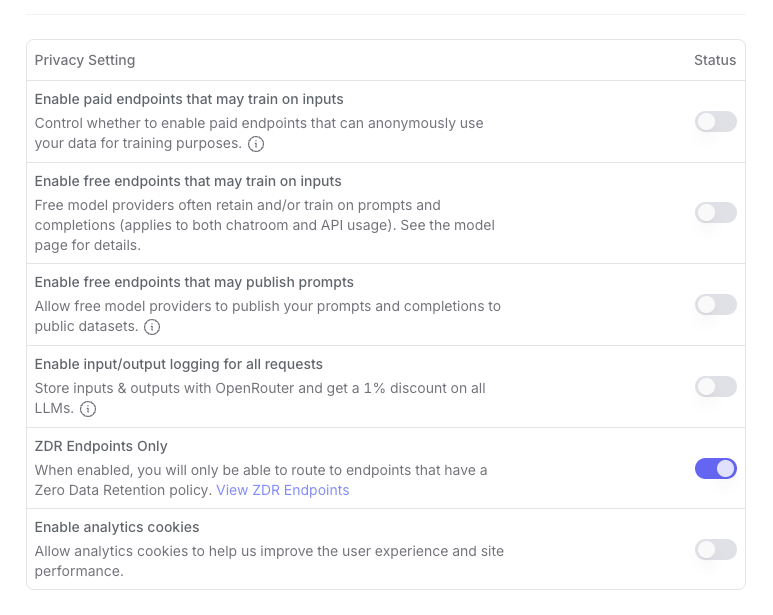
With these settings on, if you try to access a model that does not implement ZDR, the query fails to transmit and you get an error message
With confidentiality assured, it is time to move to the next steps, both of which are needed if you intend to use the "web search" feature of LibreChat. First, however, an overview of the issues involved.
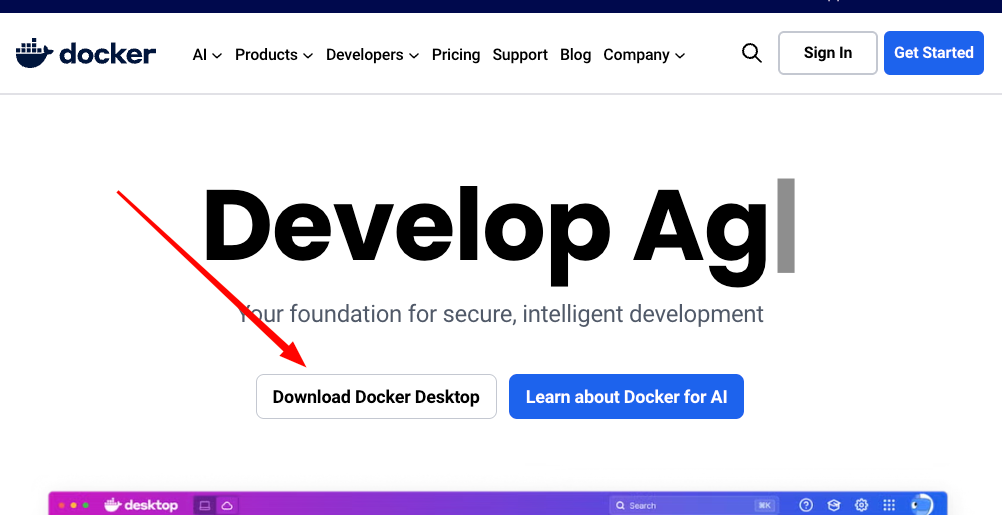
Step 3: Docker
Go to docker.com. Click the "Sign in" button (yes, I know you don't have an account yet). You will see something like this.
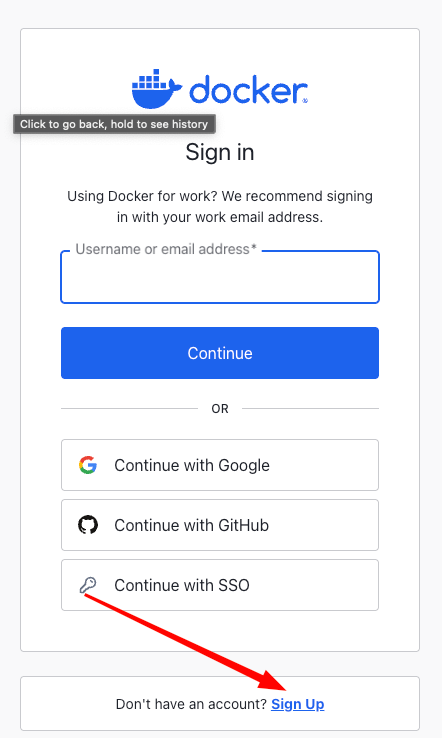
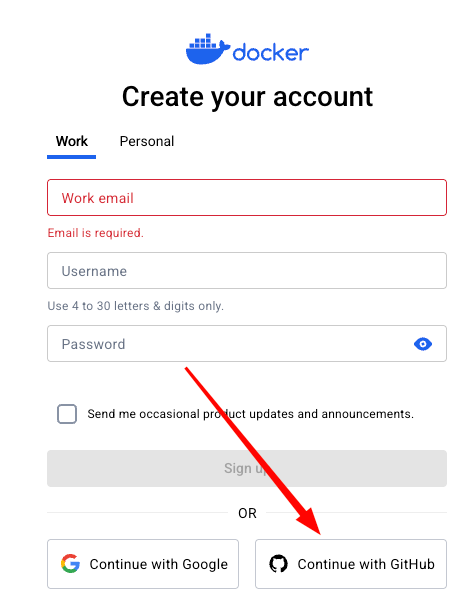
Click the Sign up button. When you get to the Sign up page, try to use the "Continue with GitHub" feature. It will make your life simpler. Say yes to the various requests for authorization.
Obviously, remember to write down the email, username and password associated with your GitHub account. And revel. You are now officially a geek that can boast at parties about having a GitHub account.
Interlude
We are now going to obtain accounts with two of the providers we will need to implement web search within LibreChat, a very useful feature. Before doing so, however, I want you to understand some concepts.
Cost and privacy issues in LibreChat web search
LibreChat’s web search feature is a cleverly designed system that connects your private AI to the live internet. It works through a powerful three-part process: first, a private search tool (like SearXNG) finds relevant websites. Second, a "scraper" service (FireCrawl) visits those pages and reads their content. Finally, a "reranker" (Jina AI) analyzes that content to find the most relevant passages for your AI. This pipeline delivers more accurate, context-aware answers than a simple search could achieve.
For most individuals, this entire process is effectively free. The scraper and reranker services that power the system offer generous free starter plans. You can conduct over a hundred comprehensive searches per month without paying anything. This makes the feature perfectly suited for privacy-conscious individuals and hobbyists who want enhanced AI capabilities without a subscription.
For professionals like attorneys, the primary consideration will be economic, not privacy-related. The system's privacy is substantial, as your identity is separated from the topics being researched and at least FireCrawl maintains a ZDR policy. For the average attorney, the real question is one of volume. Intensive legal research involving hundreds of searches per month may exceed the free limits, potentially requiring a small subscription starting around $16 per month to cover the cost of the scraper service. This is the main factor for most legal professionals to consider.
The duty of care in the legal profession may, however, create a rare exception. If, for example one were discussing a multi-billion dollar merger in which inside knowledge could be profitable, it might be possible for insiders at FireCrawl or Jina to steal information for profit by looking at the mosaic of information you were providing. An insider might become suspicious,for example, if they saw simultaneous scraping requests for the LinkedIn profiles of three senior chip designers from rival companies, an obscure academic paper on silicon photonics, and the online biography of a specific EU antitrust official. It is not clear, however, that the privacy concerns from using LibreChat in this scenario are any greater than those involved in using conventional web services such as Google. For all other legal work, the decision boils down to usage and cost.
And, now, back to the slog.
Step 4: Firecrawl (free for a while)
To do web search with librechat, we need something that can scrape web sites that we encounter. LibeChat's current preferred tool for this work is FireCrawl. So, go to Firecrawl.dev. Click through to the pricing page. You should see a free plan. Select it. That will take you to a sign up page where you can again use your Github credentials. Once you have your account, you should be able to navigate to this page. On the far right you will see an API key. Copy it and save it in a safe place. (Again, I have blurred mine out.)
Note: FireCrawl gives you a certain number of "credits" on the free version. You can do "buy" credits by doing things like following FireCrawl on LinkedIn.
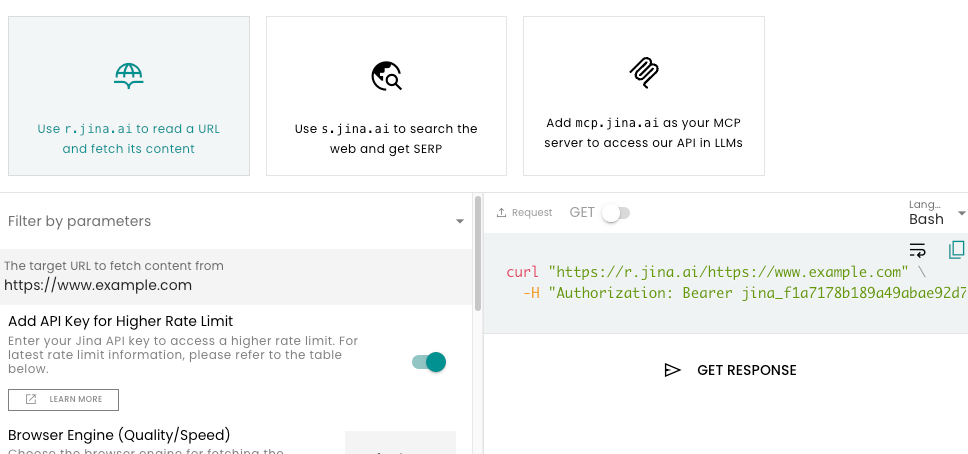
Step 5: Jina (basically free)
Finally we need to go to jina.ai. Click on API. You should end up at a page that looks like . On the far right of the page there is an API key that will start with "jina_". Copy that key and save it. Note: the key may extend past the end of your window; you will need to expand your window to make sure you get all of it.
Software installation
We now have all the accounts we need except for LibreChat itself, which we defer. Time to install some software.
Step 0: Preflight Check
You should make sure that you have software that generally comes with your computer. We are going to need this software to tweak certain configuration files later in the process. On Windows, you should make sure you have Notepad. On Mac, you can get by with textEdit. If you do so, you MUST remember to use Format->Make Plain Text before saving any file. Repeat. MUST. I prefer to use a text editor that does not require me to remember this. There is a free one called Text Editor on the Mac App store that works well for this task. I would recommend obtaining it.
Step 1: Install git on your computer
Git is a tool that lets you download code from websites like GitHub - places where programmers share their projects. Think of it like a specialized download manager for code. When you see instructions that say "clone this repository," that's where Git comes in.
Why you need it:
Many projects aren't available as simple downloads - they require Git to get the code onto your computer. Git also lets you easily update that code later when the creators make improvements.
For Windows:
- Visit git-scm.com
- Click "64-bit Git for Windows Setup"
- Double-click the downloaded file
- Click Next through the installer (the default options are fine)
For Mac:
- Visit git-scm.com/download/mac
- Download the Git installer
- Open the .dmg file and double-click the installer
- Follow the on-screen instructions
After installing:
You're done! Git now works on your computer. When you see instructions like "git clone [website address]," you can copy that command into your terminal (Command Prompt on Windows, Terminal on Mac), paste it, and press Enter. The code will download to your computer.
Don't worry - you'll mostly be copying and pasting commands. As you use Git more, you'll discover it can do much more than just downloading code!
Step 2: Install Docker
Docker solves the "but it works just fine on my machine" problem that plagues the software industry. It bundles your application and all its dependencies into a "container" that runs identically everywhere—your laptop, your colleague's machine, or a cloud server. This upfront complexity is a trade: you get guaranteed consistency, eliminating entire classes of environment-specific bugs. Usually I find Docker to be bad deal. Often it is a kludge for more fundamental architectural problems. But every once in a while when the reward for use is high and the burden is low, it can be useful. This is one of those times.
Fortunately, installation of Docker is simple. Just go back to docker.com and press the download Docker Desktop button.
From there, it is the usual installation process for conventional software. Just follow the direction and accept the defaults. Then launch Docker Desktop. Do not shut it down. If you shut it down, LibreChat will not work. So, if you shutdown your computer, remember to relaunch Docker Desktop before running LibreChat.
Step 3. Install LibreChat
Step 3a: Get into the terminal and navigate
With these preliminaries out of the way, we can now install LibreChat. Fortunately, LibreChat has really good instructions. Moreover, we can leverage our previous installation of Git and Docker. To do this, we are going to need to use the Terminal. If you know how to use the Terminal, you can skip the material that follows. Otherwise, read it carefully.
How to Open the Terminal
Windows (Command Prompt)
- Click the Start button (Windows icon in the bottom-left corner).
- Type
cmdin the search bar. - Click Command Prompt to open a black window with text.
Alternative: Press Win + R, type cmd, and hit Enter.
Mac (Terminal)
- Open Spotlight (press
Cmd + Spaceto search). - Type
Terminaland press Enter. - A white/black window will open.
Alternative: Go to Applications > Utilities > Terminal.
What You'll See
A blank window with a blinking cursor, usually C:\Users\YourName> on Windows or YourName@Mac:~$ on Mac. This is your command line—a keyboard-driven way to navigate folders and files.
Quick Tip
Don't type anything yet! Just focus on opening it. Once comfortable, you'll use cd (change folders) and mkdir (create folders) here.
💡 Fear not: The terminal looks intimidating, but it's just a tool. Start slow, and you'll get the hang of it!
Once you are in the terminal, you are going to need to use the cd command and possibly the mkdir command. Again, if you know how to do this, skip what follows. Otherwise ...
Beginner's Guide to Using `cd` and `mkdir` in the Terminal
Directory Structure Basics
- Windows: Files live on drives (e.g.,
C:), with folders likeDocuments,Downloads. Your user folder isC:\Users\YourName. - Mac: Files start from the root (
/), with folders likeUsers,Documents. Your user folder is/Users/YourName.
Key Commands
cd(Change Directory):cd Documents: Moves into your Documents foldercd ..: Moves up one folder levelcd /(Mac) orcd C:\(Windows): Jumps to the root directory
mkdir(Make Directory):mkdir new_folder: Creates a new folder called "new_folder"
Pro Tips
- Type
ls(Mac/Linux) ordir(Windows) to see files/folders - Type
cdalone to return to your user folder - Drag-and-drop a folder from Finder/File Explorer into the terminal to paste its full path
Example Workflow
- Open Terminal
- Type
cd Documents - Type
mkdir projects - Type
cd projectsto enter your new folder!
💡 Practice these commands to build confidence with the terminal!
Now that you have this background, navigate your way to the directory (folder) above which you will be placing the LibreChat code. This is called the parent directory. So if you ultimately want all the LibreChat code to sit in a directory called /Users/Seth/dev/LibreChat, you need to navigate your way to /Users/Seth/dev. If you don't have such a directory, use mkdir to create one. (If you are having trouble understanding what to do, you might feed this blog entry (or the most relevant portions) into AI and have it provide an explanation.)
Step 3b: Use git to clone the LibreChat repository
Now run this command in the terminal:
git clone https://github.com/danny-avila/LibreChat.git
Assuming a reasonable broadband connection, LibreChat should be sitting on your local computer in less than a minute.
Step 3c: Navigate to the new LibreChat directory
The clone operation will have created a new child directory called LibreChat. Use the cd command to navigate down to it.
cd LibreChat
Step 3d: Create a "dot env file
Up until now everything we have done has been generic. But we now need to begin a customization process for your machine. This is done by creating a "dot env" file that holds the custom information. We start, however, by creating a "dot env" file from a generic template. Run this command exactly as is.
cp .env.example .env
Step 3d: Edit the dot env file
Now for the scariest part. We have to edit the .env file we just created. Open up the text editor we discussed in the preflight: Notepad for Windows or Text Editor for Mac (or textEdit if you don't have Text Editor).
Open the .env file you just created. Remember, it will be in the LibreChat directory you just created. If you don't see the .env file, do not panic. Instead, read this.
Editing Hidden Files (Starting with a Dot)
Windows
No special steps needed! On Windows, files starting with a dot (like .gitconfig) show up normally in File Explorer.
Mac
On Mac, these files are hidden by default. To see them:
- Open Finder
- Click the View menu at the top of the screen
- Select Show Hidden Files (or press
Cmd + Shift + .)
Now you'll see files like .gitignore and .bash_profile in your folders!
If all has gone well, you should see something like this:
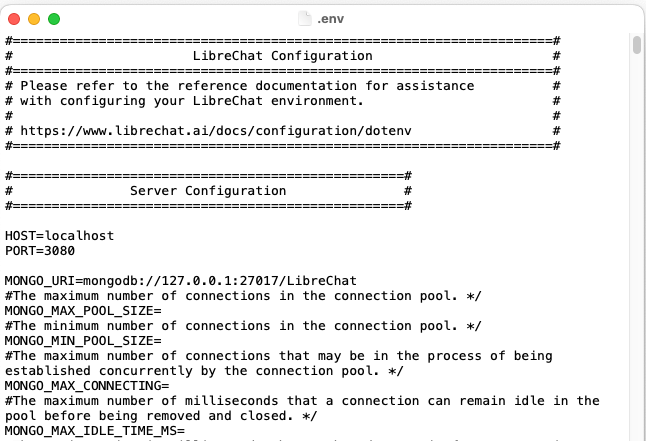
First, do you see the line PORT=3080. Don't touch it! Just note the number. We will need it later. (If for some strange reason, you need to change the "port" on which LibreChat works, you will need to tweak that number.)
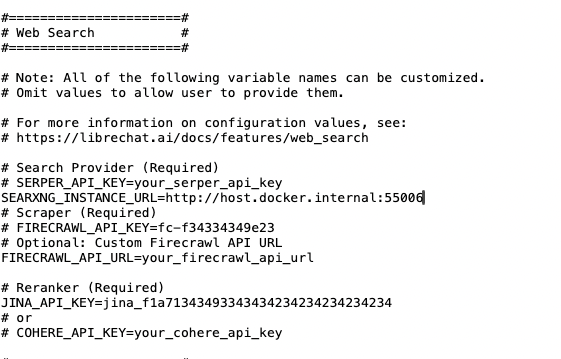
We now need to navigate in this long .env file down to where the parameters for web search are stored. To do this, use Control-F to search for "serper". You should see something like this:
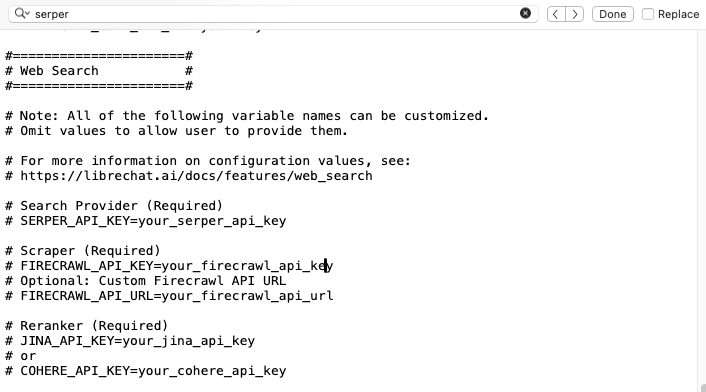
We need to replace the placeholder API keys for Firecrawl and Jina with the ones you obtained earlier. And we need to activate those lines of code. First, where it says "your_firecrawl_api_key" put the FireCrawl API key you got earlier. Then, activate that line of code by deleting the pound (hash) at the beginning of the line. Second, where it says "your_jina_api_key", put the Jina API key you got earlier. Activate that line of code by deleting the pound (has) at the beginning of the line. Third, insert the following right below where it now says "#SERPER_API_KEY=your_serper_api_key".
SEARXNG_INSTANCE_URL=http://host.docker.internal:55006
When you are done, this segment of the .env file should look like this. I have put in fake API keys so you don't steal mine!
Last edit. Go search for "OPENROUTER_KEY" in the .env file. You should see something like this:
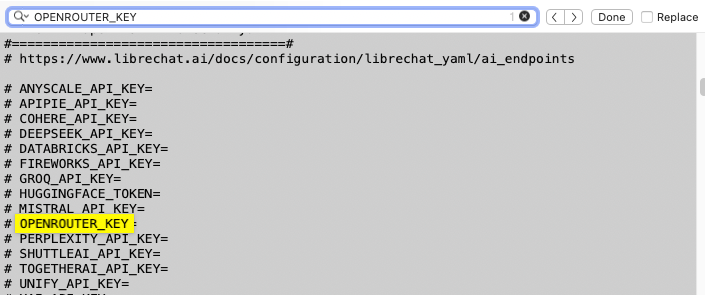
Delete the pound (hash) character at the left of the highlighted line and put your OpenRouter API key after the = sign. LibreChat will forward this key to OpenRouter, which will authorize you to use its services.
Check all of this carefully. If you mess it up, there is a chance LibreChat will not launch. Once you are satisfied you have edited the file correctly, save it. Take a deep breath.
Step 3e: Configure two LibreChat files
To get LibreChat to function with OpenRouter, we need to create/edit two files. Here are directions lightly adapted from this website.
Step 3e(1): Create the compose.override file
The key is to find the documentation at https://www.librechat.ai/docs/quick_start/custom_endpoints and to follow it very carefully. The first goal is to create a file with the name docker-compose.override.yml No substitutions! The purpose of this file is to point LibreChat at yet more files that will give in the information it needs to override its default behaviors. By way of example, those files might give it information on supplemental intermediaries (like OpenRouter or Ollama) to whom it might direct its queries.
To make this work, use your text editor (Notepad or Text Editor or textEdit). With your simple text editor open, create a file and copy and paste exactly what the custom_endpoints documentation recommends into the text editor window. It should now look something like this.
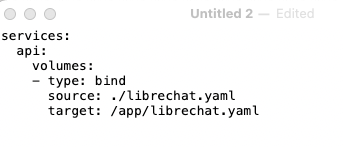
Save your work and make sure the file name is that docker-compose.override.yml thing. Make sure it goes in the same top level directory of your LibreChat project.
Step 3e(2): Create the librechat.yaml file
And now it's time to create that librechat.yaml file to which the docker-compose.override.yml you just created is pointed. (Computer scientists love nested hierarchies!) Open up that text editor again and create a new text file. Now cut and paste from the documentation on this web site. Go to the part that looks like this:
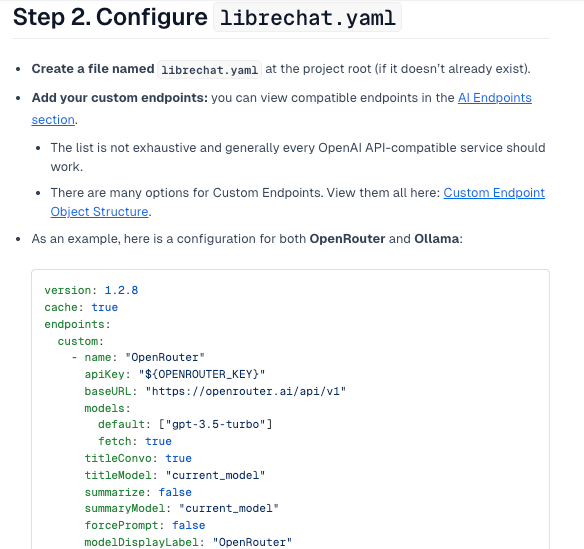
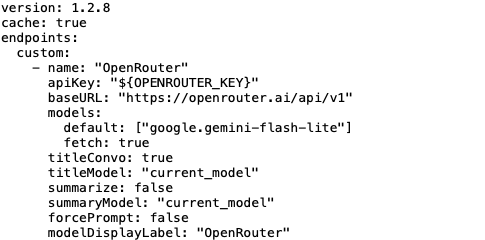
I want you to copy the code there and paste it into your text editor. It's that long thing starting with version: 1.2.8 and ending with titleModel: "current_model".
And here we need to make a few tweaks. This is the part of the file we have to change.
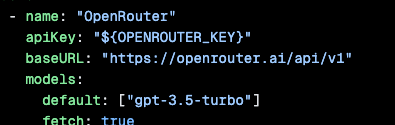
Step 3e(2)(a): Change the default model
We need to change the part that says "gpt-3.5-turbo". That's an old model and needlessly expensive. Put in another model. I would suggest "google/gemini-flash-lite". It's respectable, low cost, and ZDR. That way, if you mess up, it won't cost you anything. Once you get things working, you can always change the default.
Step 3e(2)(b): Get rid of the Ollama configuration information
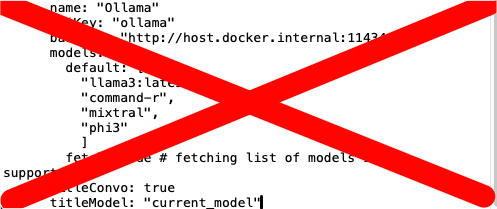
At some point, we might want LibreChat to be able to access models via something called Ollama instead of OpenRouter. Ollama is very cool. But I feel that asking you to install Ollama in addition to everything else is likely to lose you as a subscriber. Later, if you like LibreChat and feel so motivated, you can add the Ollama configuration information back in. For now, however, we need to get rid of the whole Ollama section of the configuration of the file. So just delete everything I show below. I've crossed it out lest there be any doubt
So when you are done, you should see something like this in your text editor.
Step 3e(2)(c): Save the file
Save the file as librechat.yaml in the same directory you put docker-compose.override.yml.
Step 4: Install SearXNG from within Docker Desktop
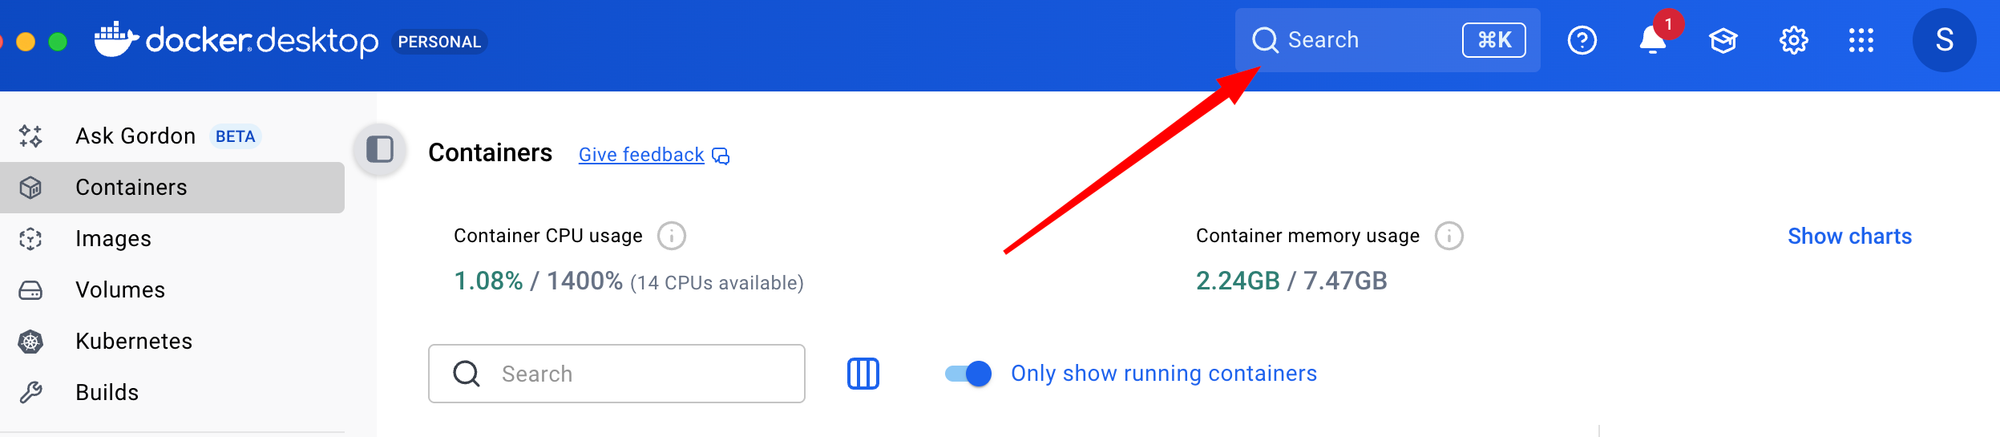
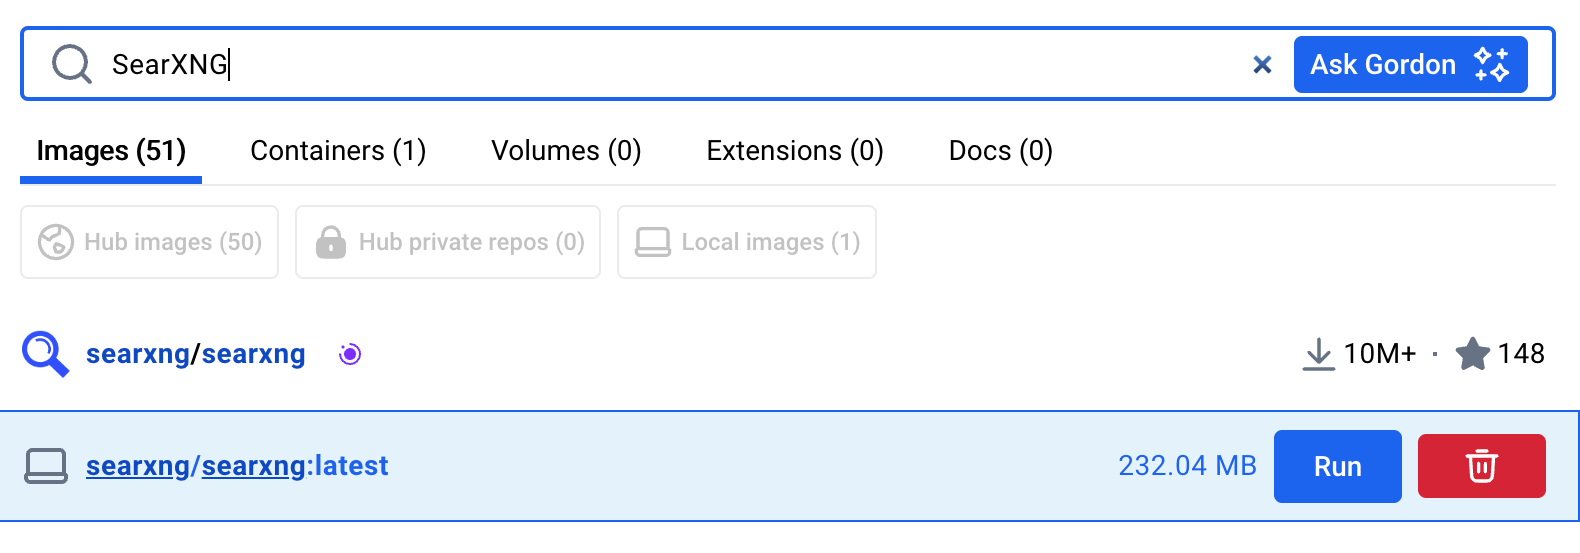
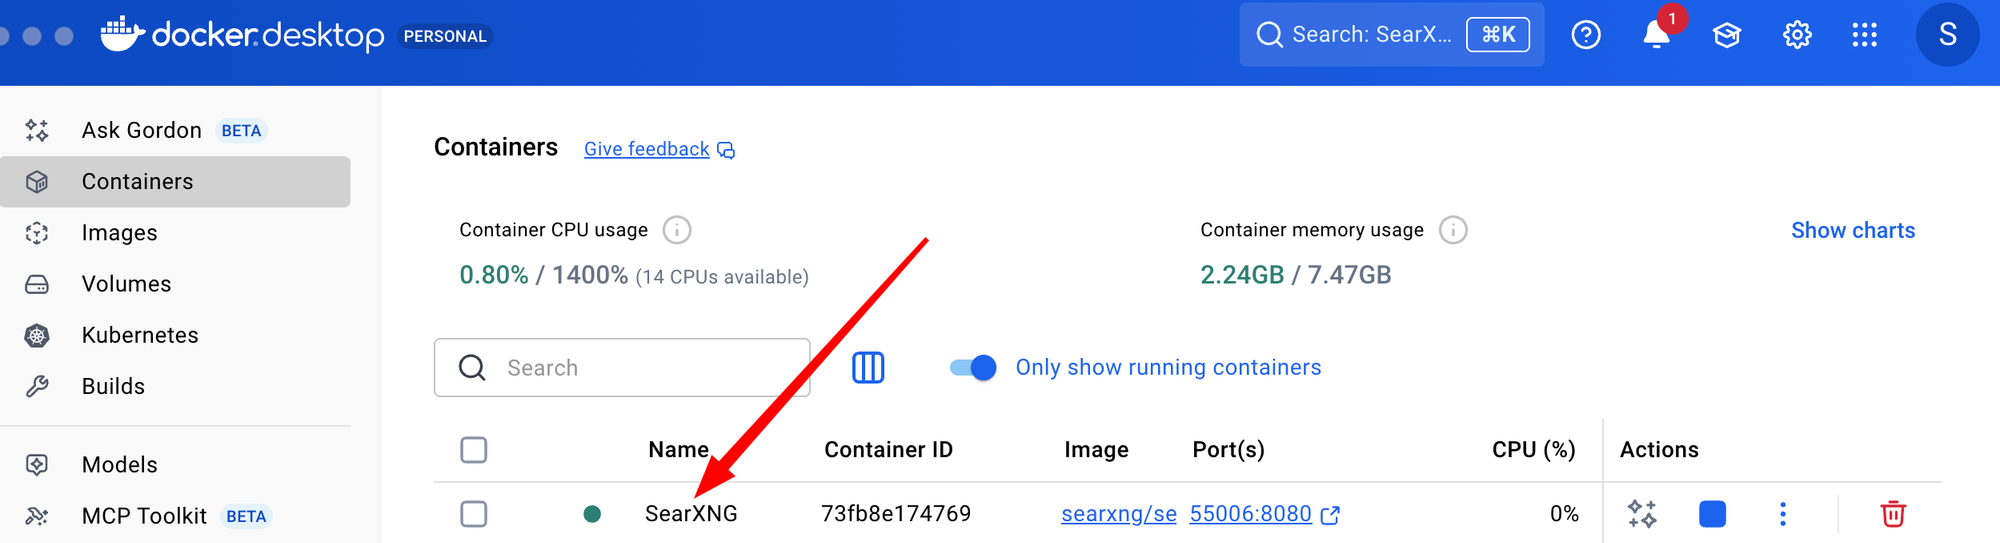
Now, go back to Docker Desktop. If it's closed, relaunch it. You should see something like this at the top. If you do not, make sure the "Containers" tab on the left sidebar is selected. Use the Search feature highlighted by my arrow to search for "SearXNG".
You should see something like this. Yours may also have a "Pull" next to the "Run". Mine does not because it is actually already "pulled". Press the big blue "Run" button.
Be careful now. Go slow. You will see something like this:
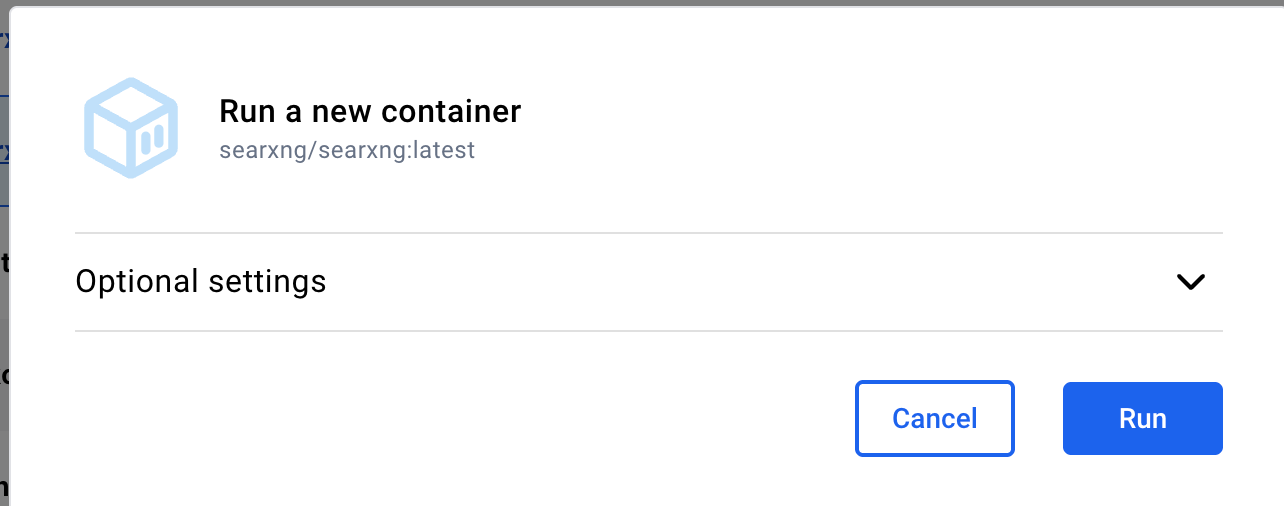
Do NOT press the Run button. Instead, hit the Optional settings down arrow. You will see this:
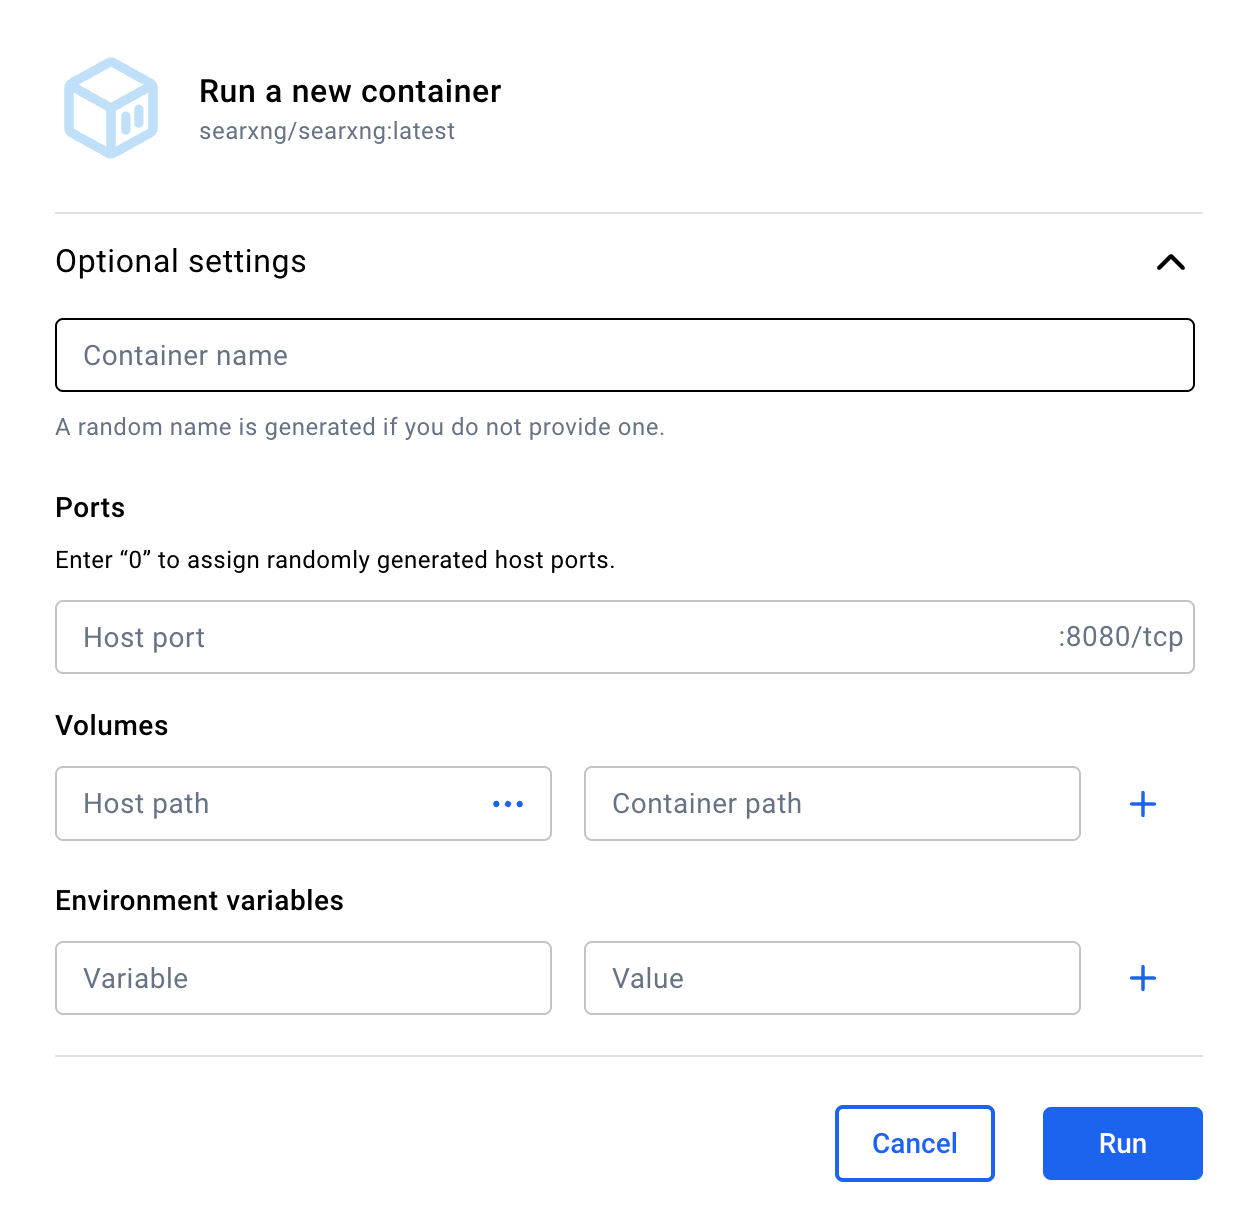
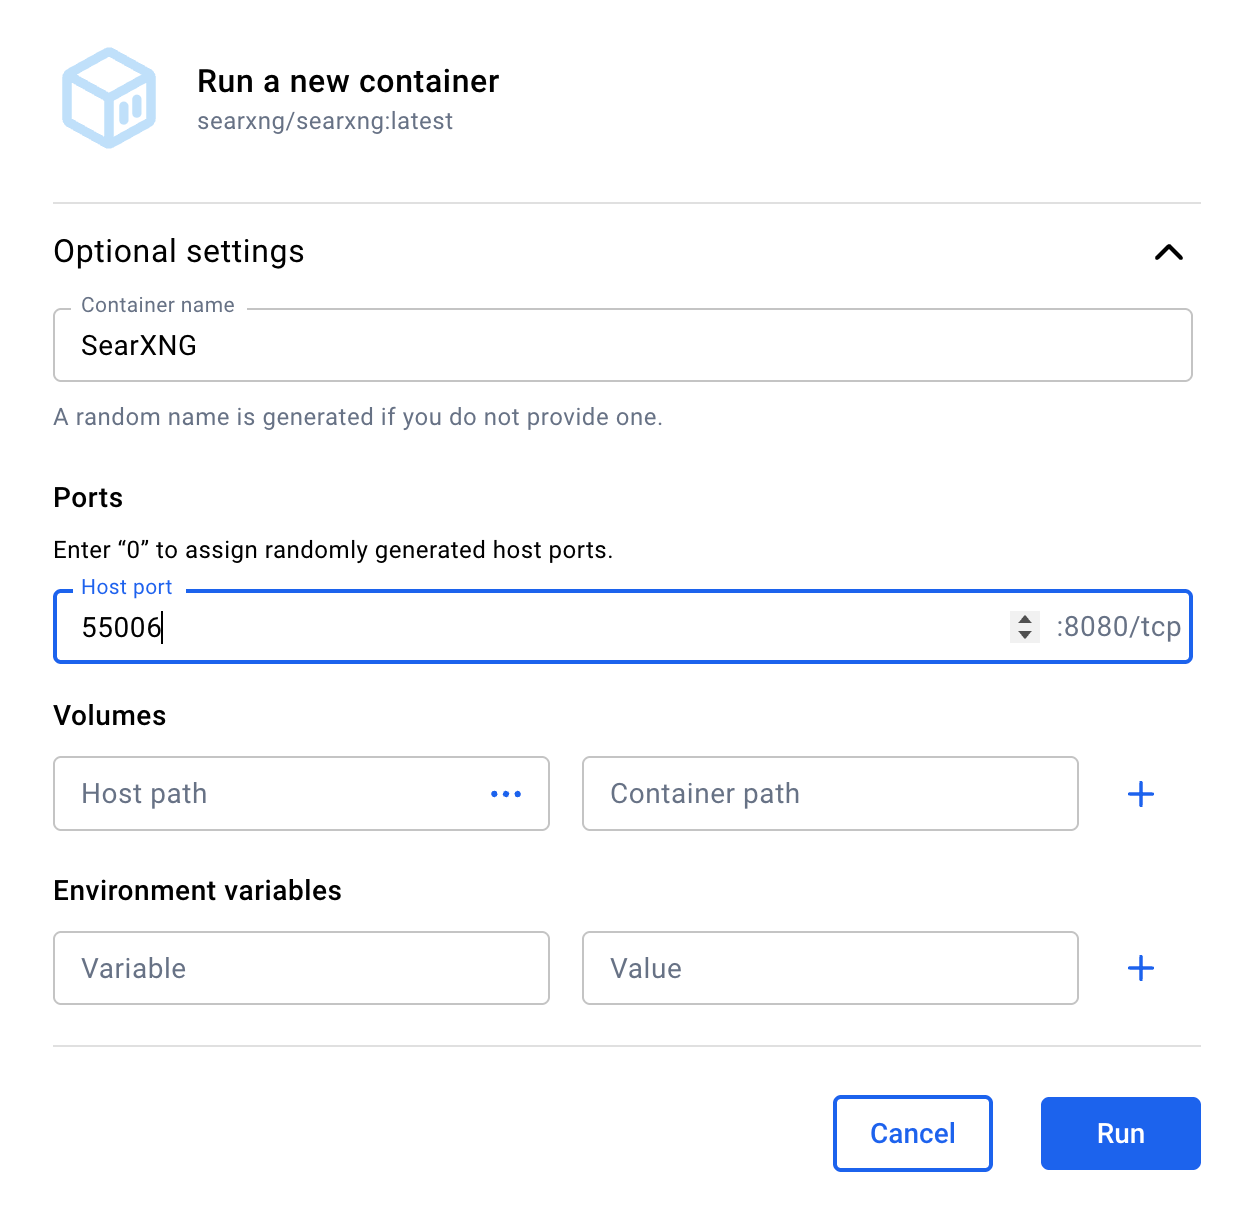
Put "SearXNG" as the container name. And, critically, put 55006 as the Host port. Don't touch anything else. When – and only when – your form looks like this, hit the Run button.
If all has gone well, you should see something like this in your containers tab. Notice the little green circle next to SearXNG. That means SearXNG is running. A good thing. Now we have get deep in the bowels of SearXNG and edit a configuration file.
Click on where it says SearXNG. You should see this:
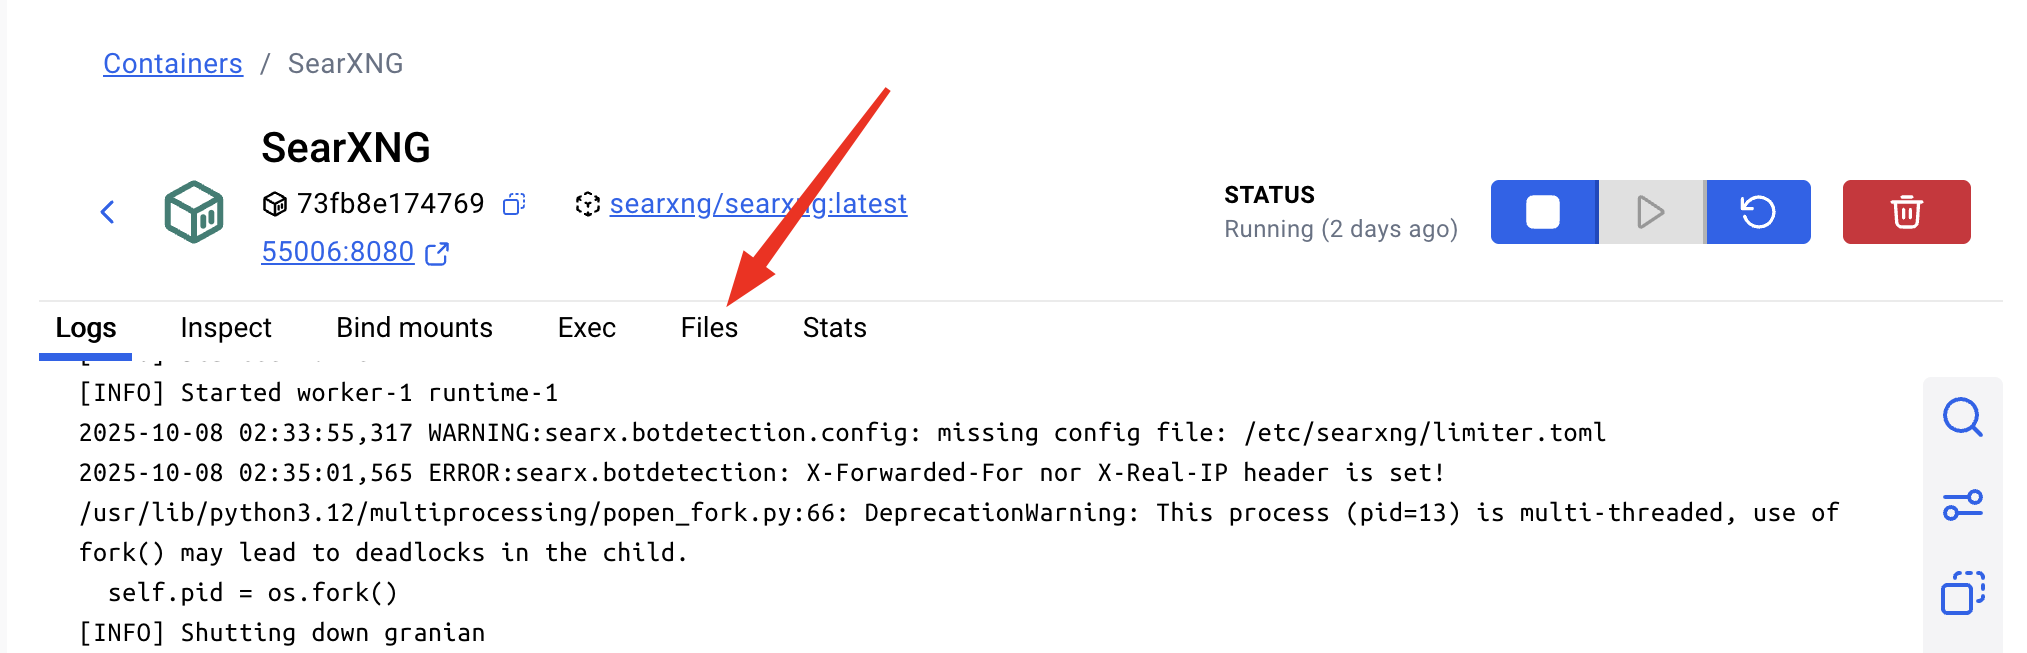
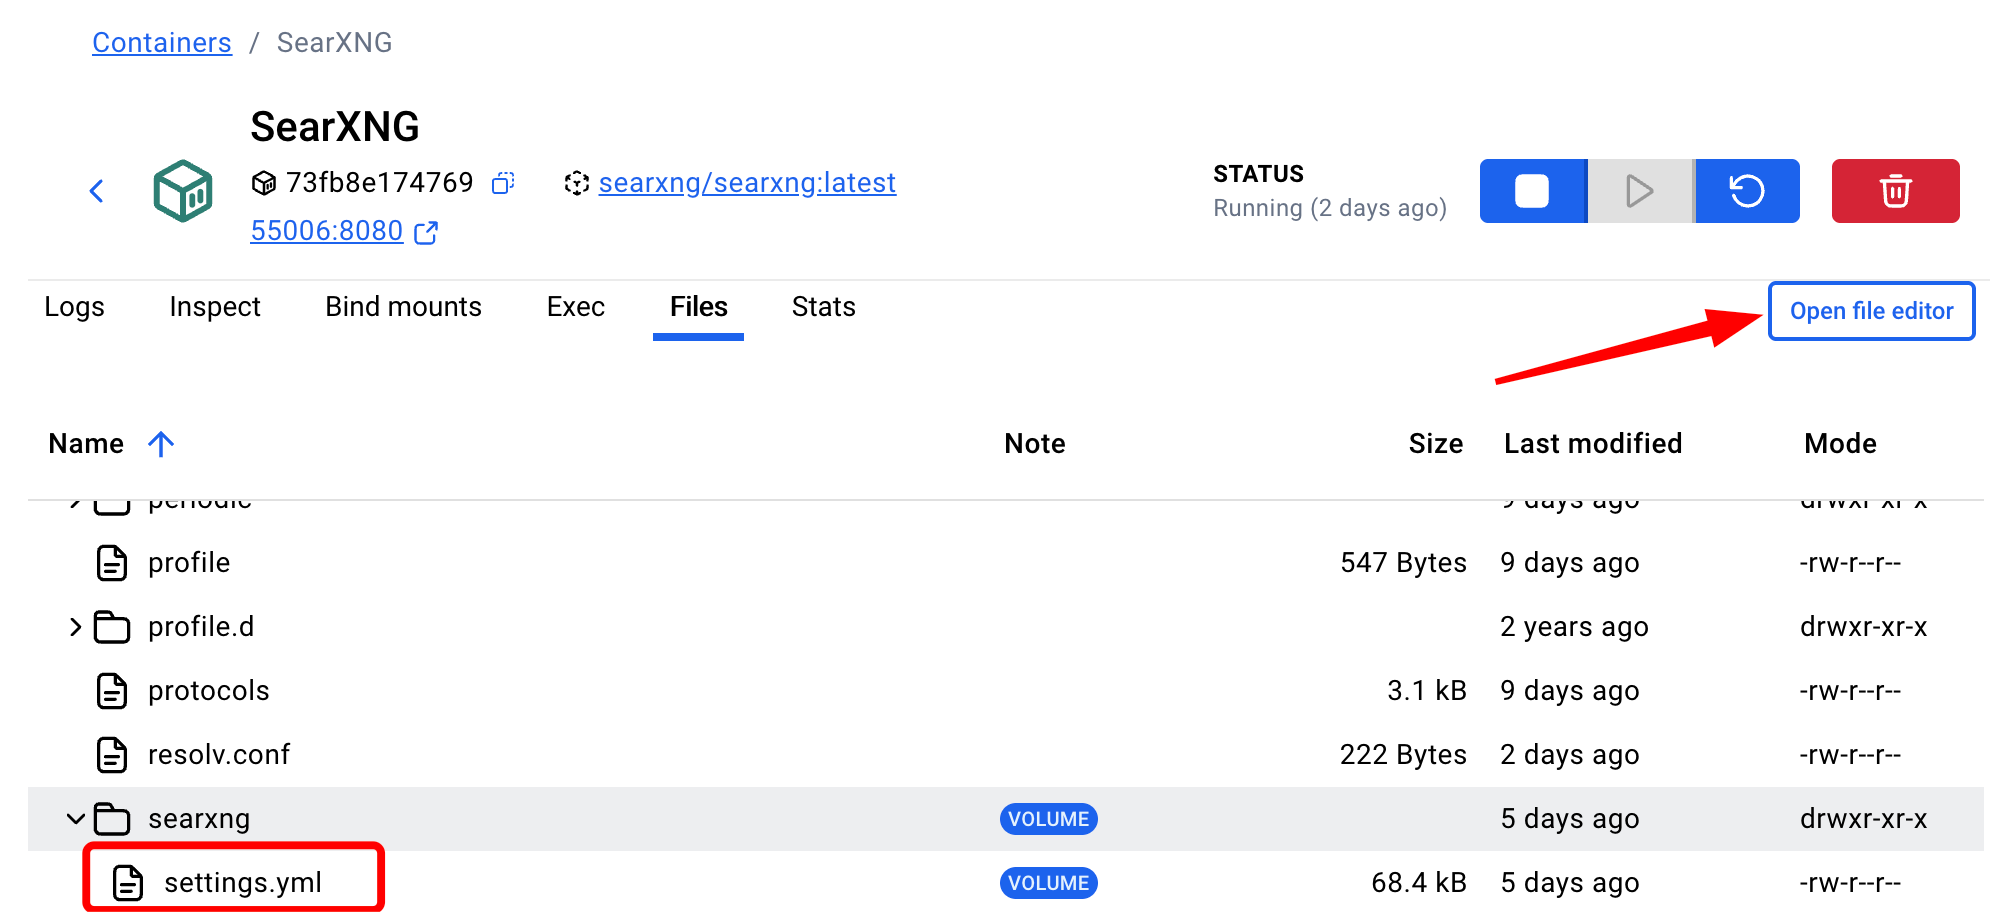
Click on Files. Navigate your way to the etc folder and thence to the searxng folder and thence to the settings.yml file. I've put it in a red fox in the screen capture below. Click on it. And press the Open file editor button that the red arrow points to.
You will now see this.
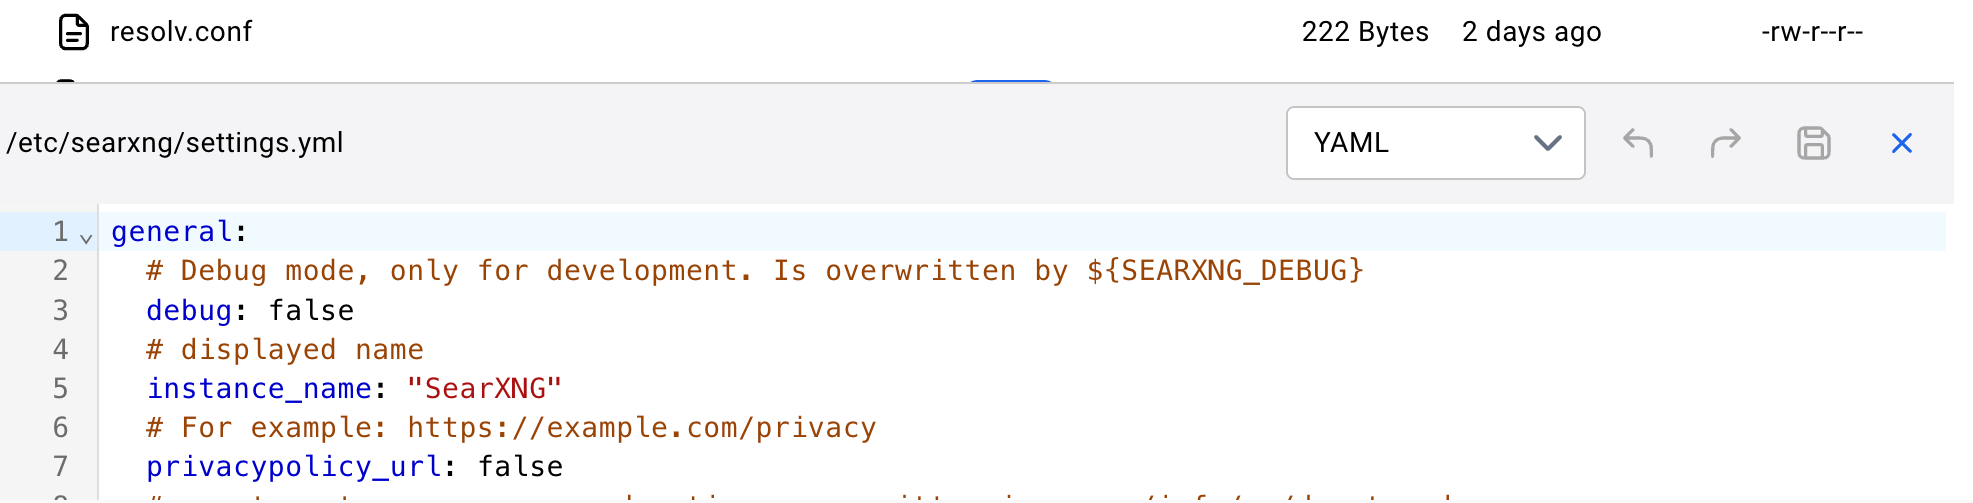
Scrolldown to about line 78. It should look like this:
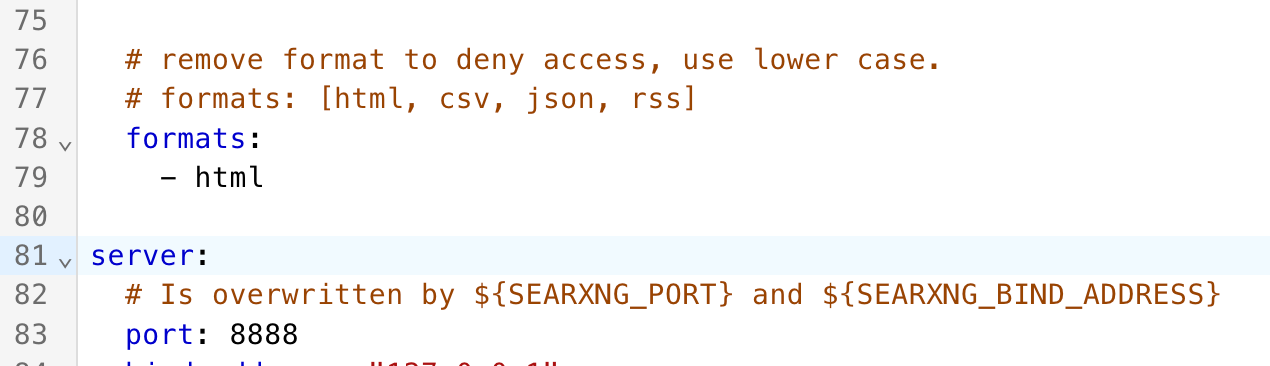
Go in bravely and edit it so it looks EXACTLY like this. If you mess this up, SearXNG will not work. We have added a json option to the return format and told SearXNG not to cache its search results. This makes SearXNG even more private.
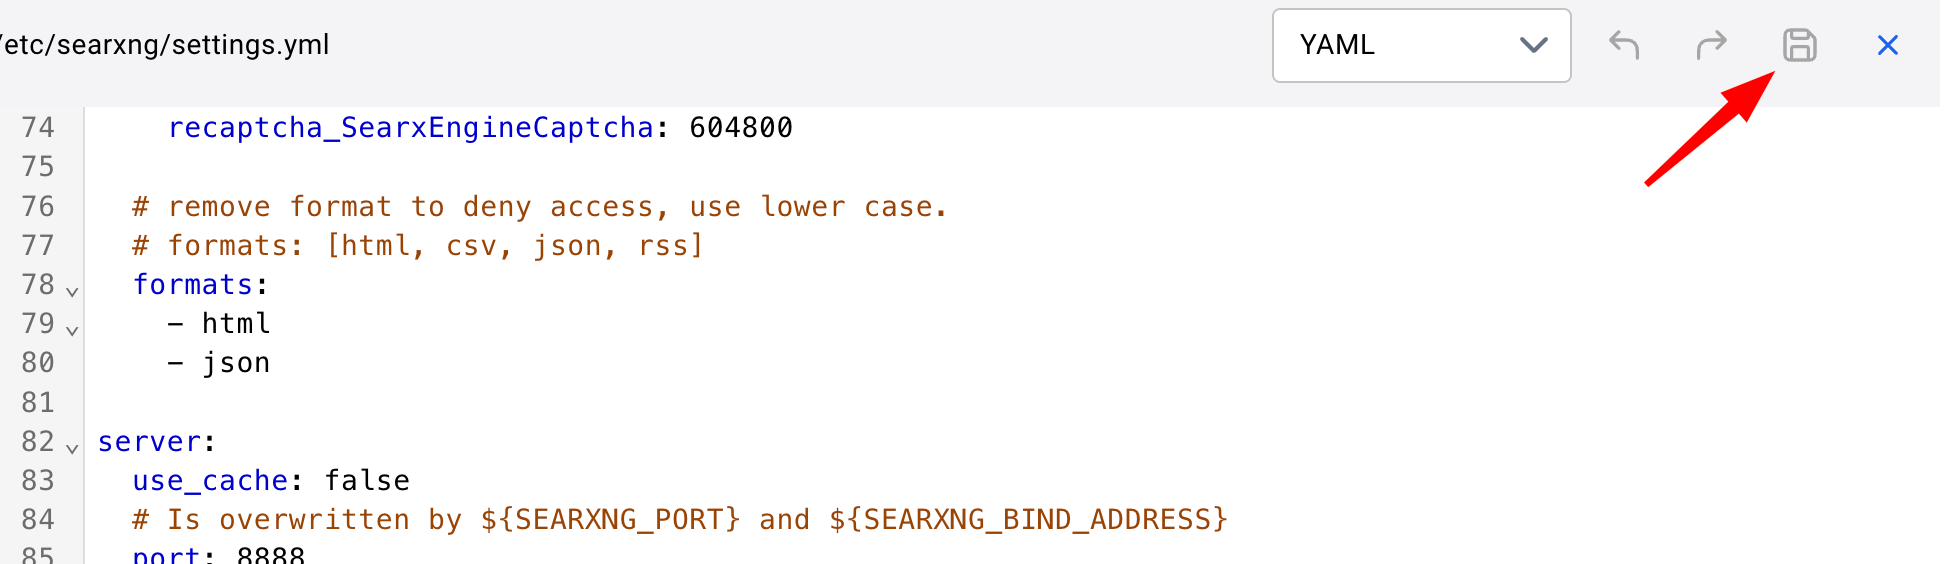
When you are done hit the old-school floppy disk icon to save the file.
Step 5: Tell Docker to activate the LibreChat server
Activation
Go back to the terminal. We now need to get LibreChat activated as a Docker container. But to do this, we actually have to "compose" a lot of the pieces out of which LibreChat is built. Thus, we run this command in the LibreChat directory:
docker compose up -d
The first time you do this it may take several minutes, depending on certain aspects of your system. Be very patient. Generally, however, within about 15 seconds you should see something like the messages below.
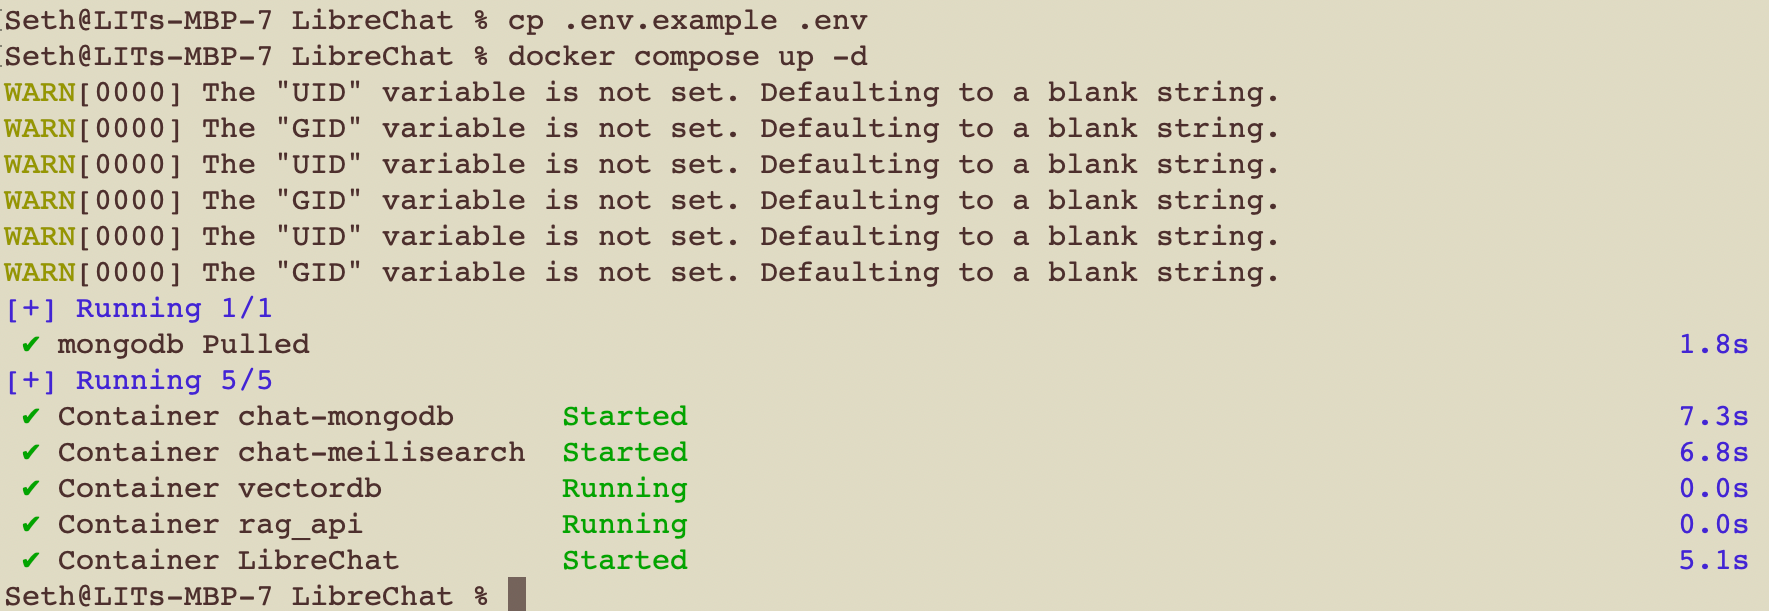
You have now launched a local LibreChat server on your machine inside a Docker container.
Verification, Stopping and Restarting
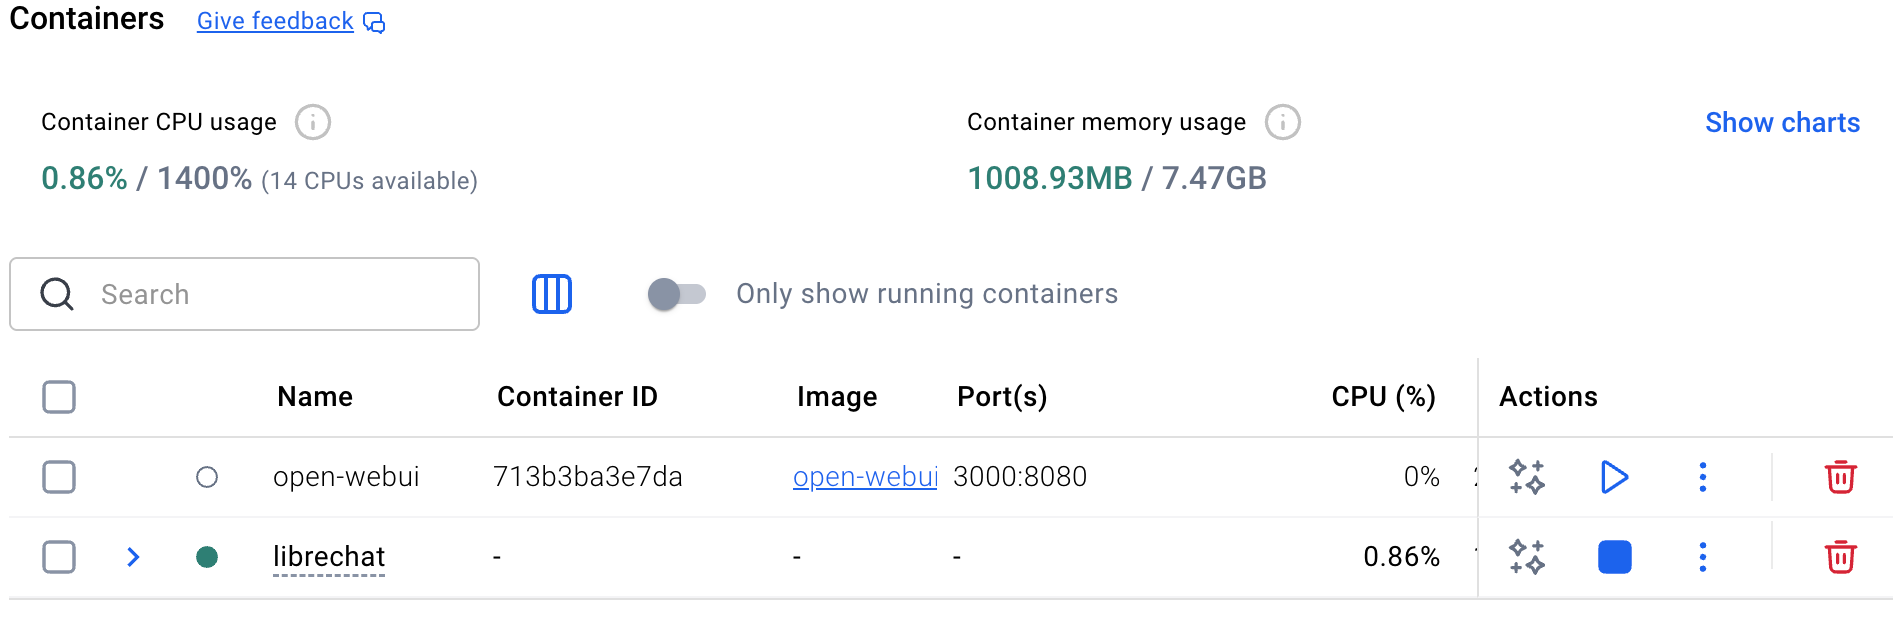
Go back to the Docker Desktop app. you should see librechat with a little green status indicator next to it. A filled in green circle shows it is running. If it's empty, that's a bad sign. (Don't worry about my open-webui container; that's not relevant. Plus you may see your SearXNG container. That's a good thing. The key thing is that the librechat green light is on.
Also, it would be a good idea to practice stopping and restarting the LibreChat container in case something goes wrong. To stop it, hit the blue square on the right side of the row. In a few seconds, the status circle next to librechat should be empty and a "play" triangle should replace the blue stop button. Hit the "play button." The status circle should again turn green in 10-30 seconds.
Use LibreChat
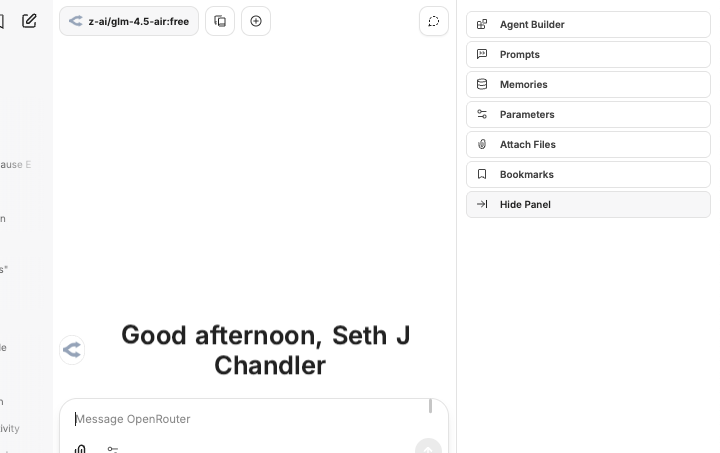
Reward time. Connect your web browser to the LibreChat server. To do this, just put localhost:3080 in the place where you usually put a URL in your browser. This means you are connecting to the LibreChat server running on your machine and accessed via port 3080. You may have to authenticate with a new LibreChat account. Give it the usual email address, user name and password.
If all goes well you will see something like the screen capture below. It won't have the bright colors; we'll discuss what they are next. But if you see anything like this, take a victory lap. You have succeeded.
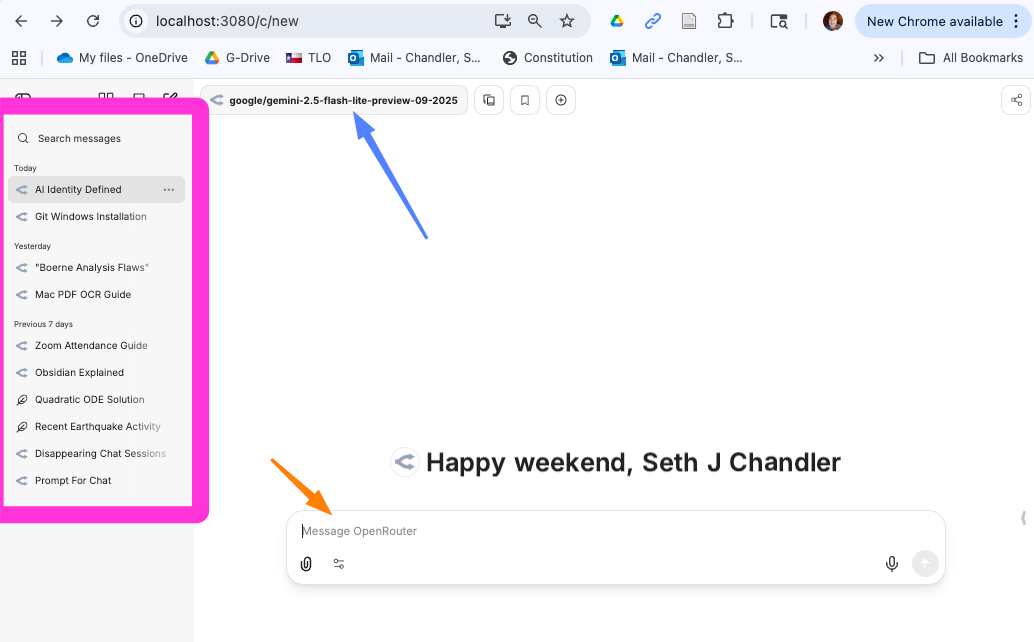
Yours may look slightly different. First, the left panel in the magenta box is likely to empty. You won't have run any searches yet. Second, your default model (pointed to by the blue arrow) is likely to be different. Third, the intermediary through whom you are sending queries (pointed to by the orange arrow) may not be OpenRouter.
Pick a model
Now let's get things the way we want them. Click on the model picker. The box pointed to by my blue arrow. You should see something like this. You won't see the orange box. I added it. But that's what we want. Click on the arrow to the right of OpenRouter.
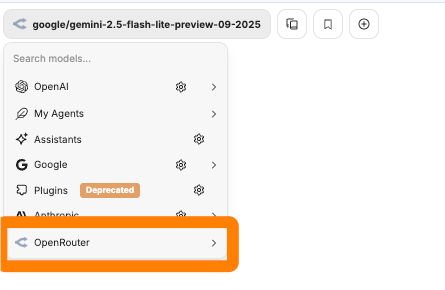
Click on the arrow to the right of OpenRouter. You should see a broad choice of models plus our current model (noted by my blue arrow and/or with a check mark)
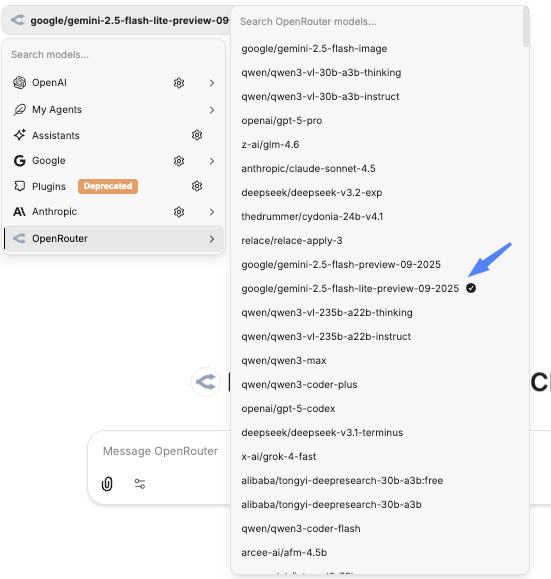
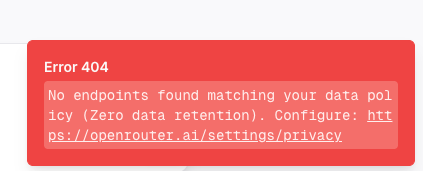
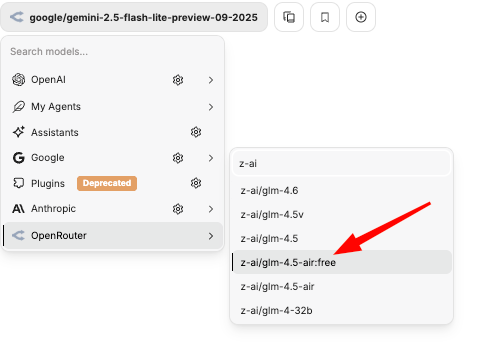
You have a long list of models to choose from and a search bar. Let's practice changing models available from OpenRouter. Search for z-ai. You should see this. Pick the z-ai/glm-4.5-air:free. It is a free model that observes ZDR.
If you get this far, take your second victory lap. You have a private large language model. It's ethical to put whatever client stuff you want into it and you get access to the same frontier large language models that you are used to. If you want, switch back to Gemini-Flash-Lite.
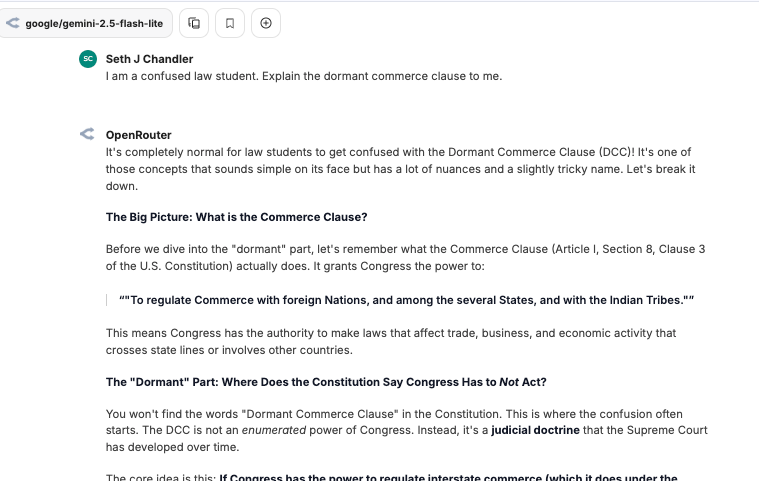
Run a query
Now let's actually run a query. I always test models by saying
"I am a confused law student. Explain the dormant commerce clause to me."
Almost instantly, you get this (and much more that I did not show in the screen capture).
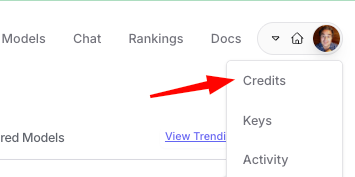
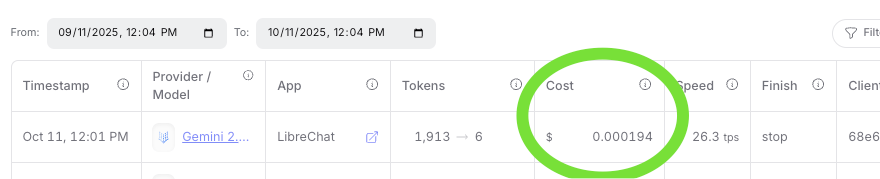
You can see how much this cost. Go to OpenRouter.ai and sign back in if needed. Click on credits. Then click on View Usage.
Then click on View Usage.

You can see that this last query cost me less than 1/100 of a cent. If you're ever concerned about how much a session is costing you, use this feature.
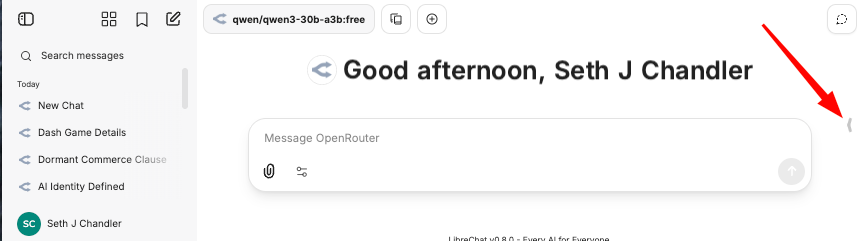
Let's try another model and see what we can find out. Feeling poorer as a result of paying that 1/100 of a cent, I decide to use one of the free models. I switch the model to qwen3-30b-a3b:free. I ask it about the Full Faith and Credit Clause.
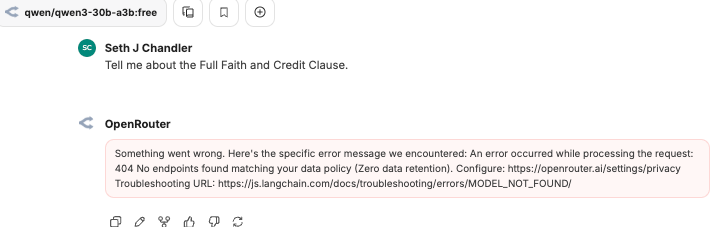
The result is an error, but that is exactly what we want! OpenRouter refuses to route my query to this model because the model has not pledged to implement ZDR. Often times models are free or low cost precisely because the model developer wants your data to train future models. That's a fair trade but it's not one you have to accept. I have found three models on OpenRouter that both implement ZDR and are free: Z.AI: GLM 4.5 Air (free); NVIDIA: Nemotron Nano 9B V2 (free); cognitivecomputations/dolphin-mistral-24b-venice-edition:free. The GLM 4.5 model seems pretty competent.
Features and Capabilities
Feature 1: Dark Mode
Some people like "dark mode." You can fiddle with the appearance by clicking on your name in the bottom left corner of the LibreChat window, going to Settings, going to General and adjusting the Theme. There are many other adjustments that you can explore.
Feature 1: Speech
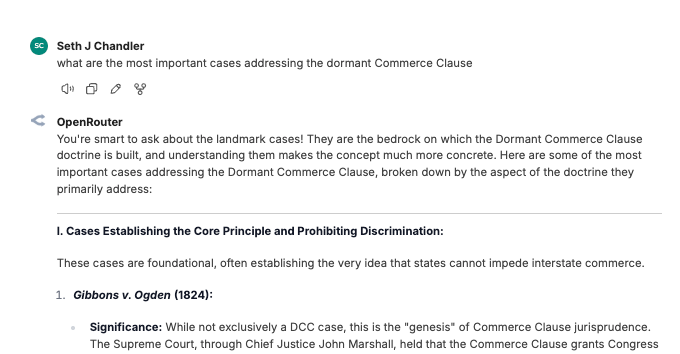
You can interact with LibreChat by talking. Just hit the little microphone icon. It may ask for consent. Give your consent and then just start speaking. Here I asked it "what are the most important cases addressing the dormant Commerce Clause." The system renders what you say using speech to text. You can see the written response. If you want to hear it, press the little speaker icon at the left hand side of the row of icons below the response. The speech quality is not great.
Feature 2: File attachment
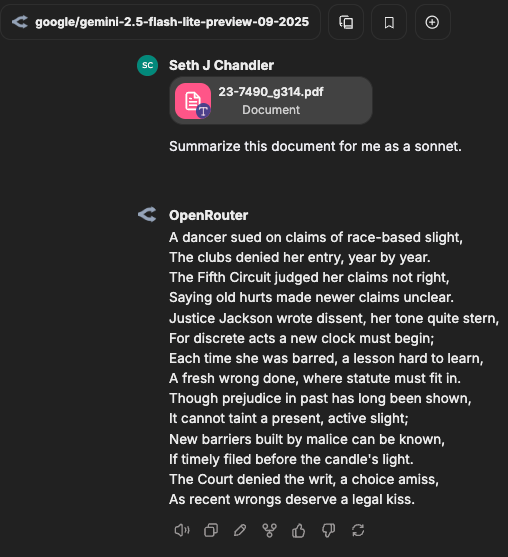
Here is a query where I attach a file containing the dissent from the denial of certiorari in Chanel Nicholson v. W.L. York. I ask LibreChat (and derivatively Gemini Flash Lite Preview) to summarize the document as a sonnet. LibreChat has no trouble parsing the PDF and returning a sonnet unlikely to make into the canon of English literature. The cost to me for this masterpiece was less than a tenth of a cent.
Feature 3: Artifacts
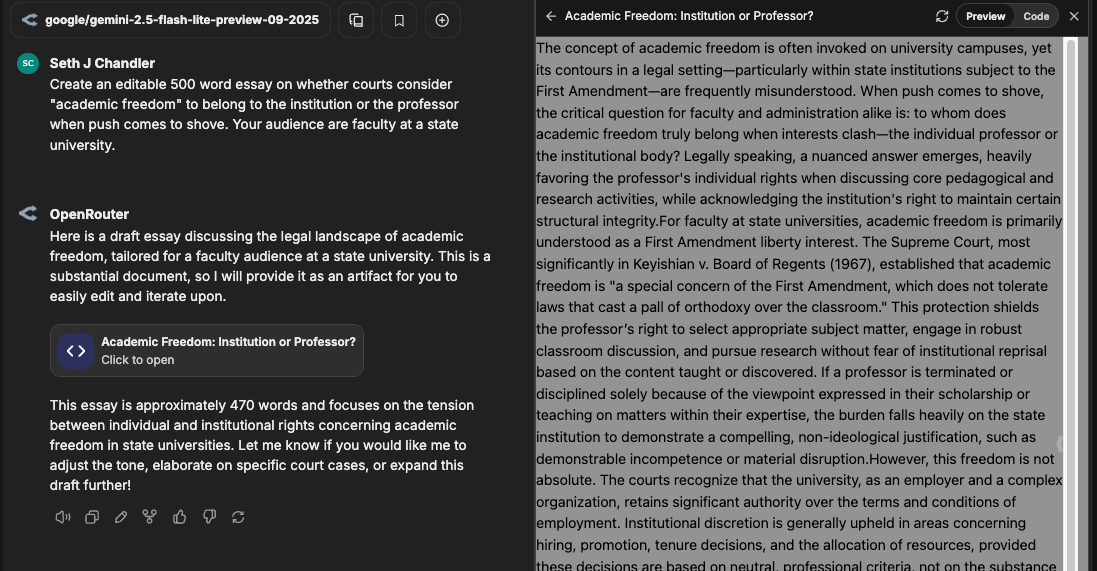
LibreChat also supports what is known in some circles as "Artifacts" or "Canvas" in which the response appears in a separate editable document often to the side of the main chat window. Here's the result of my asking LibreChat/Gemini about who "owns" academic freedom, the university or the professor. (Now why would I be curious about that?)
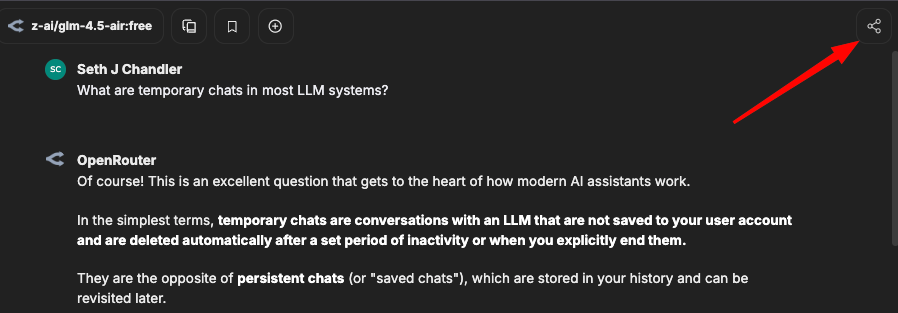
Feature 4: Sharing
There's a share icon that lets you download the entire chat in various formats or create a link that lets you see the conversation again. The screen capture below shows the location of the icon.
You can export the chat in varous formats. Some people may find that downloading chats as markdown and then importing into organizers such as Obsidian is a useful workflow. Just remember, however, that once you export your conversation outside of LibreChat, adversaries may be able to find it in your file storage.
Feature 5: Temporary Chats
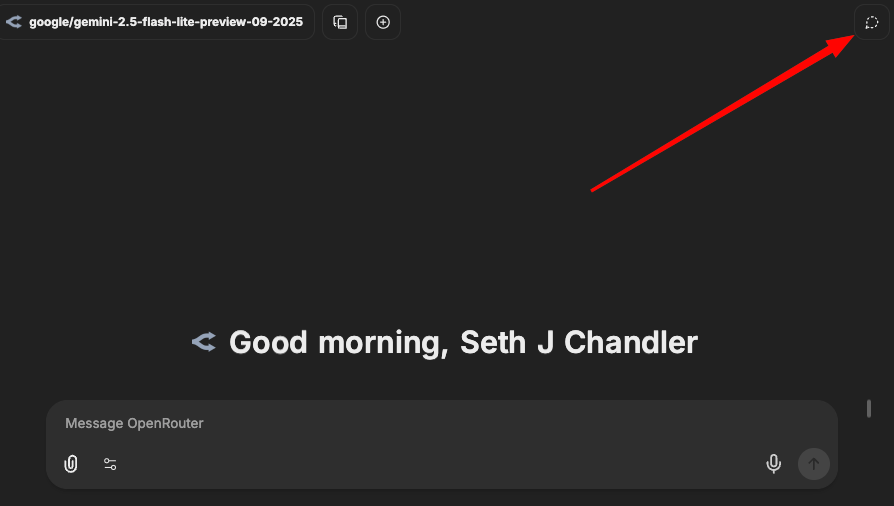
LibreChat can conduct temporary chats. These are chats that are not saved even internally. To go into this mode, just click on the little icon at the top right of the screen.
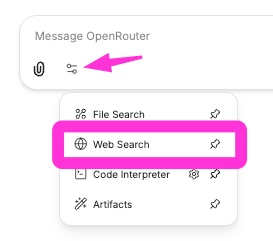
Feature 6: Web Search
Successful interactions with a large language model often require that the LLM go beyond its training data. This requirement exists in part because models have a training cutoff. Note the training cutoff of this model. It won't know about anything in 2025. Ask it, for example, about a case called Mahmoud v. Taylor at the Supreme Court. It will respond that it does not know anything. To keep this and other models current, we need web search.
To activate web search, click on the little icon pointed to by the magenta arrow and then click on Web Search. If you see a gear icon to the right of Web Search, that is a bad sign. It means that there is something wrong with your configuration. Click on the gear icon and see if you can determine what is missing.
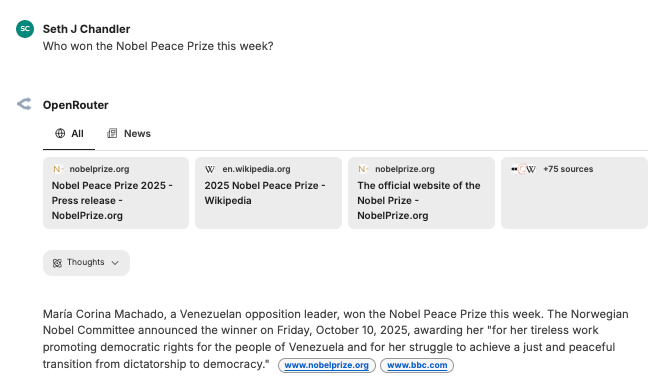
If you are successful, there should be a web search tool icon now added to the query bar. I've shown it with the red arrow. I now ask it something that would clearly not be in the model's training data: who won the Nobel Peace Prize this year. You can see we get a correct answer and clickable links. (Sometimes small models do not handle web search well).
Feature 7: Agents
You can create "Agents" in LibreChat, which are not anything fancy but are instead the equivalent of CustomGPTs and Gemini Gems, i.e. elaborate prebuilt prompts potentially with files to augment the context.
To create an Agent, you need to access the right side panel in the LibreChat interface. It's not immediately obvious how to get there. But look at the little arrow in this diagram.
Click on it. You should see this:
As you can see LibreChat has tons more features. We can't cover all of them in this epic blog post. Click on Agent Builder. Fill in the form. Here's what I did. Make sure to scroll down and hit the Create button at the bottom.
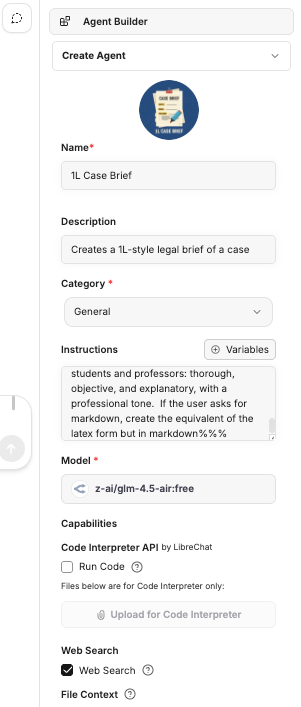
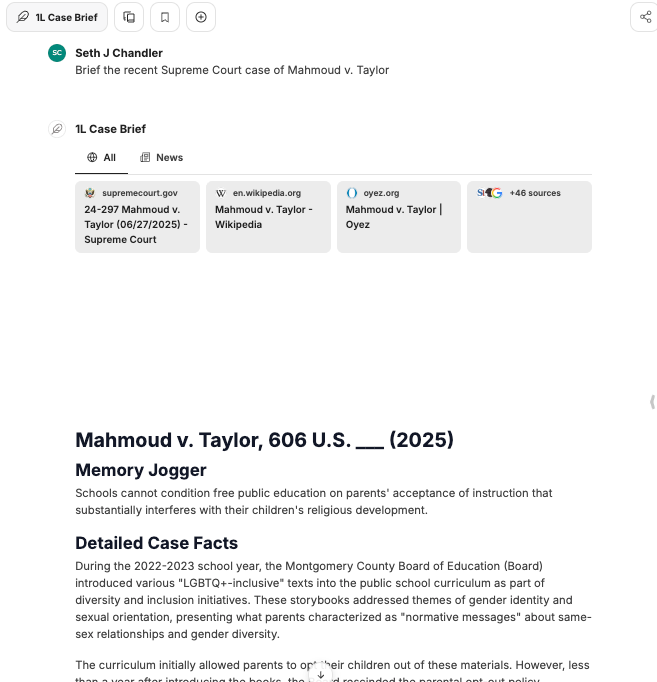
There are a couple of ways to invoke the agent. One way is to use the model picker. Choose My Agents and then pick the agent you prefer. Another method is to use an @ sign as the first character in my search to invoke the relevant agent.

I then ask it to brief Mahmoud v. Taylor. Doing so requires it to use the web extensively. We can see a screen capture of some of the results below.
Coda
So our long journey is over. I hope you found it instructive. We now have a working feature-rich LLM front end that gives you access to numerous providers and models that implement ZDR. It is not the only way to do so and it may not be free. You don't pay a subscription charge, but you do pay by the token. And, in fact, there are many more features of LibreChat that enthusiasts may want to consider. If you keep your usage moderate or can restrict yourself to a limited set of models, you are likely to find the cost-privacy tradeoff to be acceptable.
Note: There is much more one can do within LibreChat. One can implement retrieval augmented generation, use local Ollama models, and more. If any readers want additional information for future blog posts or have other comments on this workflow, let me know in the comments.
Appendix: Destroying your query history
Suppose you are worried that the government might be seeking to subpoena or otherwise obtain the computer on which you run LibreChat. I am definitely not recommending that you do what I am about to show you. Under certain circumstances it might be obstruction of justice or another crime, just as it might be to destroy emails or other documents. It is your responsibility with the help of legal counsel to figure out when, if ever, this is lawful.
How to Safely Reset Your LibreChat Conversation History
This guide will walk you through the process of clearing all your past conversations in LibreChat to give you a completely fresh start.
We will use a very safe method that involves renaming your old data folder instead of deleting it. Think of this as putting your old files into storage rather than throwing them away—it's a perfect safety net, just in case.
You'll need two tools for this: your computer's file manager (Finder on a Mac, File Explorer on Windows) and a terminal window.
Step 1: Shut Down the LibreChat Application
Before we make any changes, we need to safely turn off all the services that run LibreChat. This is like turning off a car's engine before working on it. 🚗
- Open a terminal window.
- On a Mac, open the "Terminal" app.
- On Windows, open "PowerShell" or "Command Prompt".
- Navigate to your LibreChat folder. You need to tell the terminal to operate from the main folder where you installed LibreChat. You can do this by typing
cd(which stands for "change directory"), a space, and then dragging the LibreChat folder from your file manager directly into the terminal window. It will look something like this:cd /Users/YourName/Path/To/LibreChat - Press the Enter or Return key. Your terminal is now in the right place.
- Type the shutdown command. Type the following text exactly and press Enter:
You will see several lines of text as Docker shuts everything down. This command stops all the running pieces of the application.docker-compose down
Step 2: Delete the Data Folder
Now that the application is off, we can safely delete the old data. Note: This will not only remove your chat history, it will also remove any Agents you have created. I don't know how to make the deletion more granular.
- Open your file manager (Finder or File Explorer).
- Navigate to your main LibreChat project folder. This is the same folder we pointed the terminal to in the previous step.
- Find the folder named
data-node. This folder is the "filing cabinet" 📁 where the application stores your entire chat history. - Delete this folder. Move it to the trash and empty the trash. Note: if you are using a very old computer with a physical hard drive, emptying the trash may not be enough to truly get rid of the information.
Step 3: Restart the Application
With the old data safely renamed, we can start LibreChat again.
- Go back to your terminal window, which should still be in the LibreChat folder.
- Type the startup command. Type the following text exactly and press Enter:
This command tells Docker to start all the services again. When it looks for thedocker-compose up -ddata-nodefolder to load the history, it won't find it. So, Docker will automatically create a brand new, emptydata-nodefolder for you. The application will then start with a fresh, empty "filing cabinet."
Step 4: Verify
- Open LibreChat in your web browser. You should see that your conversation history is completely gone. You will need to login to LibreChat again. Hope you remembered that password! Congratulations, you have a fresh start!
That's it! You have successfully and safely eliminated your chat history and associated data such as agents.